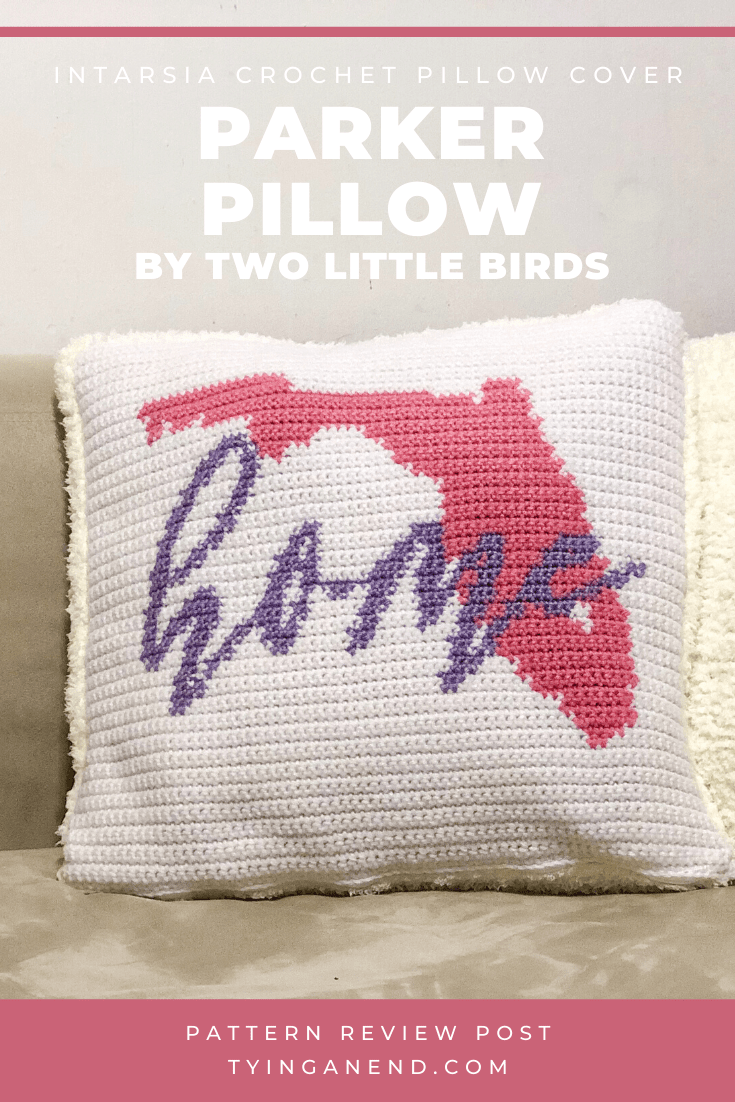
Parker Pillow – Pattern Review
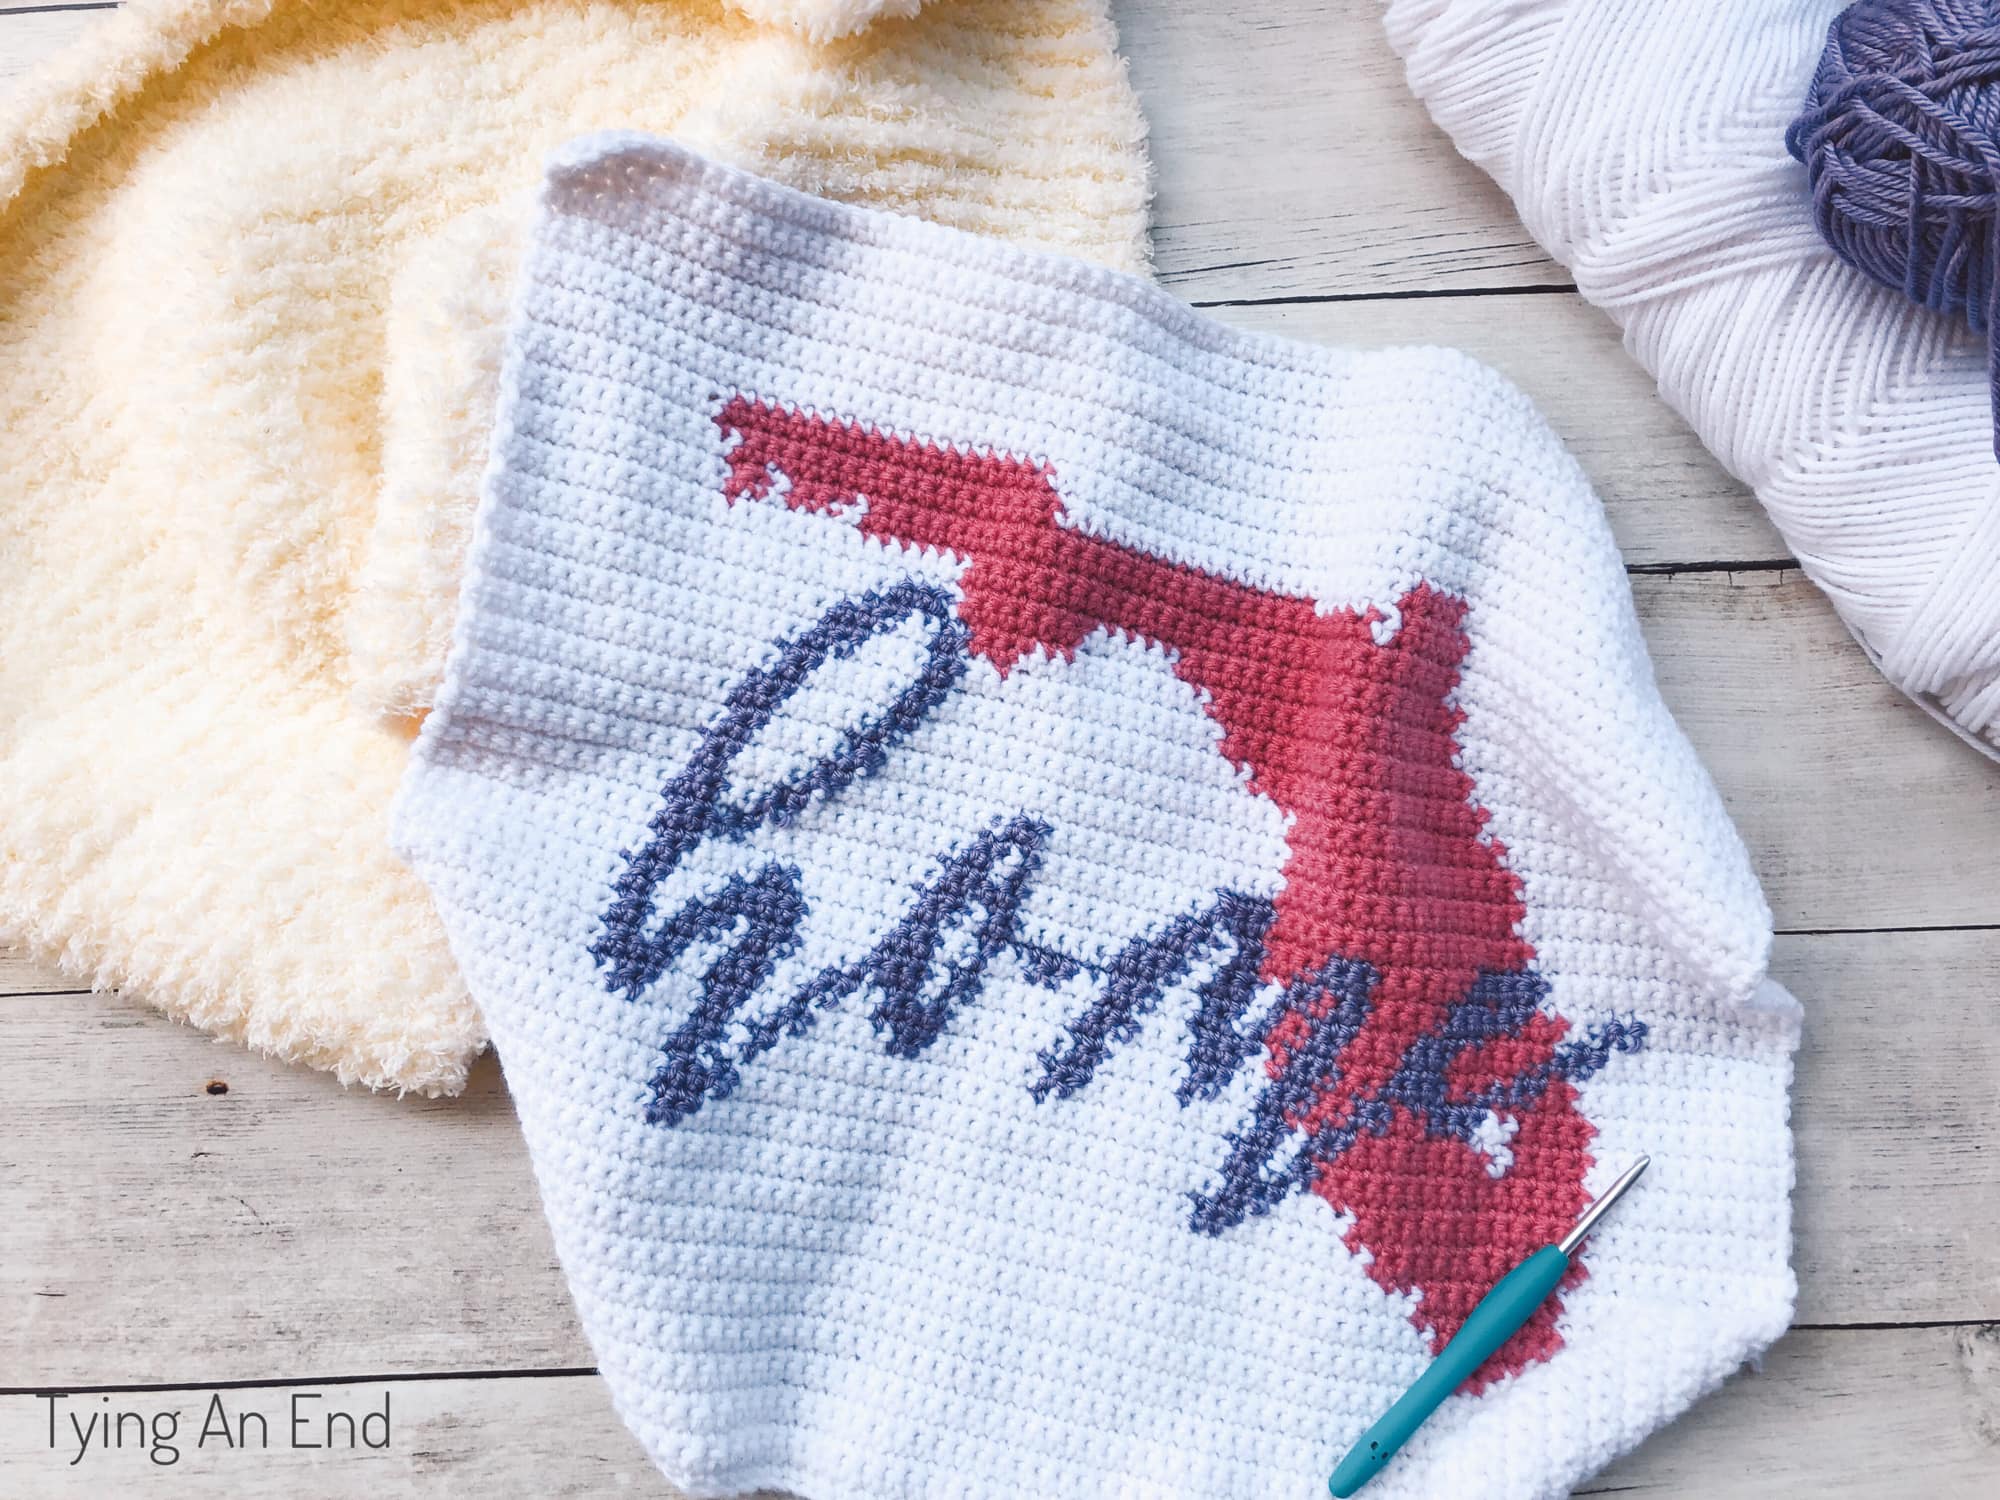
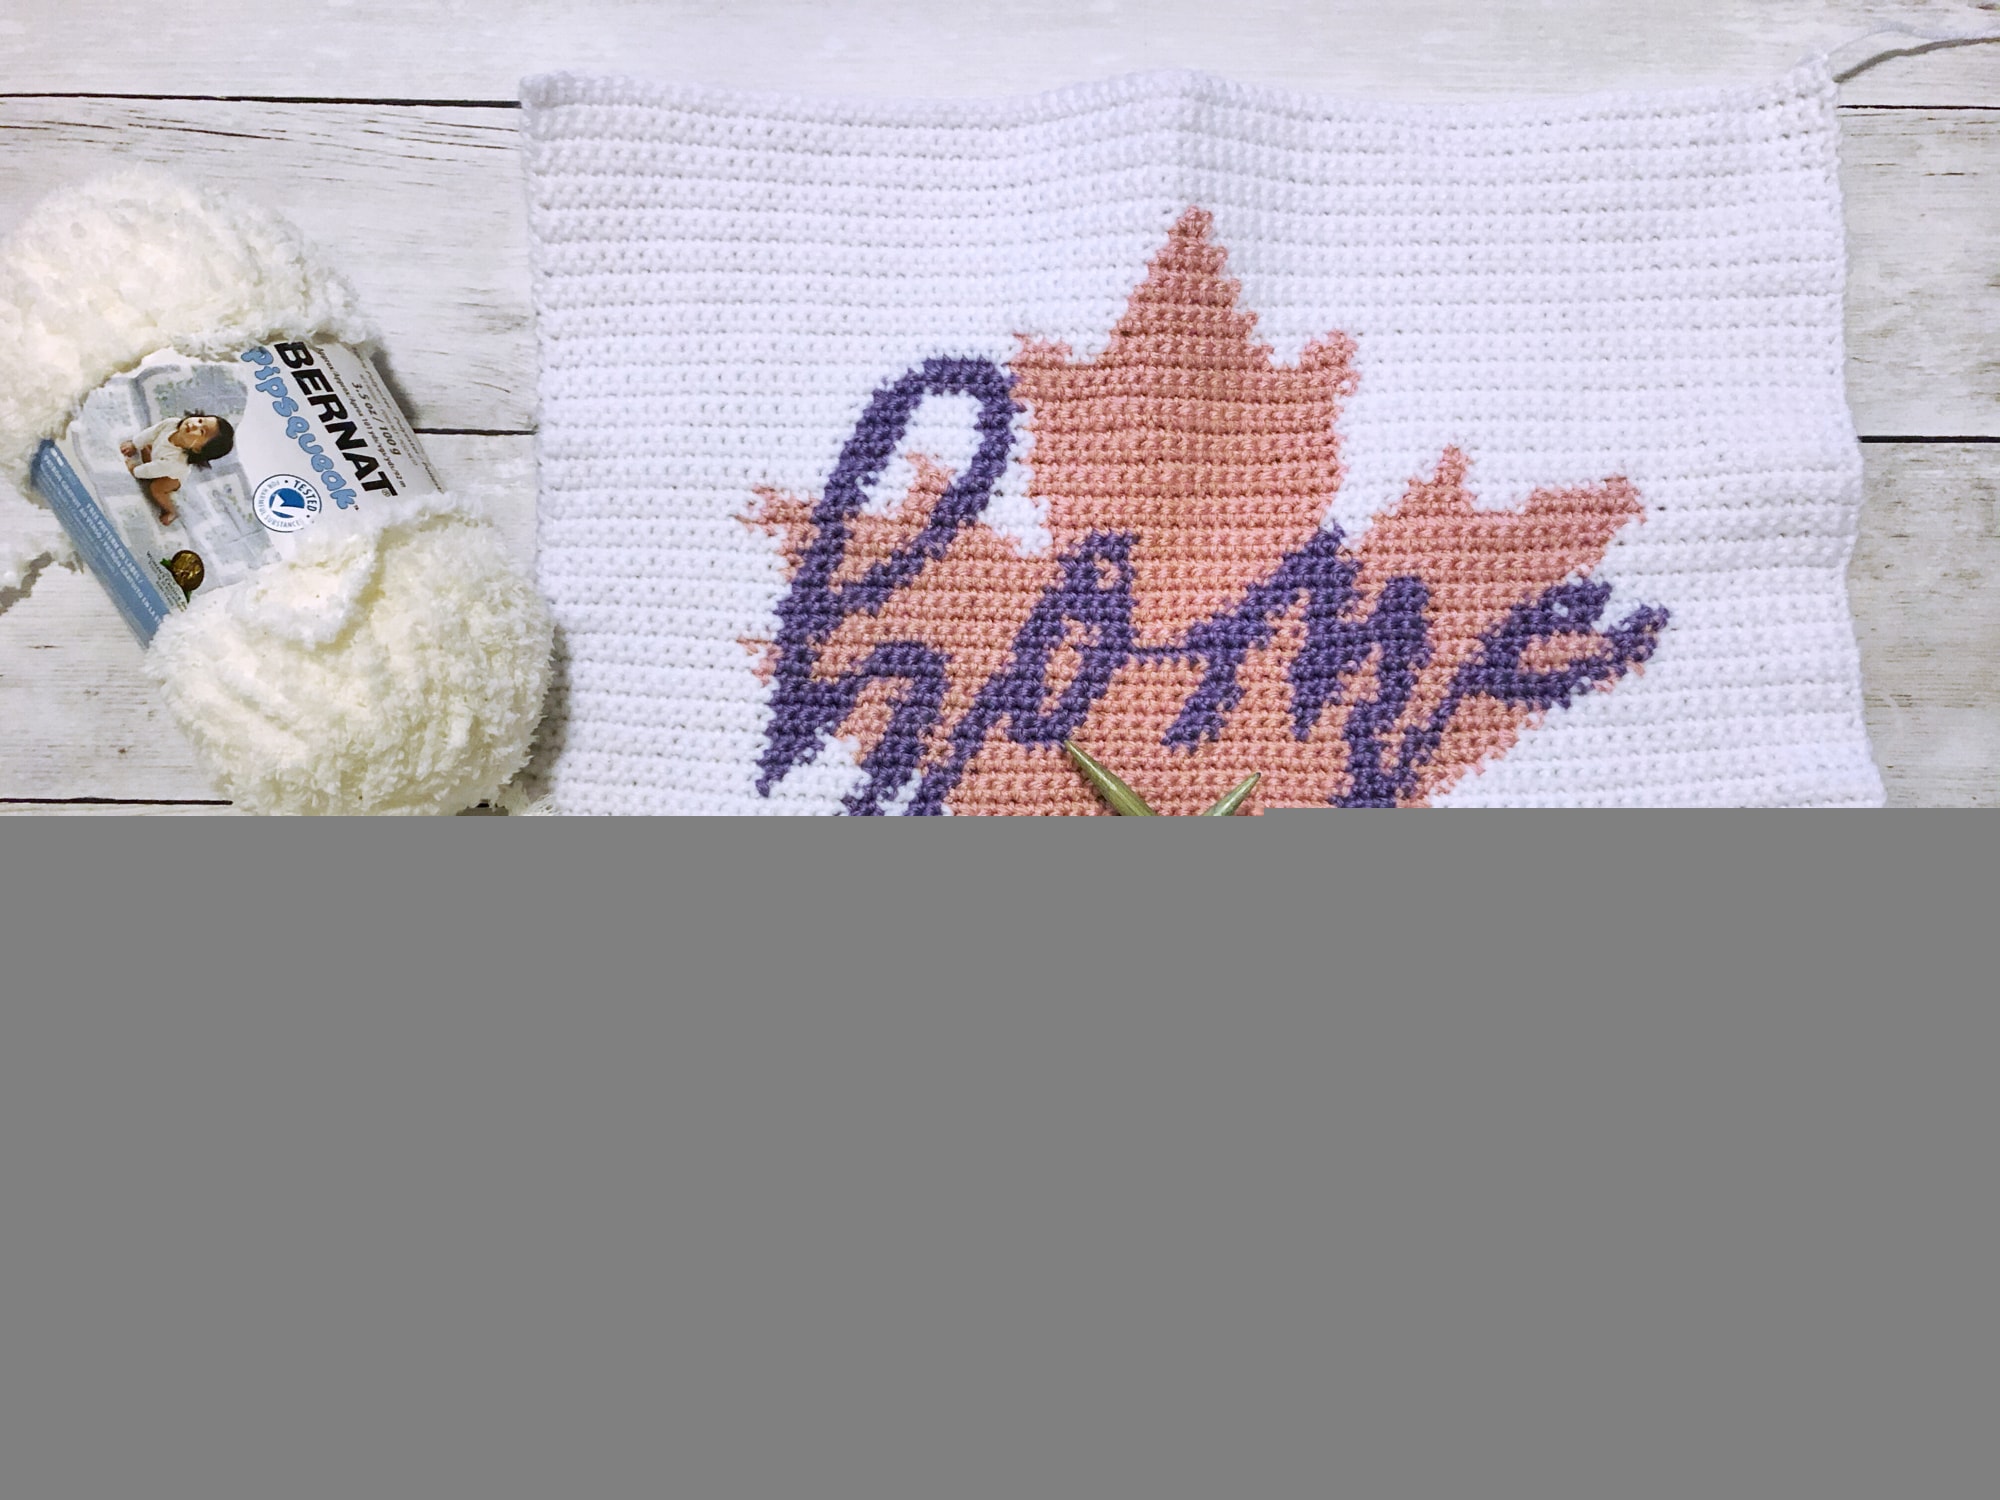
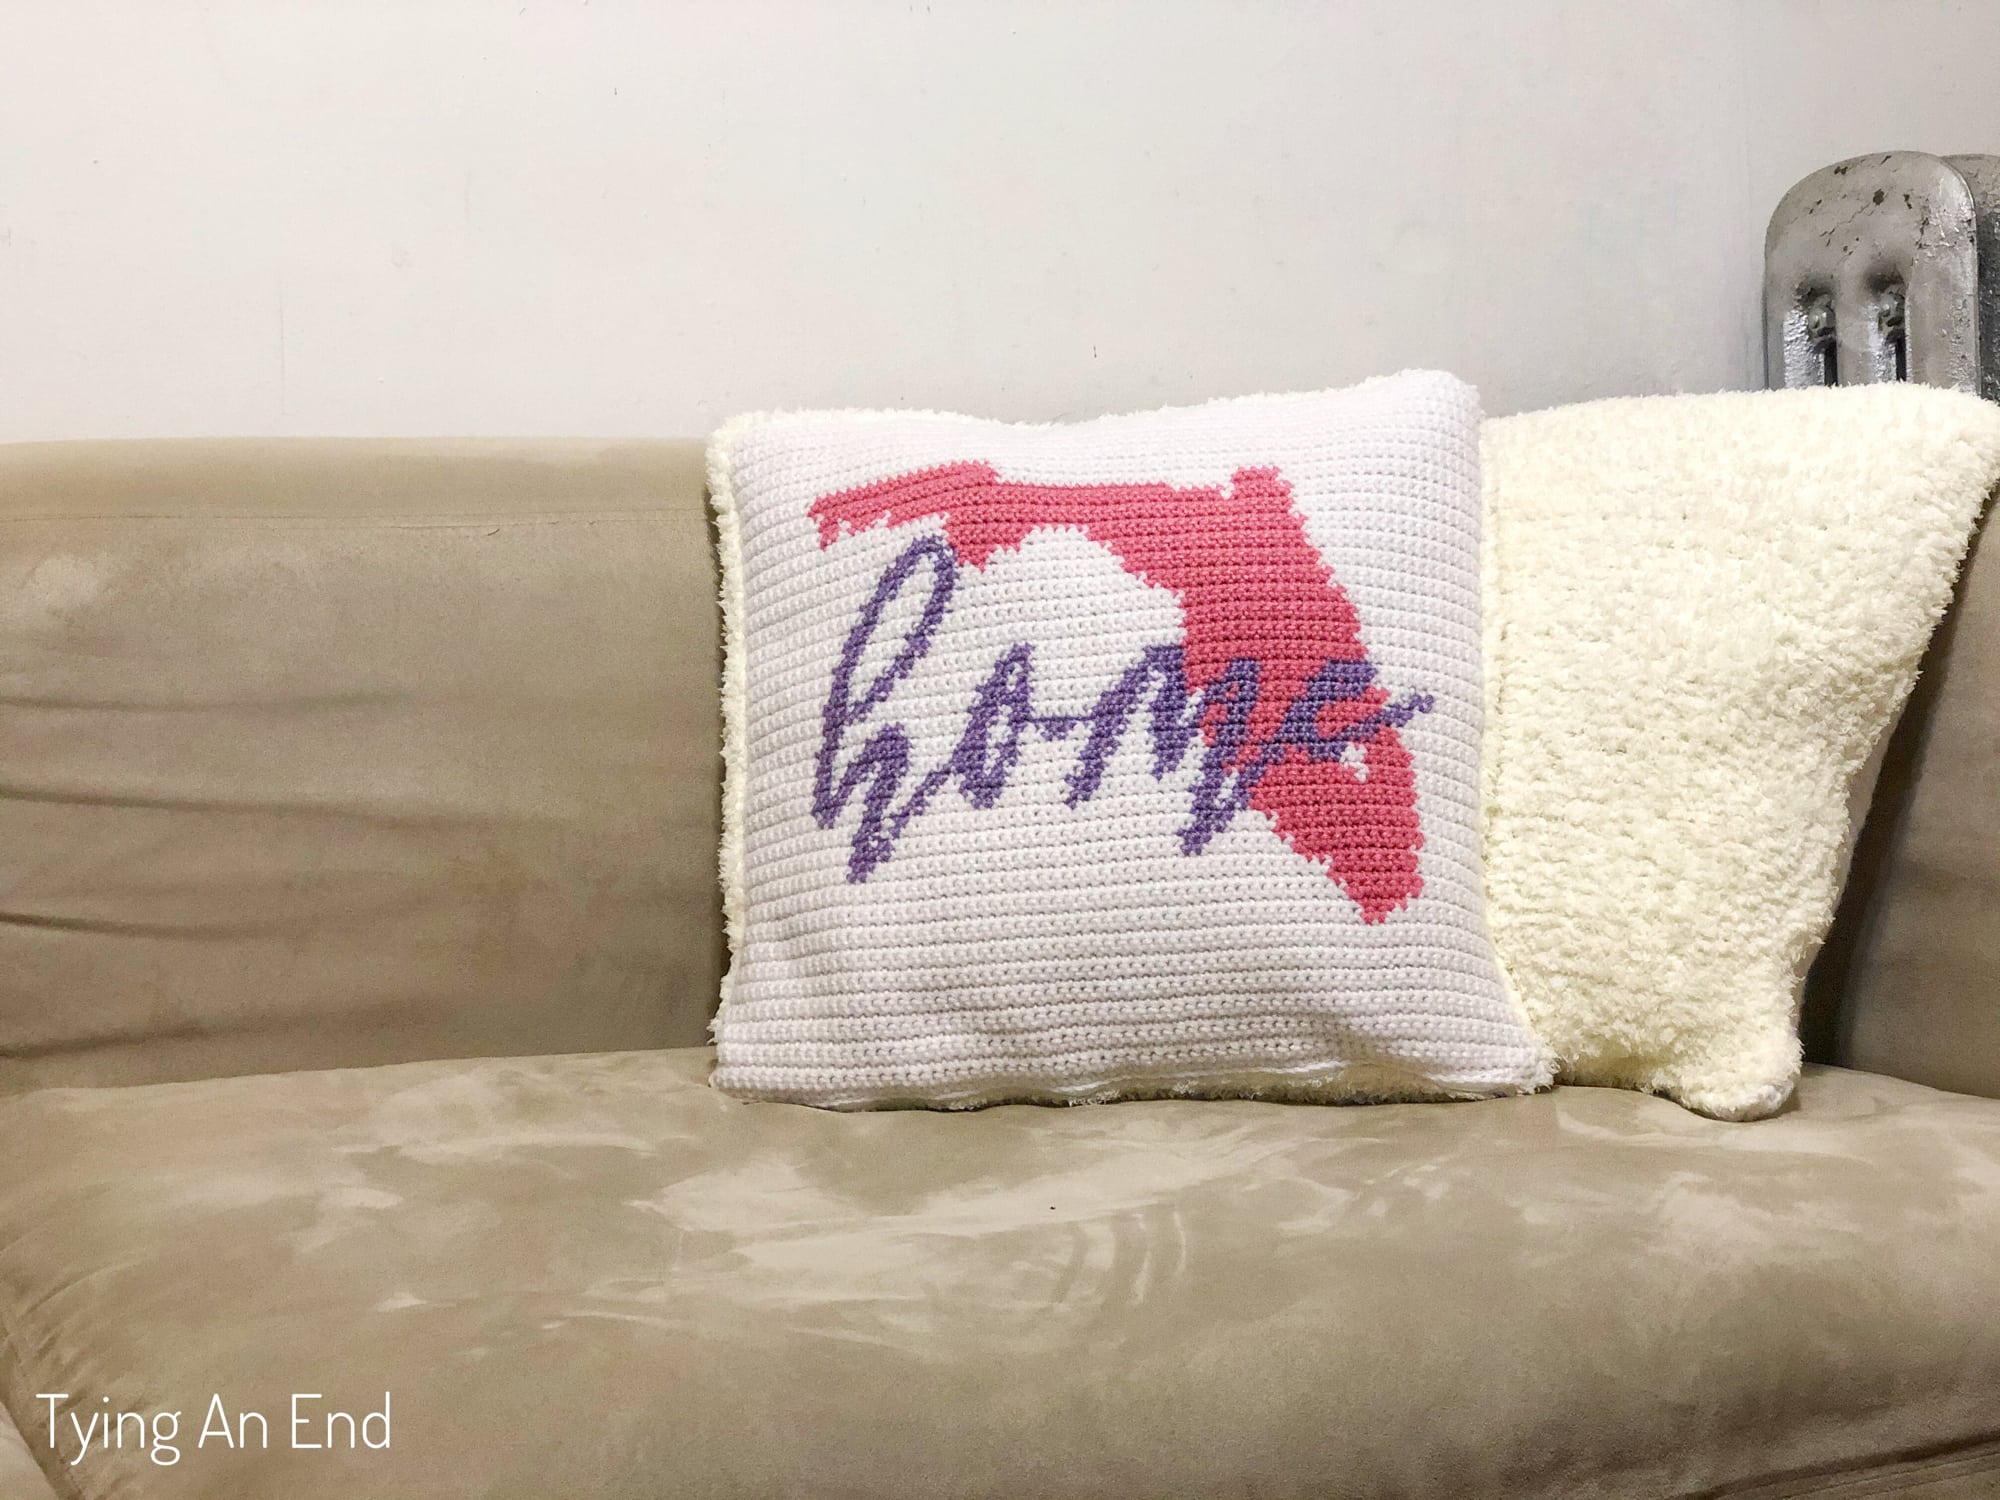
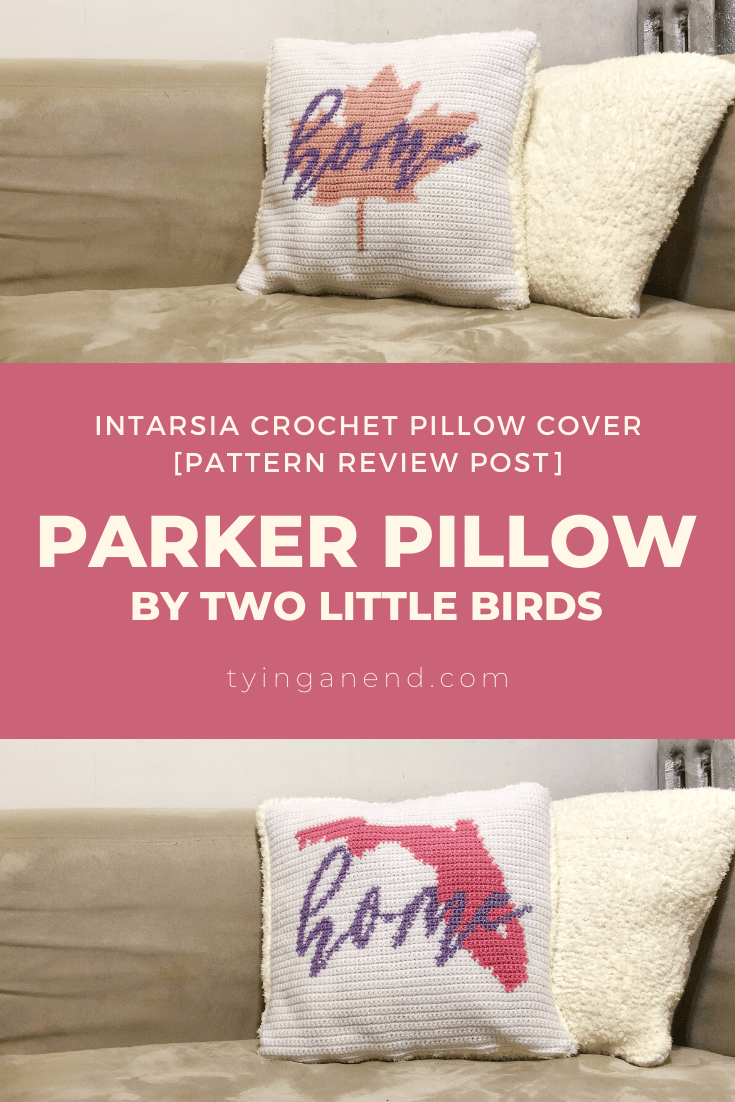
Back in October 2019, I made crochet pillow cover for my best friend. Long story short, she is originally from Canada, but she moved to Florida like 5 years ago when she got married (and her husband is from Florida). Florida is her current location of living, but I know for sure in her heart, Canada is also her “home”. That’s why I wanted to gift her something that represents both “home”.
I came across Emily from Two Little Birds while back, and since then I always admired her work. Her designs are modern and sophisticated. There are many intarsia home goods in her shop, and I found perfect design for my friend! (By the way, Emily’s customer service is excellent! If you have any issue or question, don’t hesitate to shoot her a message!)
Pin it now, read it later
USA State Design Crochet Pillow Cover
I chose The Parker Pillow for a gift. It’s an intarsia crochet design of each 50 USA States with a word “home” in the middle. Initial cost is $5.25, but each additional graph is only $0.20! That means, it’s only $15.05 for all 50 states! Also USA graph and maple leaf graph (representing Canada) are automatically included with a purchase of all 50 states. If you decide to buy certain amount of graphs and later you want to buy the rest of the graphs, there’s a graph bundle! You can purchase in 5 graphs bundle, and it’s only $0.40 a graph ($2.00 for each 5 graphs bundle. $20.00 for all 50 states)
Pattern Uses Intarsia Crochet
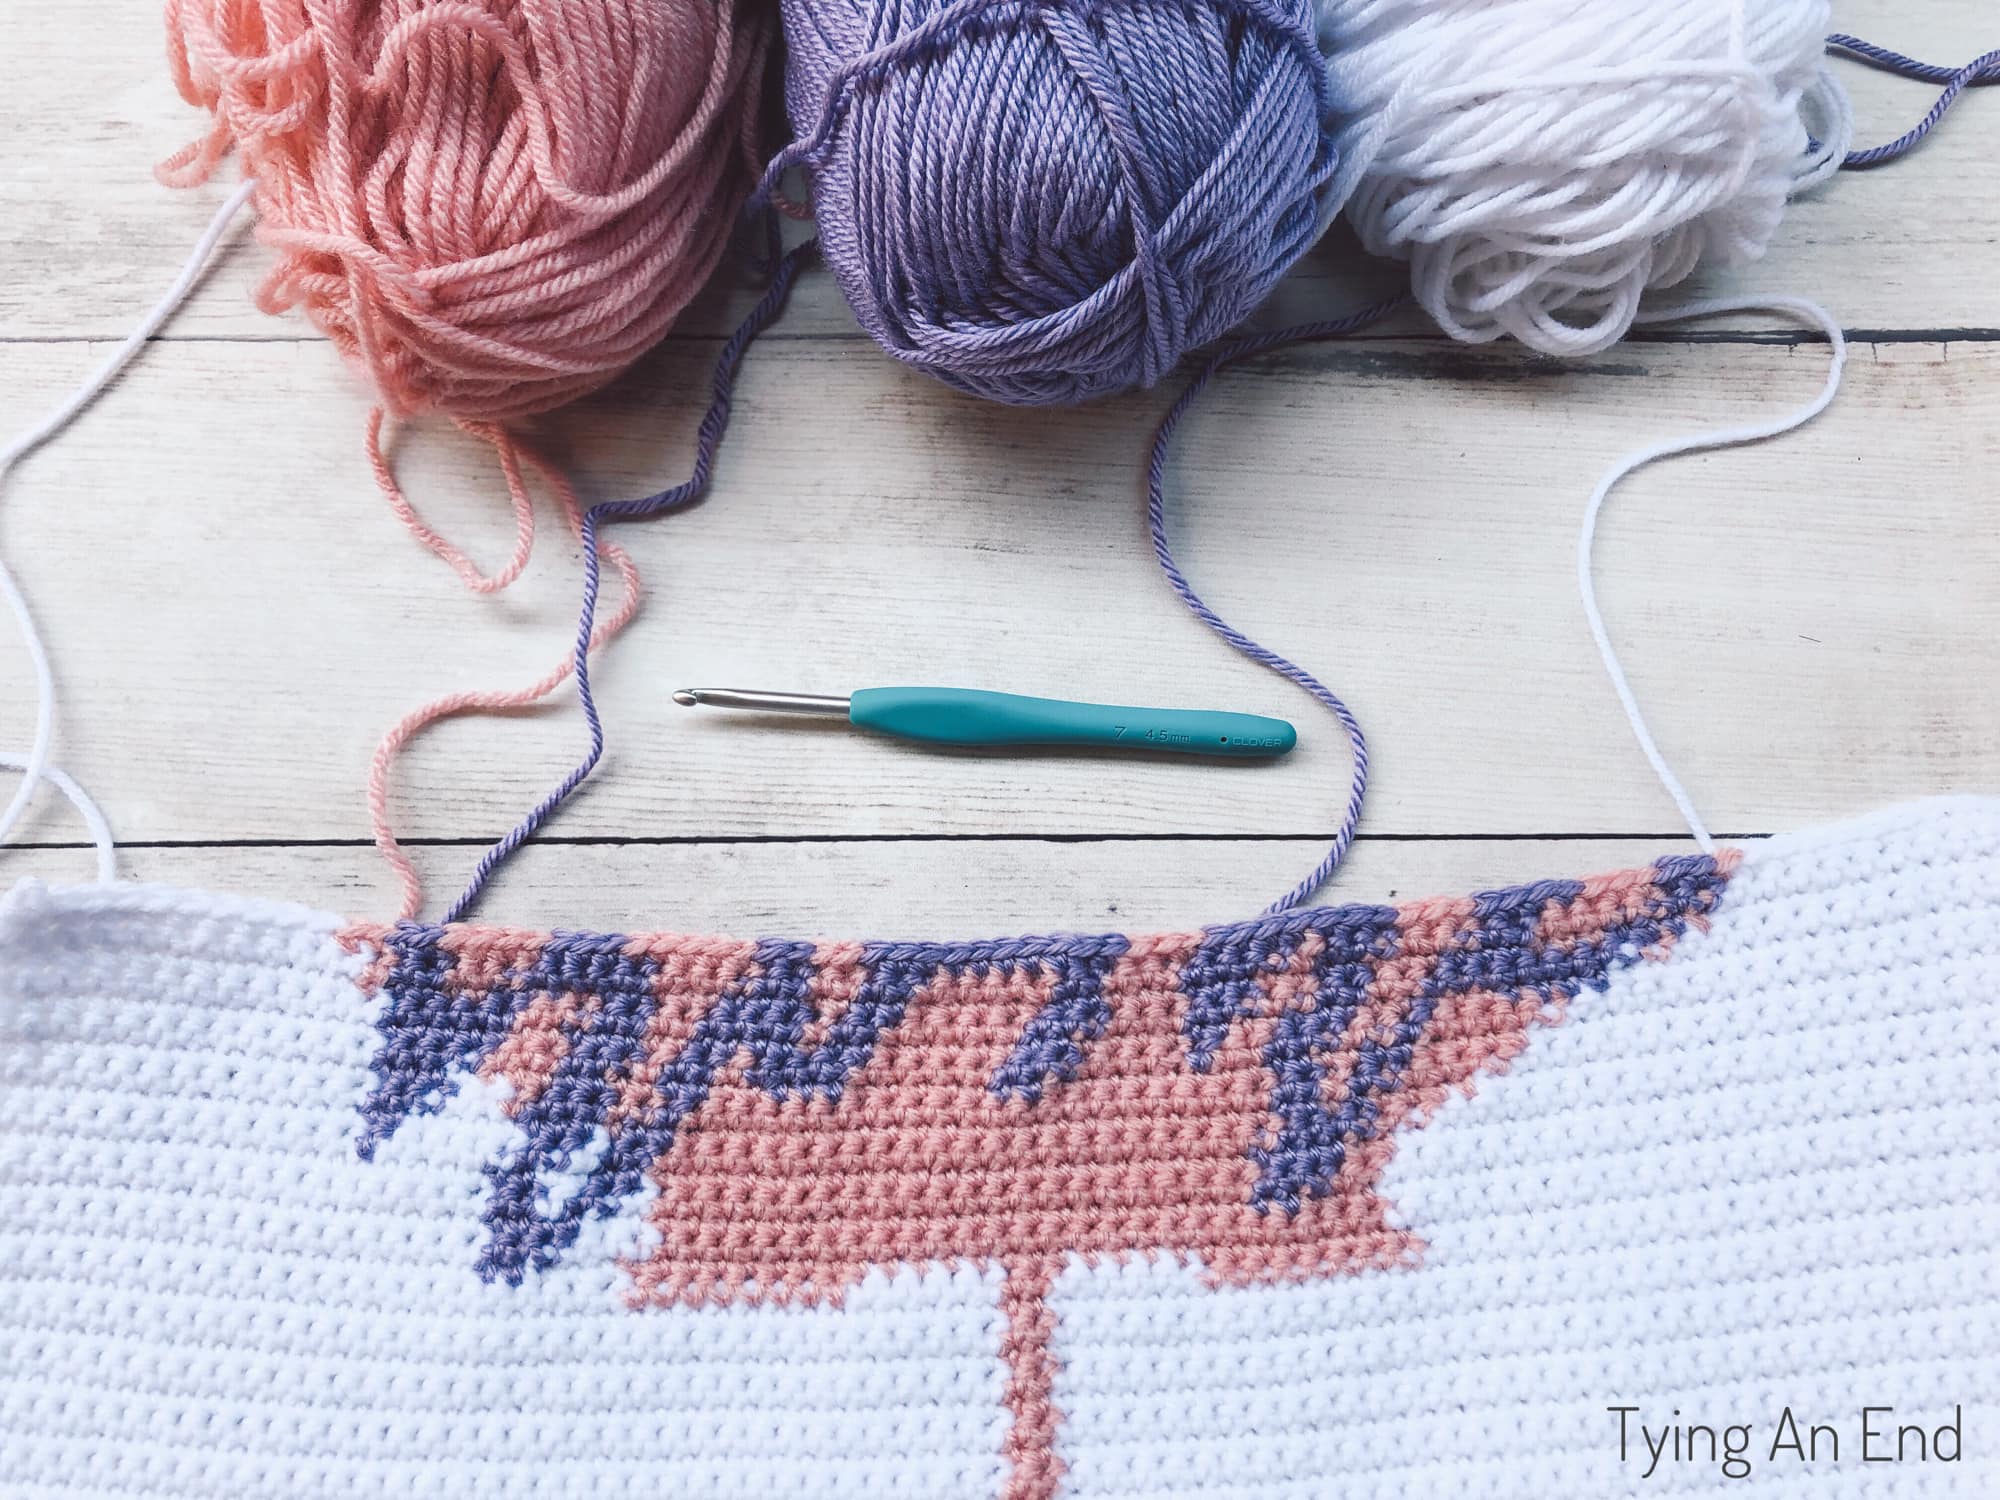
Intarsia crochet is very similar to “tapestry crochet”. (Read my blog post about the difference between tapestry and intarsia!) Following the graph, you switch colors back and forth, and design starts to show up. Choose any color you like and make customized design! If you are new to intarsia crochet, it includes step-by-step tutorial when you purchase a pattern! When you choose a color, I recommend making a swatch first. If your background color is similar tone to design color, it may be hard to differentiate.
For example, I used Big Twist Value in Bubblegum for state color and Red Heart Soft in Lilac for a word. I say they are both mid-dark tone so it’s little bit hard to read the word “home” where both colors overlap. In contrast, I used LB Vanna’s Choice in pink for maple leaf and Red Heart Soft in Lilac for a word. This time pink is much lighter so a word “home” stands out very much. (Check out my Love Crochet Throw Pillow for another great intarsia/tapestry project!)
Look of “Wrong Side”
Normally for intarsia crochet, when you switch to different color, you start with new bobbin of yarn. I probably had more than 10 bobbins if I did normal way. I didn’t have to do normal way because for something like a pillow cover that only 1 side needs to be shown, you can “drag” your unworking yarn! Below photo is how wrong side of front panel looks like. For the most part I drag unworking yarn (like the “home” part) It looks messy, but it’s not an issue at all because you’re not going to see this side anyway! Just make sure you don’t cut too short when you’re done with a color/yarn. It doesn’t have to be really long, but long enough that it won’t slip out and your finished piece fall apart!

Match Your Gauge Before Starting
Like in any other project, make sure you make a gauge swatch to see if your gauge matches with required gauge. Everyone crochet in different tightness; designer may be tight crocheter than you, vise versa. In my case, I’m a tight crocheter. My gauge did not match with Emily’s gauge. From my past experiences, changing the hook size to match gauge made my finished piece to be loose. Therefore, I decided to add more stitches and rows! There was no issue adding more on all 4 edges because it’s just white.
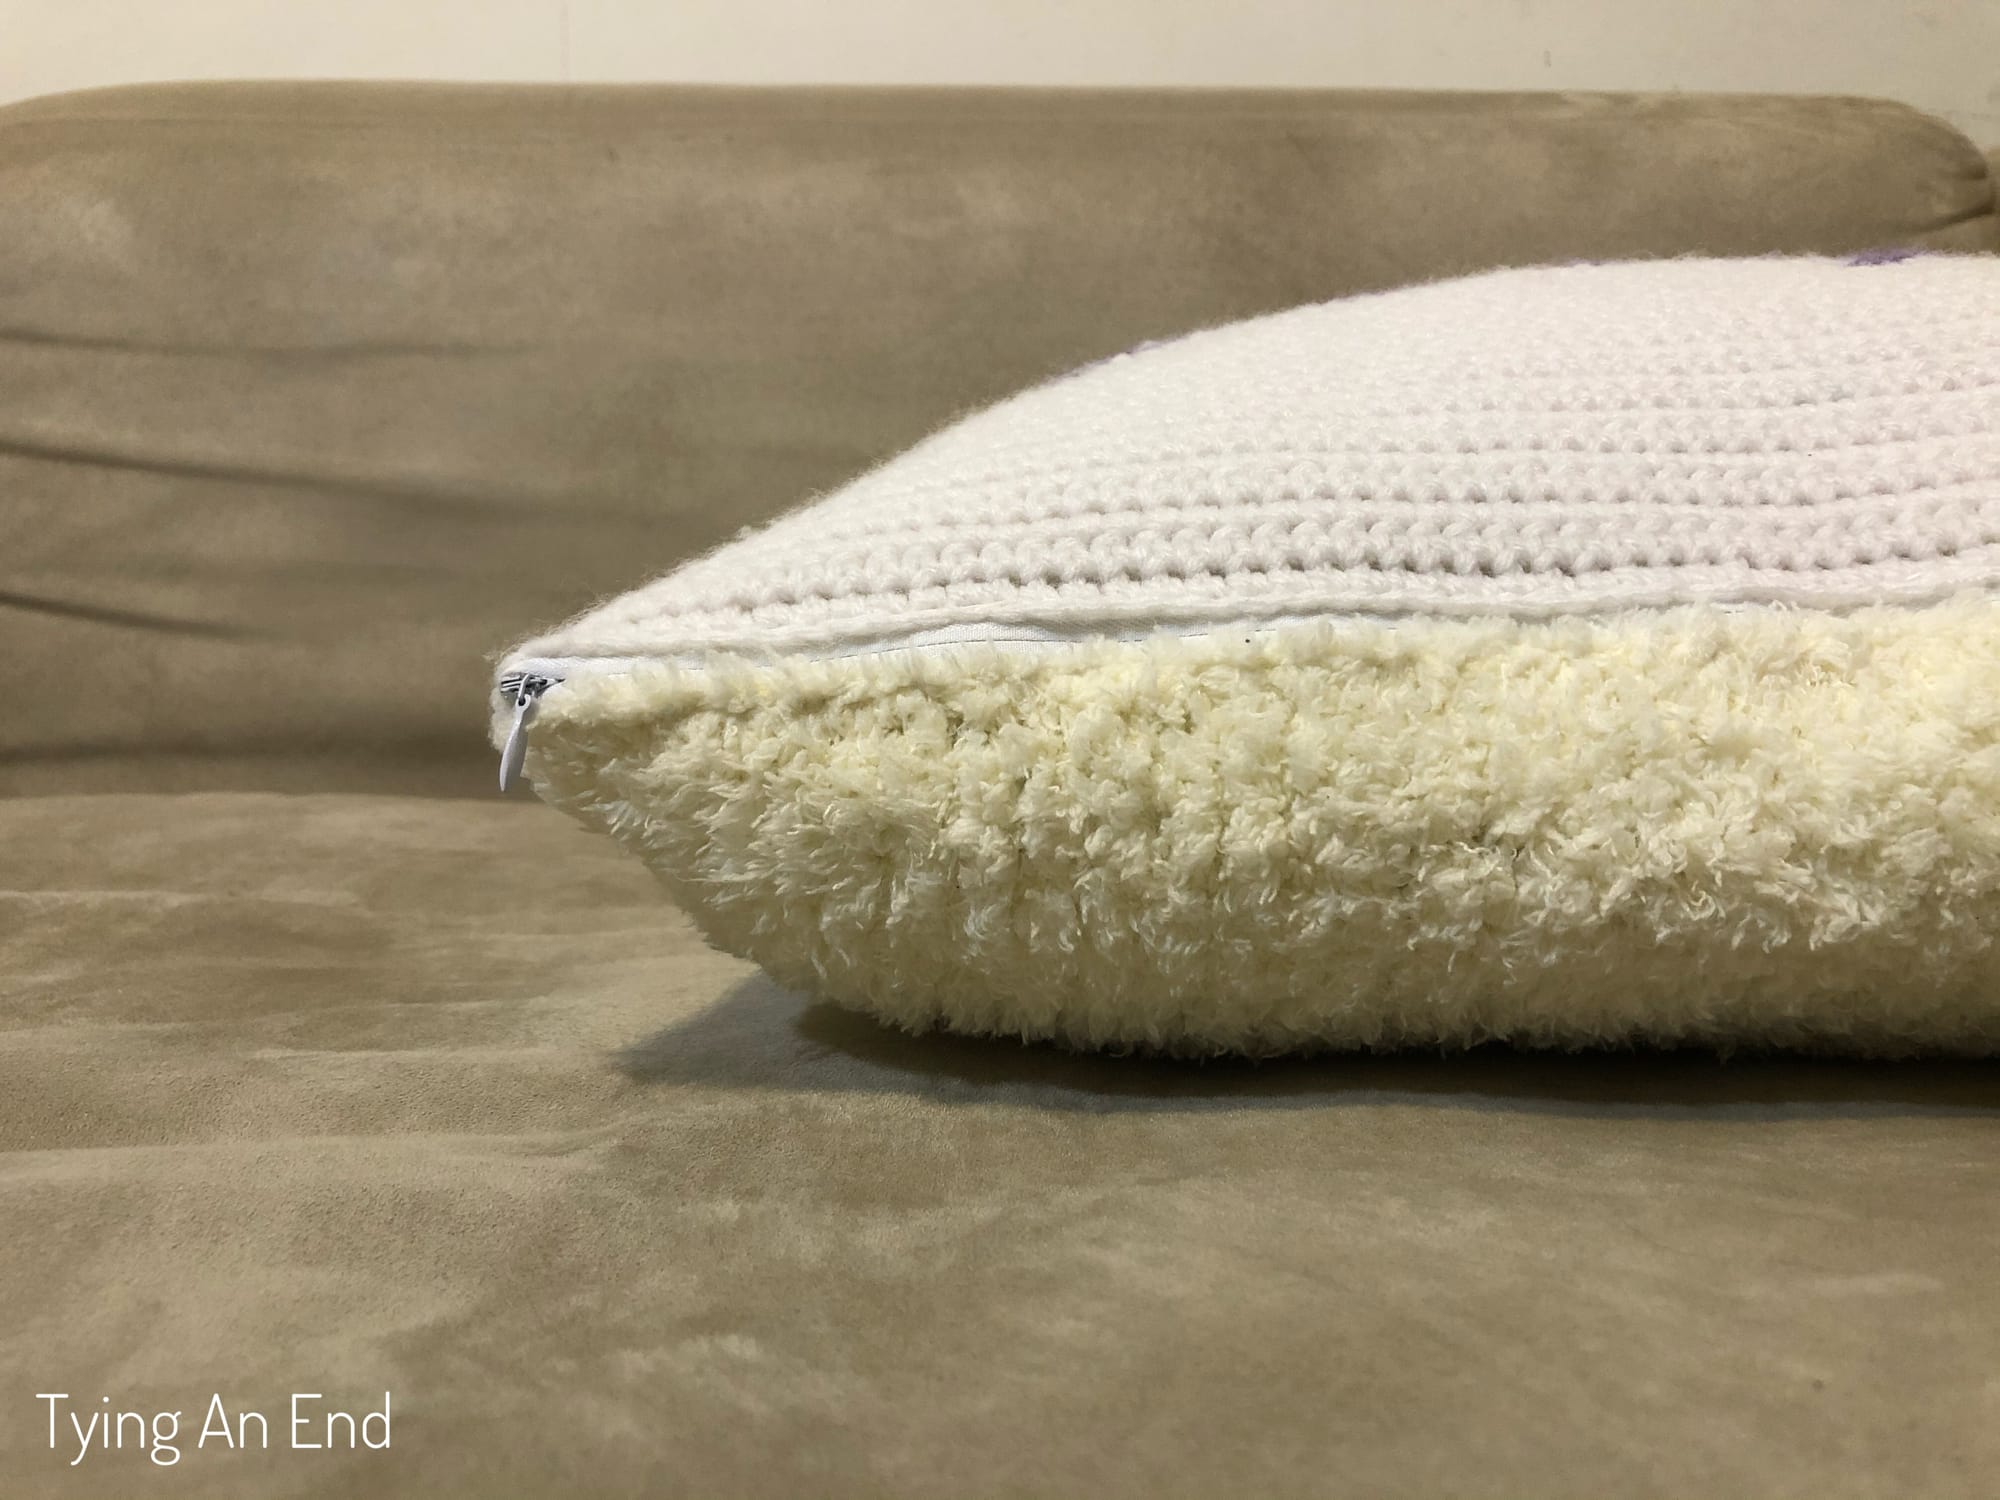
Different Yarn Weight for Back Panel
For the back panel, I wanted to use fluffy yarn. Don’t you love that fluffiness touching your skin when you hug a pillow? I love it. It’s so soft and comfortable! However, there’s little bit of a downside when working with fluffy yarn. If you ever worked with fluffy yarn, you know it’s pretty difficult to see each stitch. I could use my fingers and guess where the stitches were, but I didn’t want to risk of skipping stitches or any other mistake. So I decided to knit instead! It worked up really fast, and I had no problem with finding each stitch.
I used Bernat Pipsqueak Yarn (big ball of 250g/8.8oz) and end up using all of them after making 2 back panels. For some reason I thought I had the color Whitey White to match front and back panel colors, but I had Vanilla instead. Vanilla is more like creamy, beige color, and it still looks nice together with white. Pipsqueak Yarn is bulky yarn (yarn weight level 5) which means the back panel is going to be too big if I follow Emily’s pattern. Using a calculator (I use online gauge calculator), I got the number of stitches I need to match the same size as front panel. You can calculate to get the number of rows you need for height, but I skipped that part. Instead, I worked my way up until I reached the same height as the front panel.
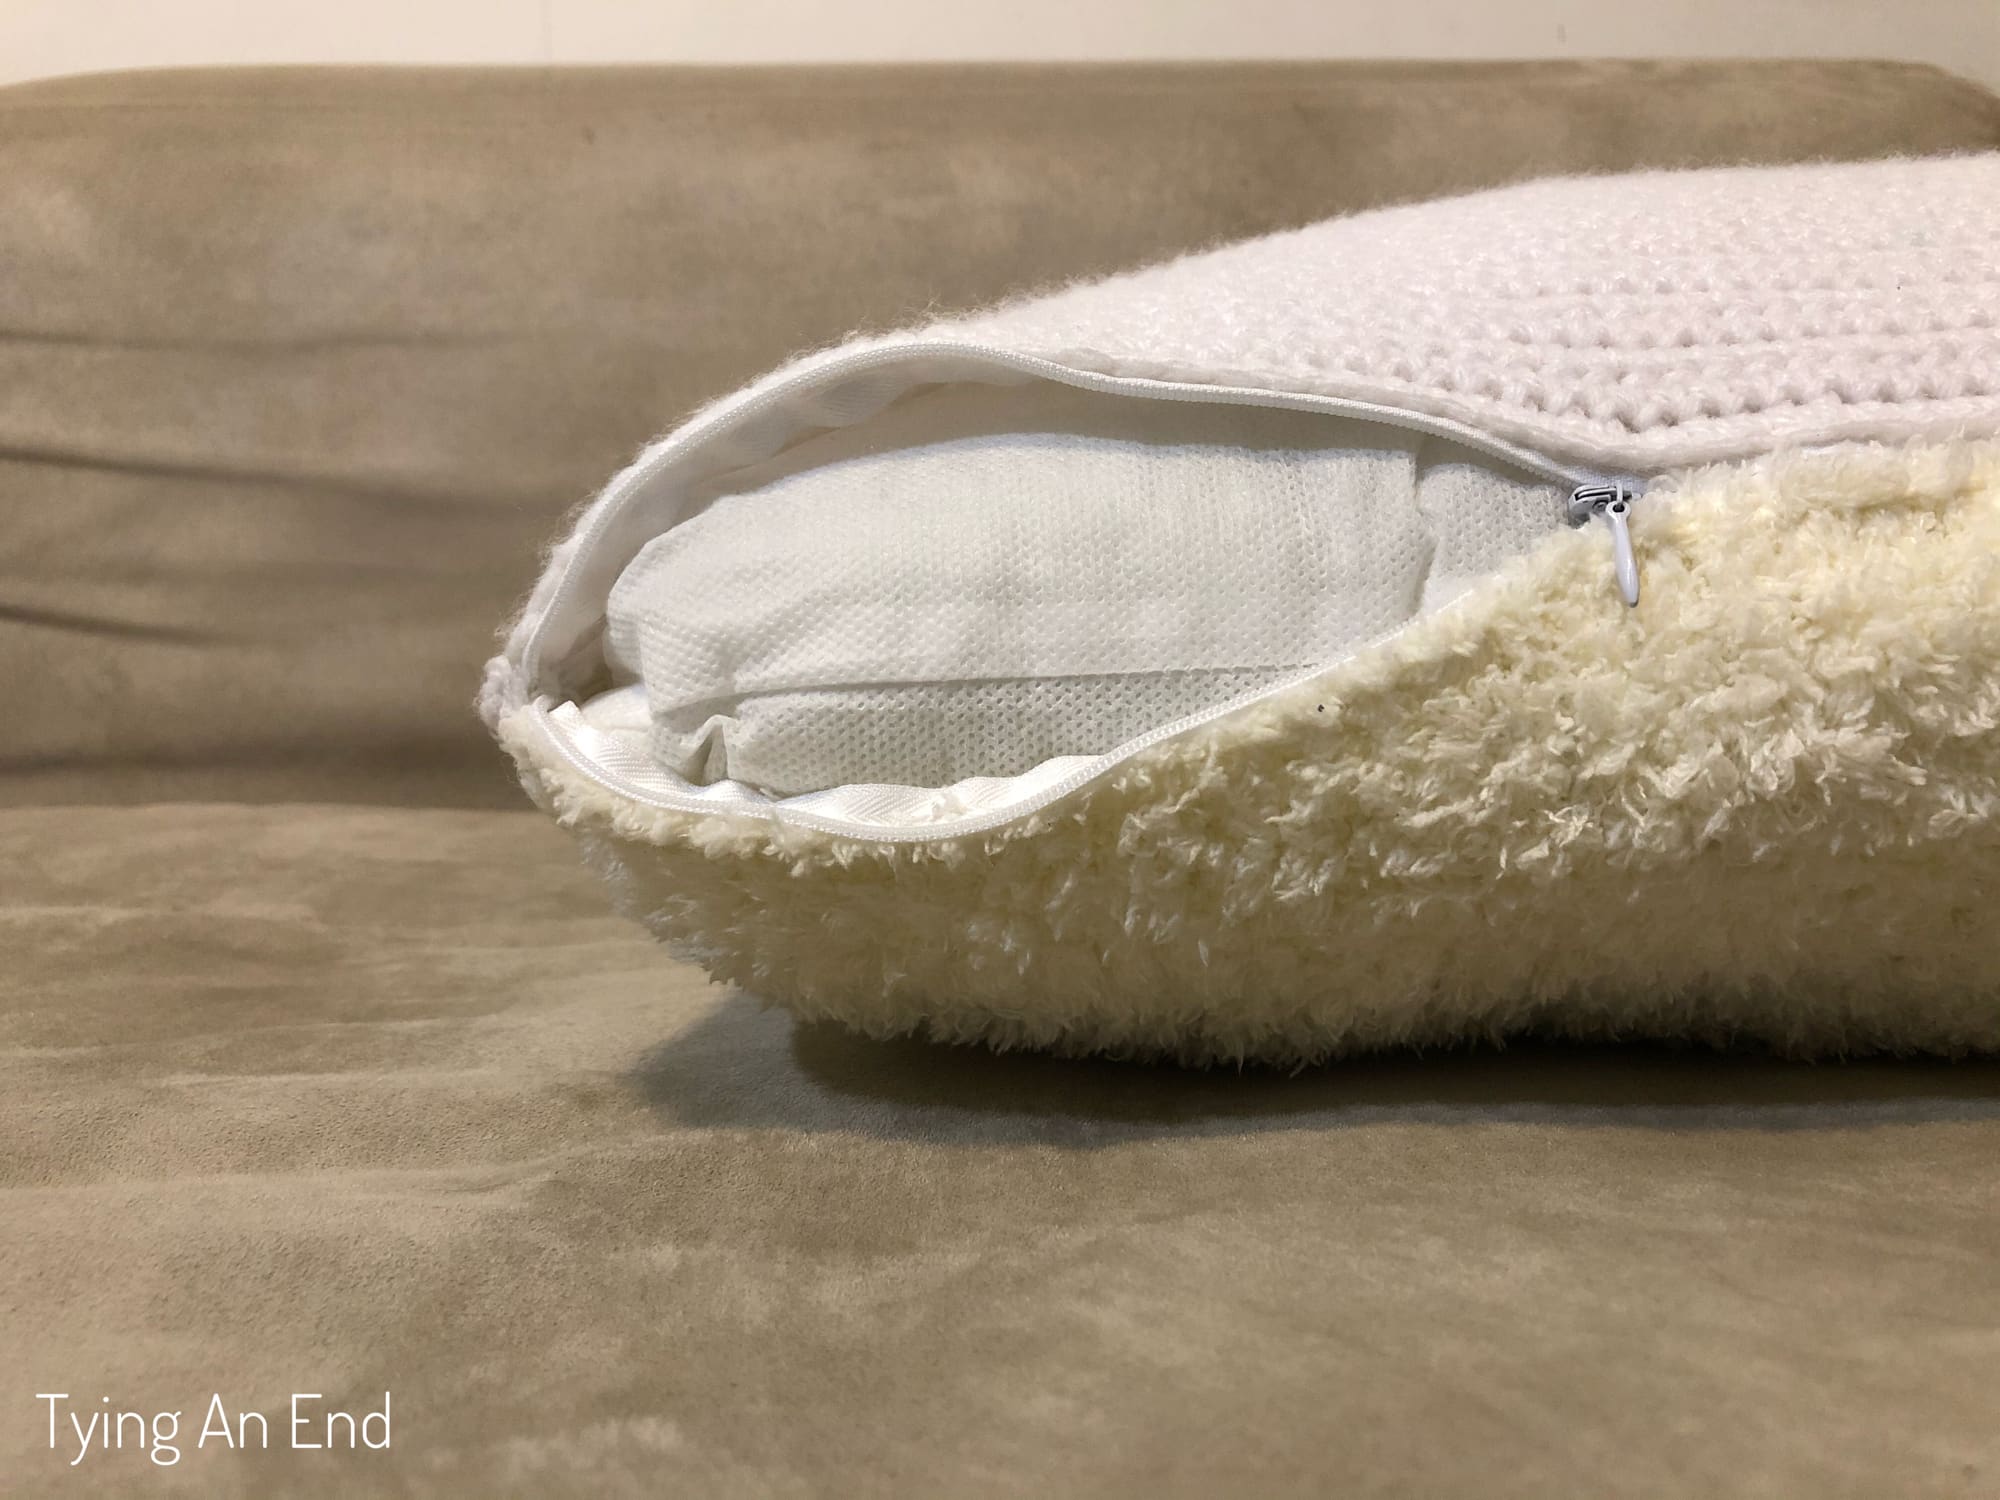
Closed Edge VS. Zipper
What’s so great about having zipper for your cover is that you can remove it to clean if it gets dirty. Now zipper was my choice of seaming the last side. You can choose to close it all off or have an option to be able to open (like mine!) Make it to however you like!
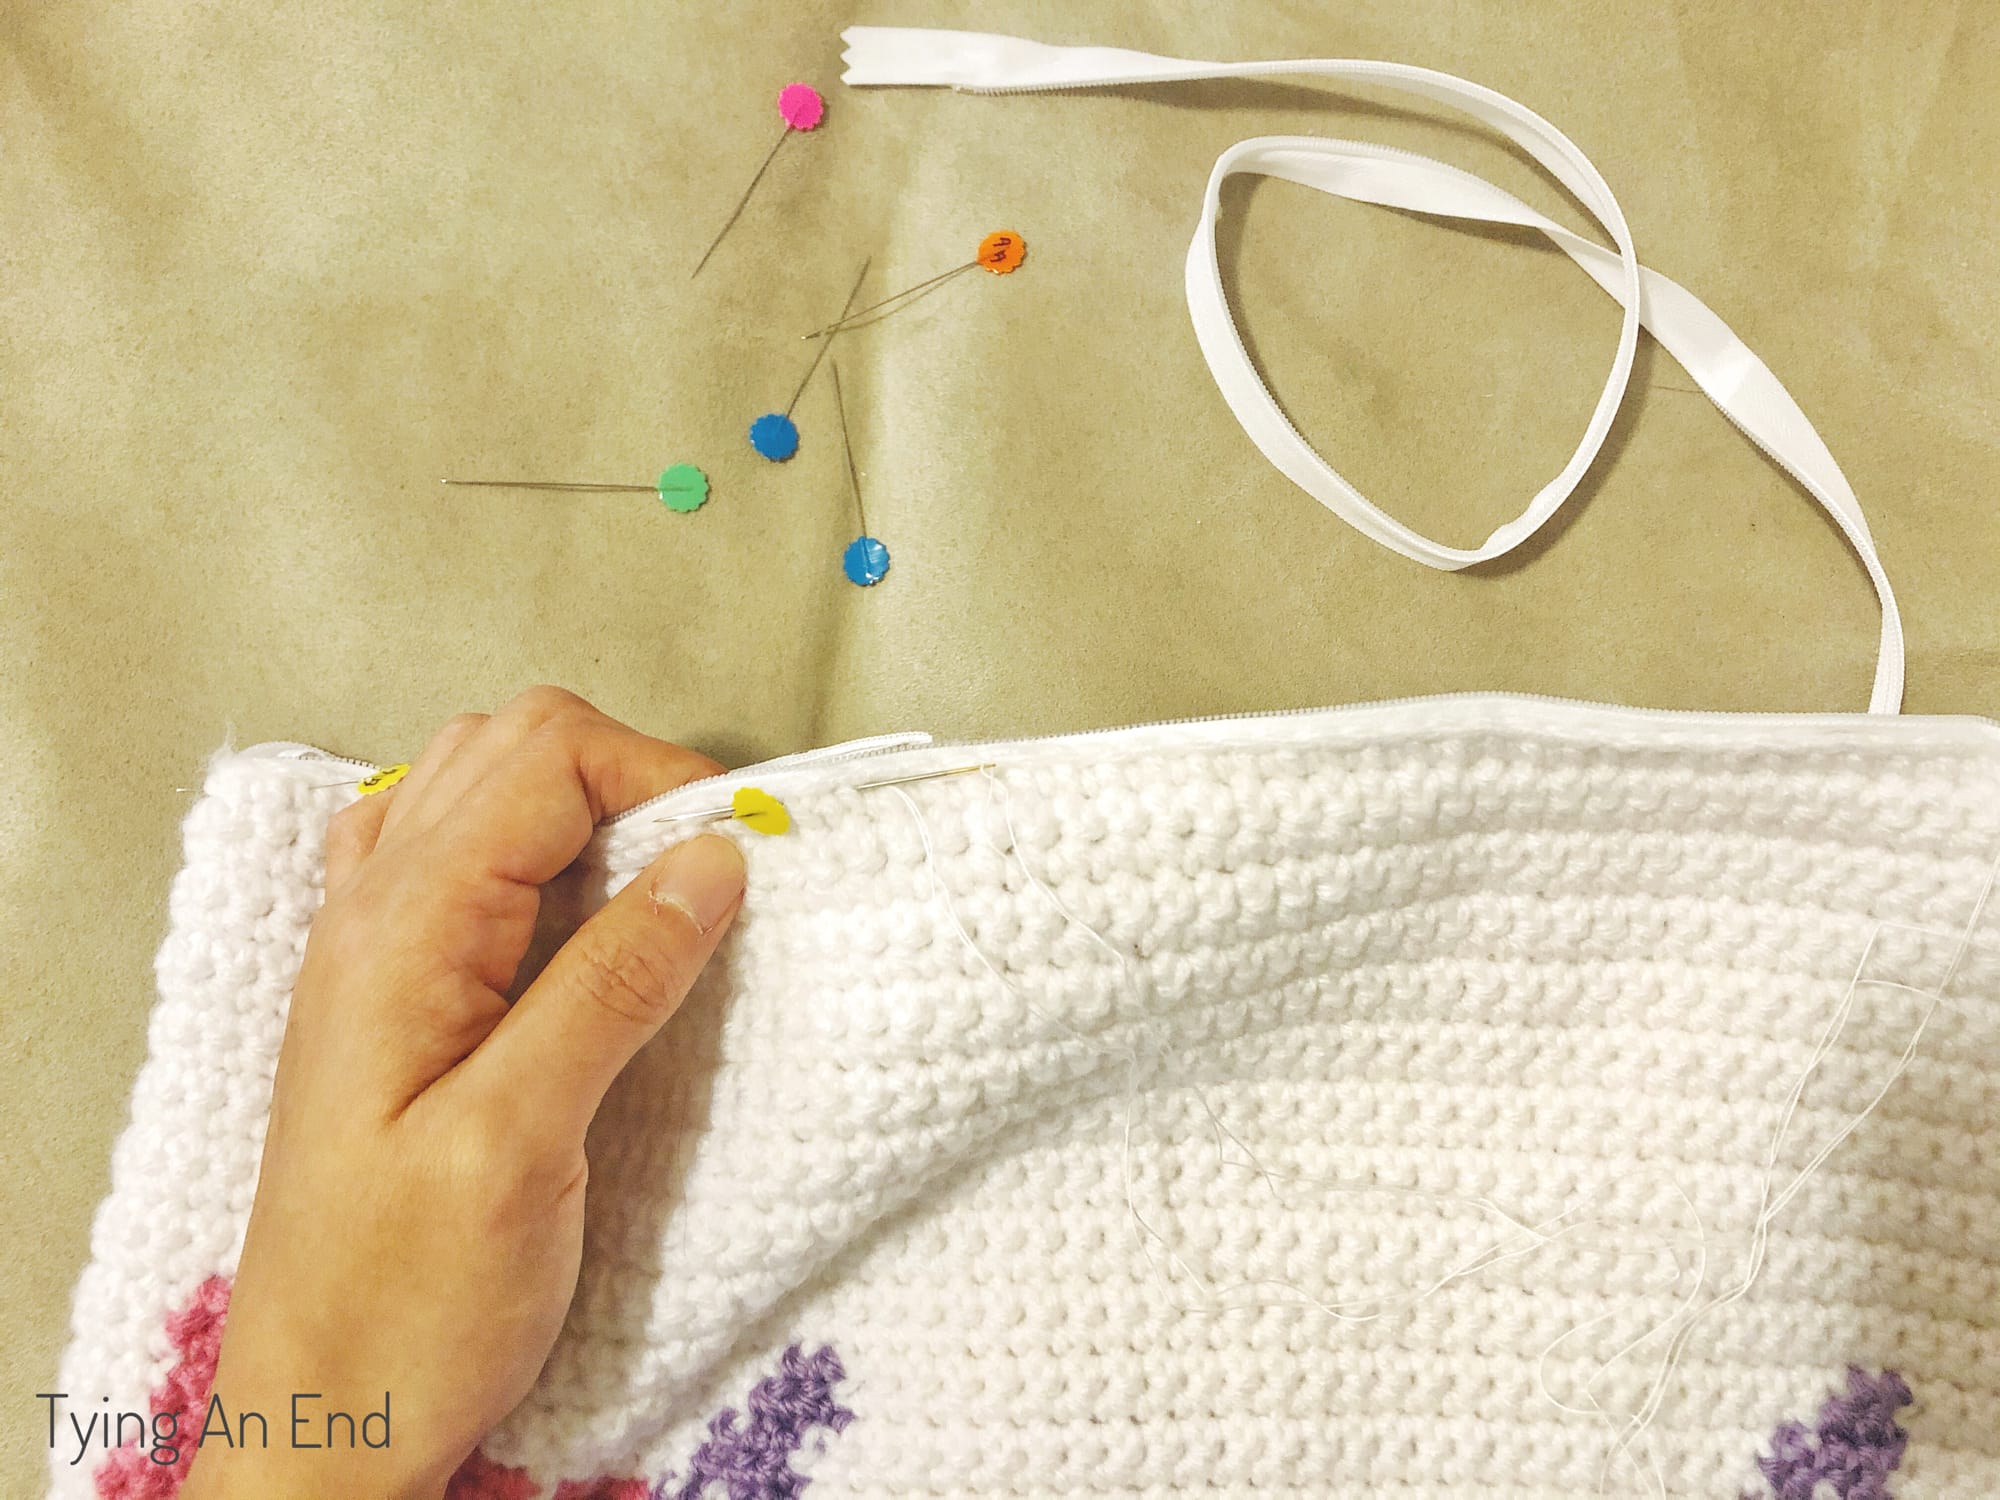
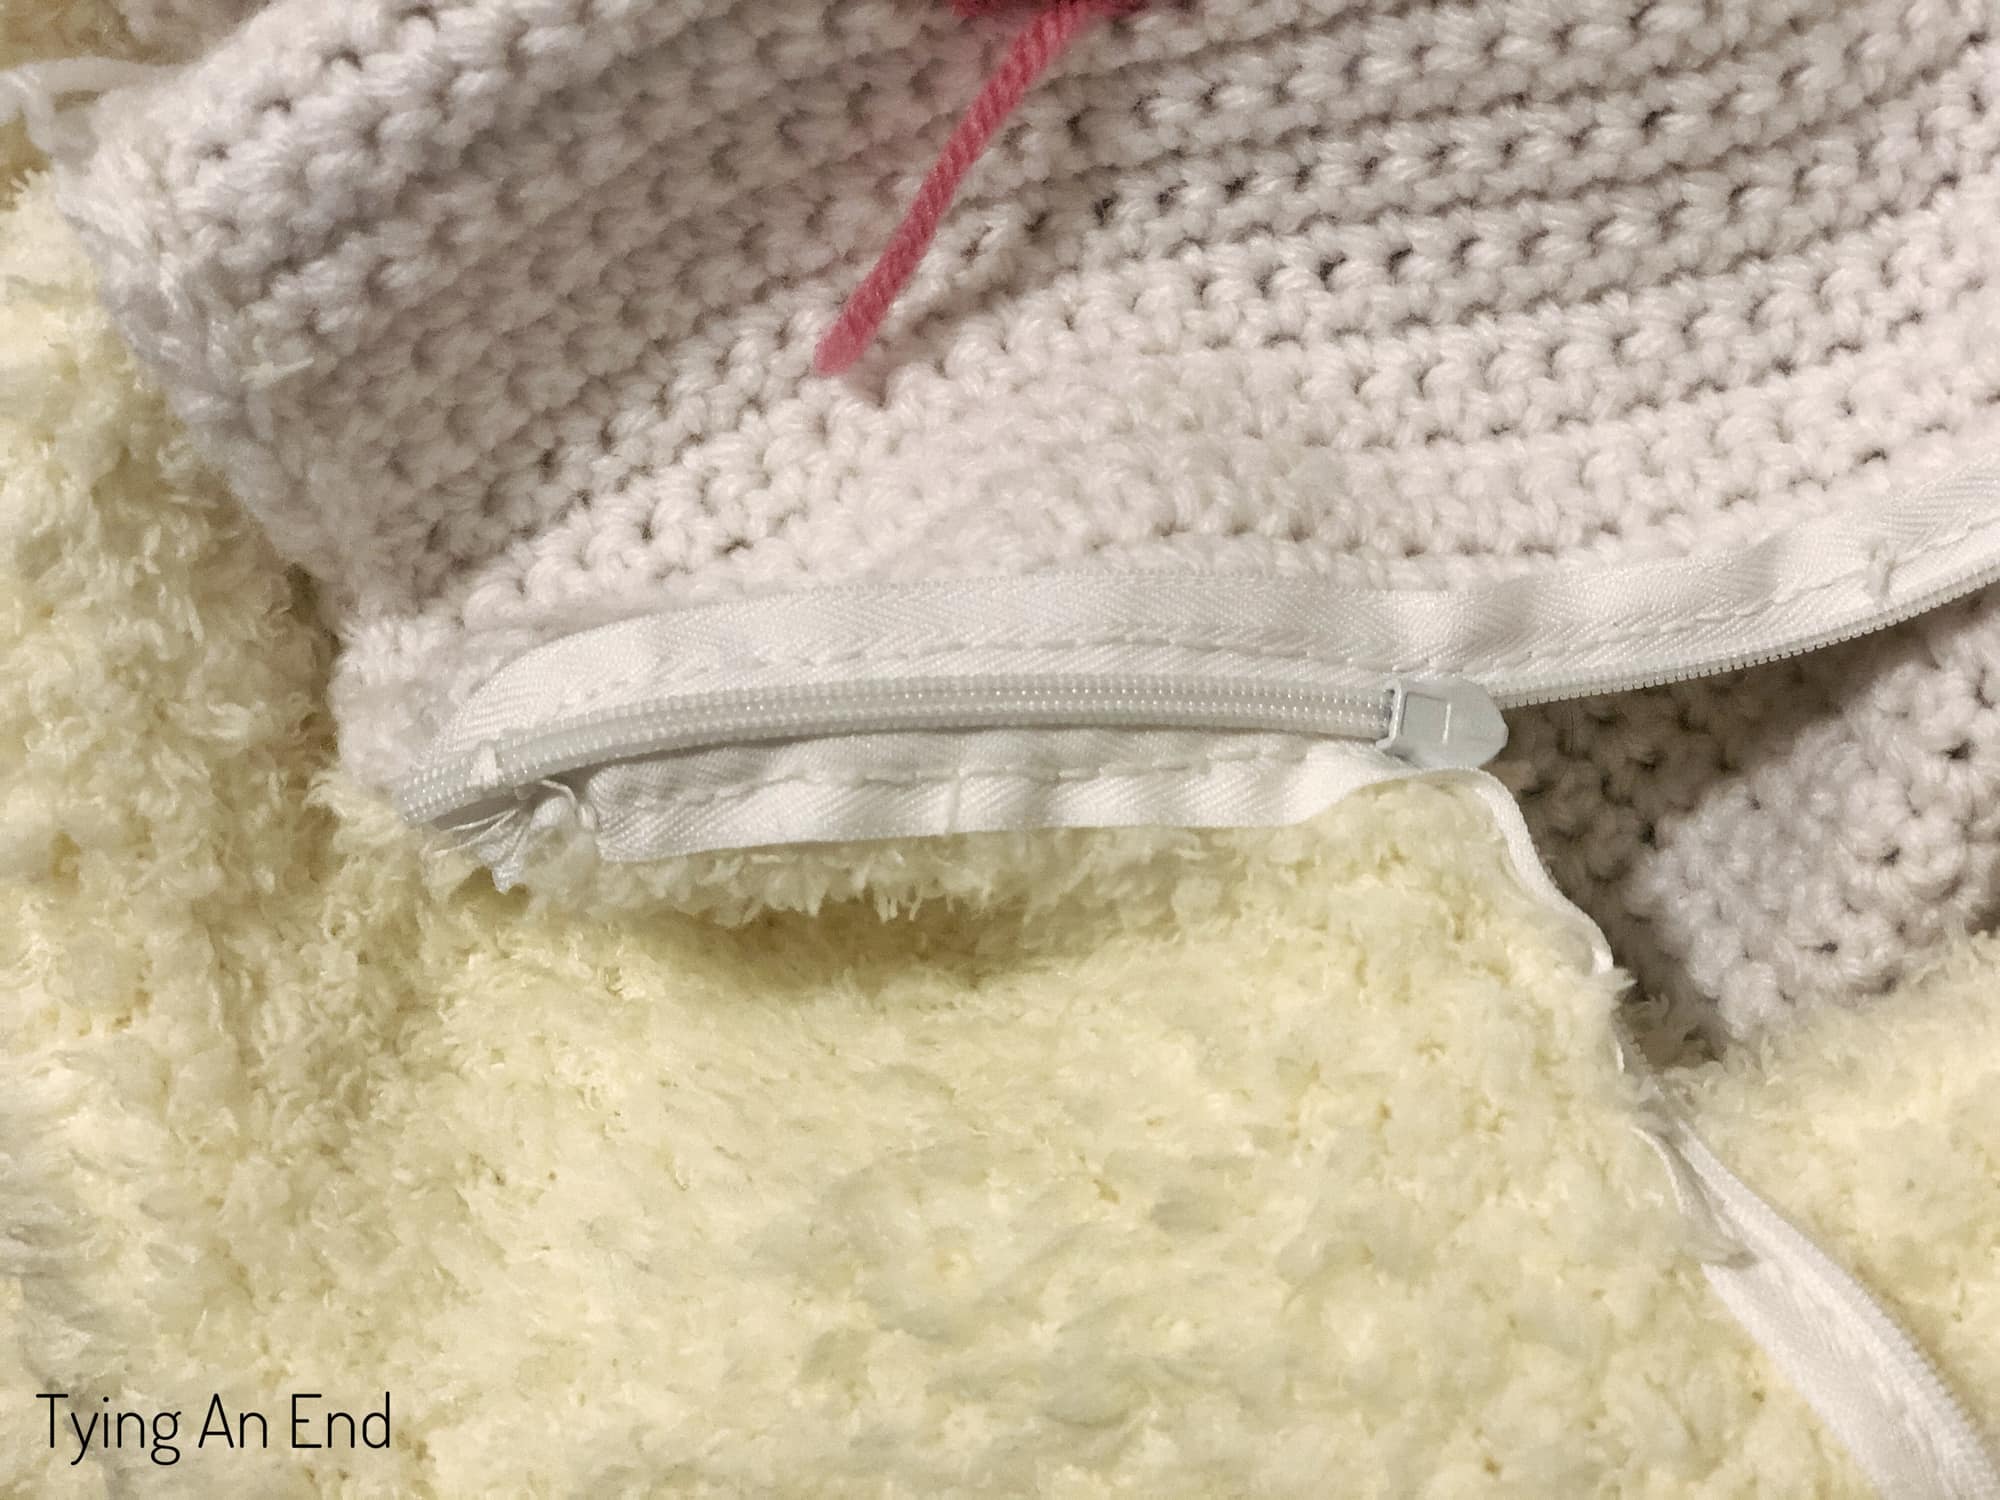
I purchased 20″~22″ long invisible zipper from JOANN (in white) and adjusted the length appropriate to the cover. Invisible zipper is great for pillow cover because you don’t see the coil (bump out part of zipper) when it’s closed. Zipper is very easy to adjust; just cut little bit longer than the length you need, and sew it (kind of like wrapping around the end) few times. Step-by-step instruction is included in the packet on how to adjust it which helped me a lot!
I wish I had sewing machine though! It would have saved me so much time! Anyways, the sewing stitch I used for zipper is called “back stitch”. I chose this stitch because it seemed much stronger than “running stitch” and seemed simple to do. Make sure you use straight pin to get nice straight stitch line. It also helps with holding zipper in place. When sewing, you don’t want to stitch too close to the opening. You want enough space so it can easily open and close.
Great Pattern for Beginner on Intarsia
I really enjoyed making these pillow covers! If you’re new or getting hang of intarsia crochet, this pattern is great one to work with. Also please make sure to check out more of Emily’s designs in her Etsy shop!
My friend sent me photos when she received these pillows in mail, and she looked so happy. It made me happy seeing her beautiful smile! I’m really happy how my final pieces turned out. Don’t they look really cozy and soft? They really are! I actually had a chance to visit my friend few months after I sent these pillows. Right when I walked in to her house, there’s a couch and I see…Parker Pillow I made for her! Seeing my finished piece in someone else’s home makes me feel happy and proud of myself (for making handmade piece)

Thank you so much for reading and happy crocheting!
This review is my honest opinions from Tae of Tying An End. Please do not use my photos and contents as your own. Please see Disclosure & Terms of Use for more info.

Tapestry VS. Intarsia