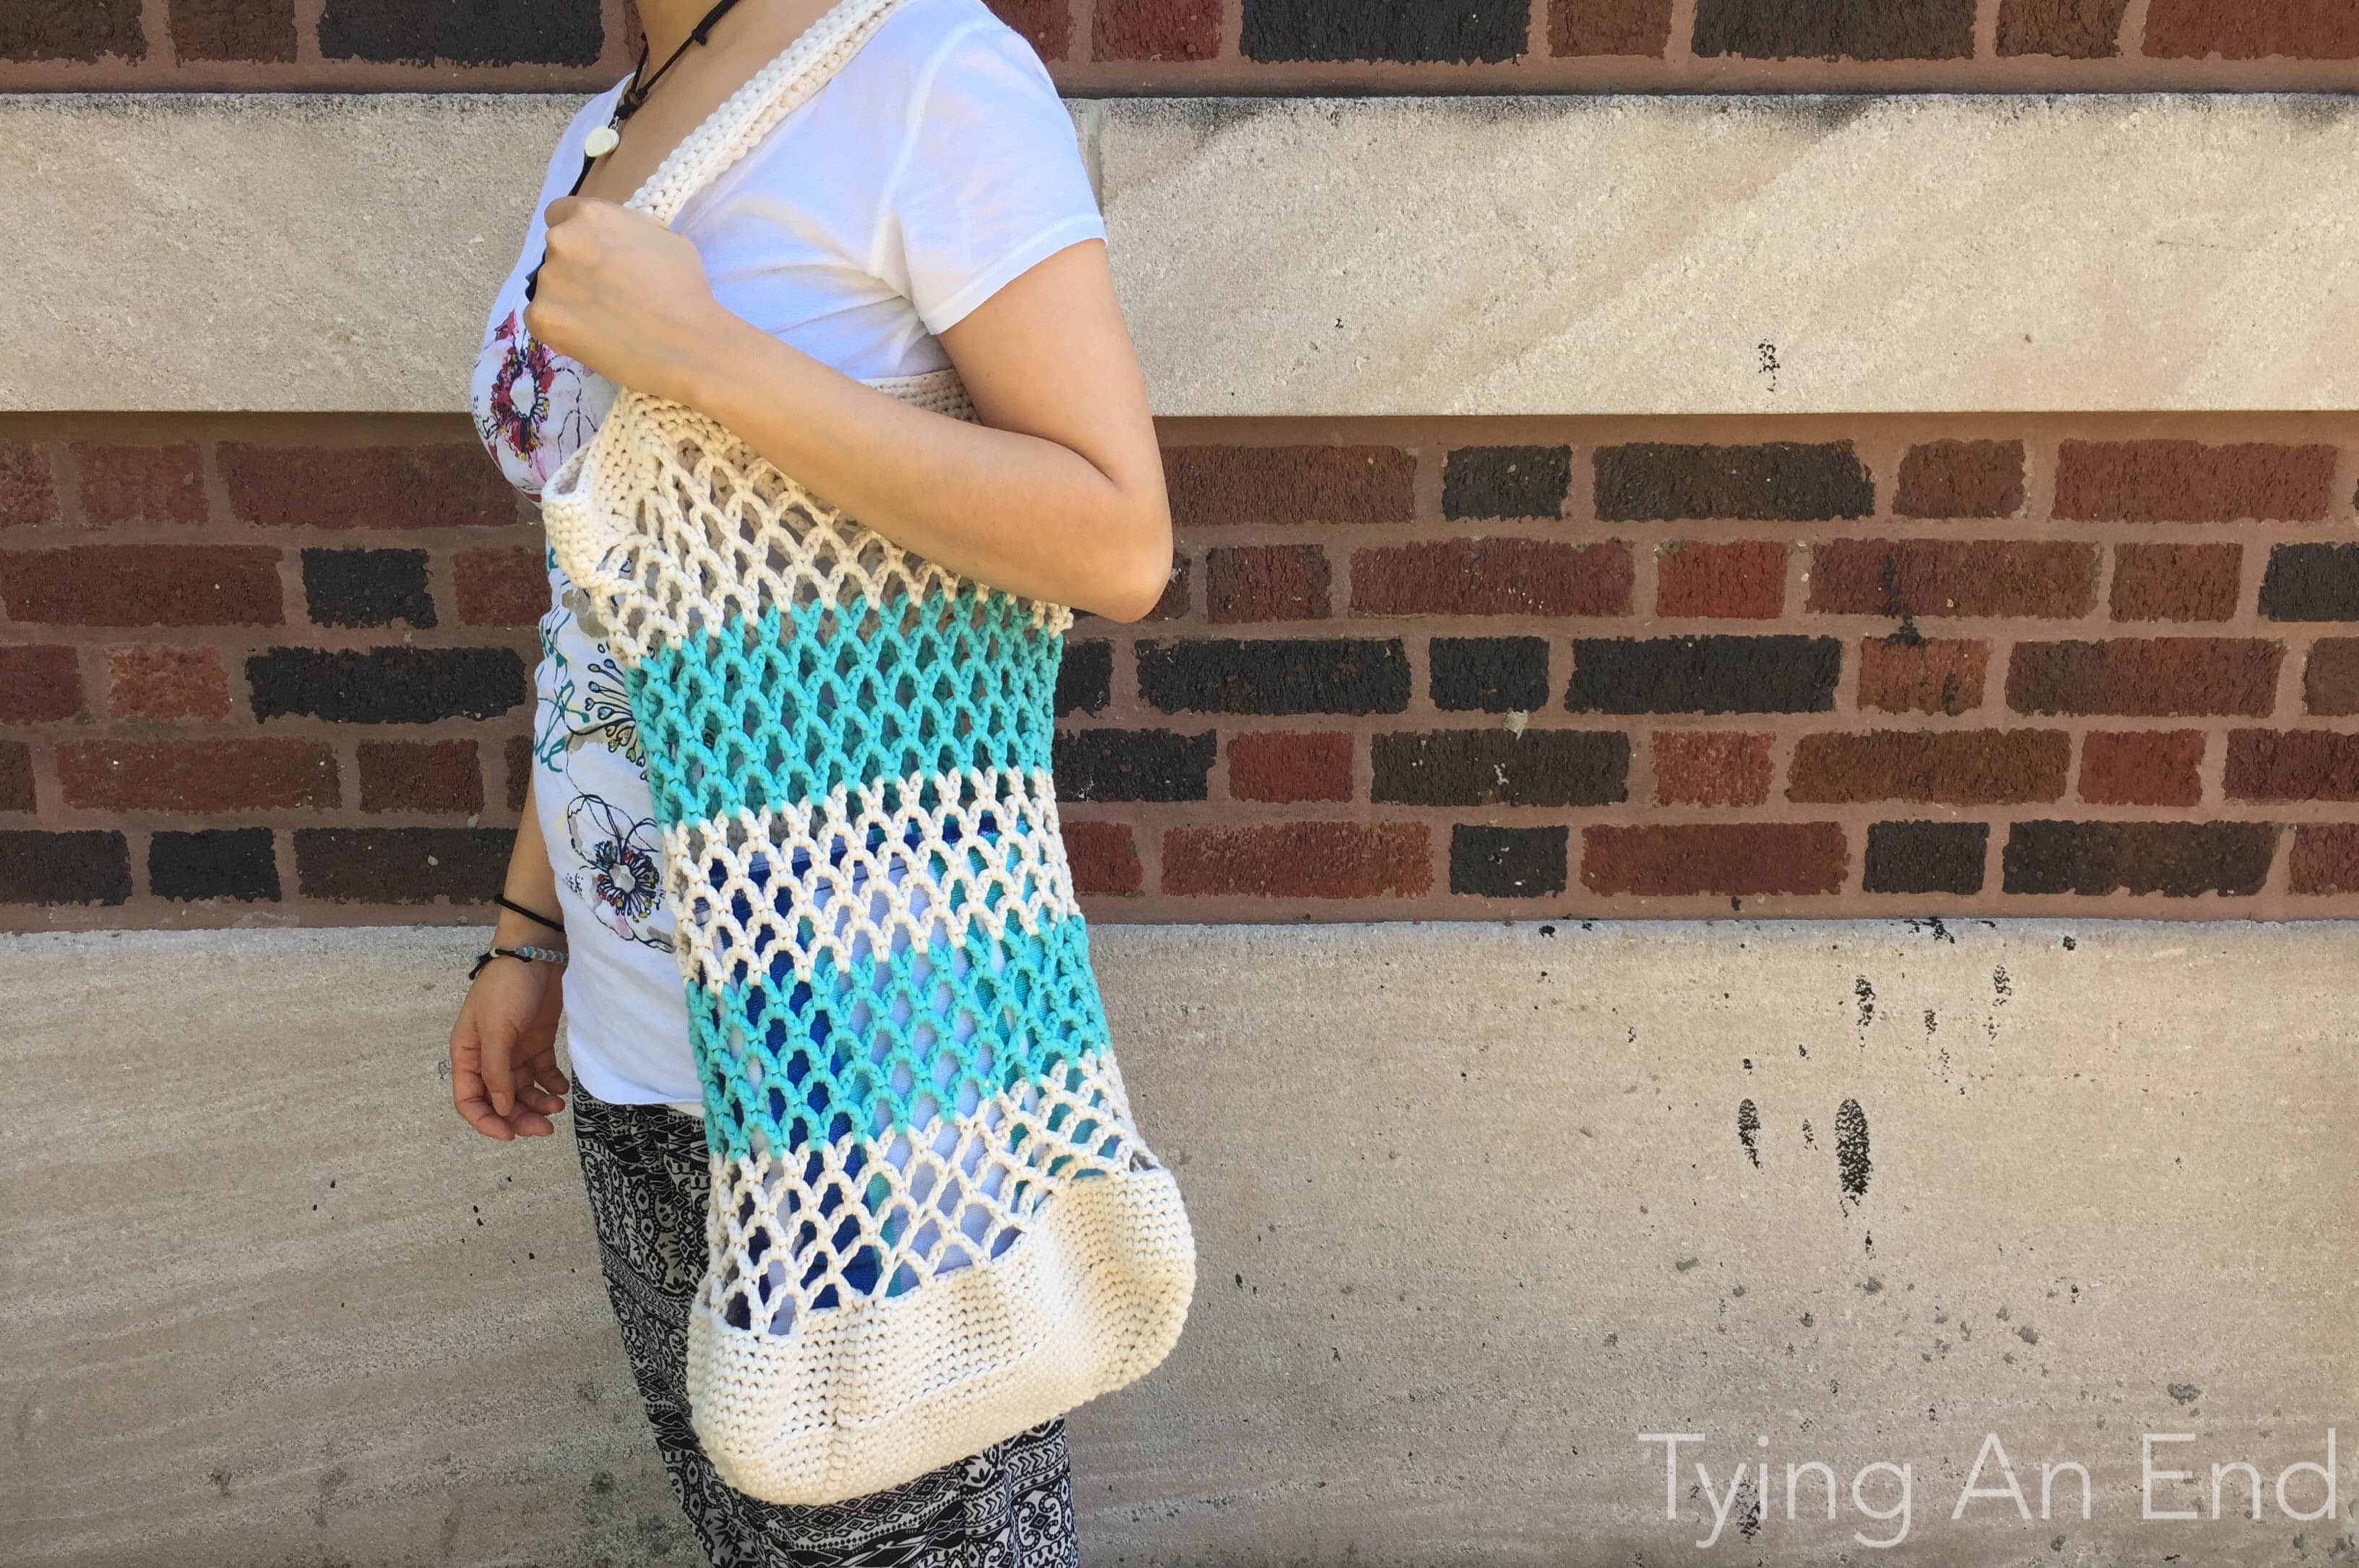
Nami Crochet Tote Bag
How’s everyone’s summer has been? I still can’t believe summer is almost over! I feel like I haven’t done much of summer activities yet. (I’m so excited for next month though! Family mini outing is happening!)
When you hear a word “summer” what comes in to your mind? For me, it would be fireworks, outdoor BBQ and beach! I’ve done first 2 activities this summer so far, but I haven’t gone to the beach yet! (Even though Lake Michigan is right there…) I’m super indoor person, but during the summer, especially with beautiful sunny weather, it makes me want to go and be outside more than usual for some reasons. I guess that’s a good thing right? So to prepare to go to beach (hopefully I can go next month), I decided to make a tote bag! I wanted to design a bag that reminds me of summer and/or beach.

I named this tote bag “Nami Crochet Tote Bag” because a word “nami” means wave in Japanese and colors I chose resembles a beach. My initial design for this bag was actually totally different. I was inspired by Emma from Steel and Stitch’s Storm Trooper Filet Crochet Bag for such a simple stitch yet intricate details. I was trying to design a wave with filet crochet using 2 colors, but as I start crocheting my initial idea, I realized it would be almost impossible to make it with 2 colors. So I decided to go with diamond mesh stitch because design still resembles wavy look. I’m still going to make a bag with my initial idea using filet crochet, but that will be some other time.
I’m still happy with the way it turned out, especially handles! I had some hard time figuring out how I should create these handles…to look clean and as simple as possible.

I hope you enjoy this project! Here’s free pattern for Nami Crochet Tote Bag! (You can purchase nicely formatted PDF at my Etsy shop HERE !)
Materials:
- 1 skein of Bernat Maker Home Dec in Cream
- 1 skein of Bernat Maker Home Dec in Aqua
- US J/6mm crochet hook
- Tapestry needle
Notes:
- Size – about 10.75” x 4.75” (27cm x 12cm) for base, 18″ (45.75cm) for straps, 17.5” (45cm) for height when stretched, excluding straps.
- Number in [ ] indicates number of stitches in each round.
- You will be working around foundation CH to make rectangle for base.
- Because diamond mesh stitch makes the bag very stretchy when you put items in the bag, please adjust the number of rounds to your liking.
- If you adjust the number of rounds, starting of your handle will change. I recommend placing stitch markers so you know exactly where you want your handles to be.
Abbreviations:
- CH – chain stitch
- HDC – half double crochet
- SC – single crochet
- SC FLO – single crochet front loop only
- SC BLO – single crochet back loop only
- SL ST – slip stitch
- SL ST BLO – slip stitch back loop only
Instructions:
CH 24 with Cream
Round 1 – 3 SC BLO in 2nd CH from hook. SC BLO 21. 2 SC BLO and SC FLO in next CH (that’s 3 SC in 1 CH). SC FLO 21. SL ST BLO to the first SC. (SL ST BLO will give you less visible joined look) [48]
Round 2 – CH 1. ([SC, CH 1, SC] in next SC.)* SC. Repeat *. SC 21. Repeat *. SC. Repeat *. SC 21. SL ST BLO to the first SC. [56]
Round 3 – CH 1. SC. ([SC, CH 1, SC] in next CH-1 space.)* SC 3. Repeat *. SC 23. Repeat *. SC 3. Repeat *. SC 22. SL ST BLO to the first SC. [64]
Round 4 – CH 1. SC 2. ([SC, CH 1, SC] in next CH-1 space.)* SC 5. Repeat *. SC 25. Repeat *. SC 5. Repeat *. SC 23. SL ST BLO to the first SC. [72]
Round 5 – CH 1. SC 3. ([SC, CH 1, SC] in next CH-1 space.)* SC 7. Repeat *. SC 27. Repeat *. SC 7. Repeat *. SC 24. SL ST BLO to the first SC. [80]
Round 6 – CH 1. SC 4. ([SC, CH 1, SC] in next CH-1 space.)* SC 9. Repeat *. SC 29. Repeat *. SC 9. Repeat *. SC 25. SL ST BLO to the first SC. [88]
Round 7 – CH 1. SC 5. ([SC, CH 1, SC] in next CH-1 space.)* SC 11. Repeat *. SC 31. Repeat *. SC 11. Repeat *. SC 26. SL ST BLO to the first SC. [96]
Round 8 – CH 1. SC 6. ([SC, CH 1, SC] in next CH-1 space.)* SC 13. Repeat *. SC 33. Repeat *. SC 13. Repeat *. SC 27. SL ST BLO to the first SC. [104]
Round 9 – CH 1. SC 7. ([SC, CH 1, SC] in next CH-1 space.)* SC 15. Repeat *. SC 35. Repeat *. SC 15. Repeat *. SC 28. SL ST BLO to the first SC. [112]
Round 10 – CH 1. SC 8. ([SC, CH 1, SC] in next CH-1 space.)* SC 17. Repeat *. SC 37. Repeat *. SC 17. Repeat *. SC 29. SL ST BLO to the first SC. [120]
Round 11 – CH 1. SC BLO around. SL ST BLO to the first SC. [120]
Round 12 – CH 1. SC around. SL ST BLO to the first SC. [120]
Round 13~18 – Repeat Round 12. [120]
Round 19 – CH 1. (SC. CH 5. Skip next 3 SC)*. Repeat * 28 times. SC. CH 2. DC in first SC.
Round 20 – (CH 5. SC in CH-5 space)*. Repeat * 28 times. CH 2. DC in DC from previous round.
Round 21~44 – Repeat Round 20. Change the yarn to Aqua at 24th round. Change the yarn to Cream at 29th round. Change the yarn to Aqua at 34th round. Change the yarn to Aqua at 39th round.
Round 45 – (CH 4. SC in CH-5 space)*. Repeat * 28 times. CH 2. DC in DC from previous round.
Round 46 – CH 1. (SC. HDC) in CH-4 space. (DC in next SC. [HDC. SC. HDC] in next CH-4 space)*. Repeat * 29 times. DC in next SC. HDC in CH-4 space. SL ST BLO to the first SC. [120]
Round 47 – CH 1. SC around. SL ST BLO to the first SC. [120]
Round 48~49 – Repeat Round 47. [120]
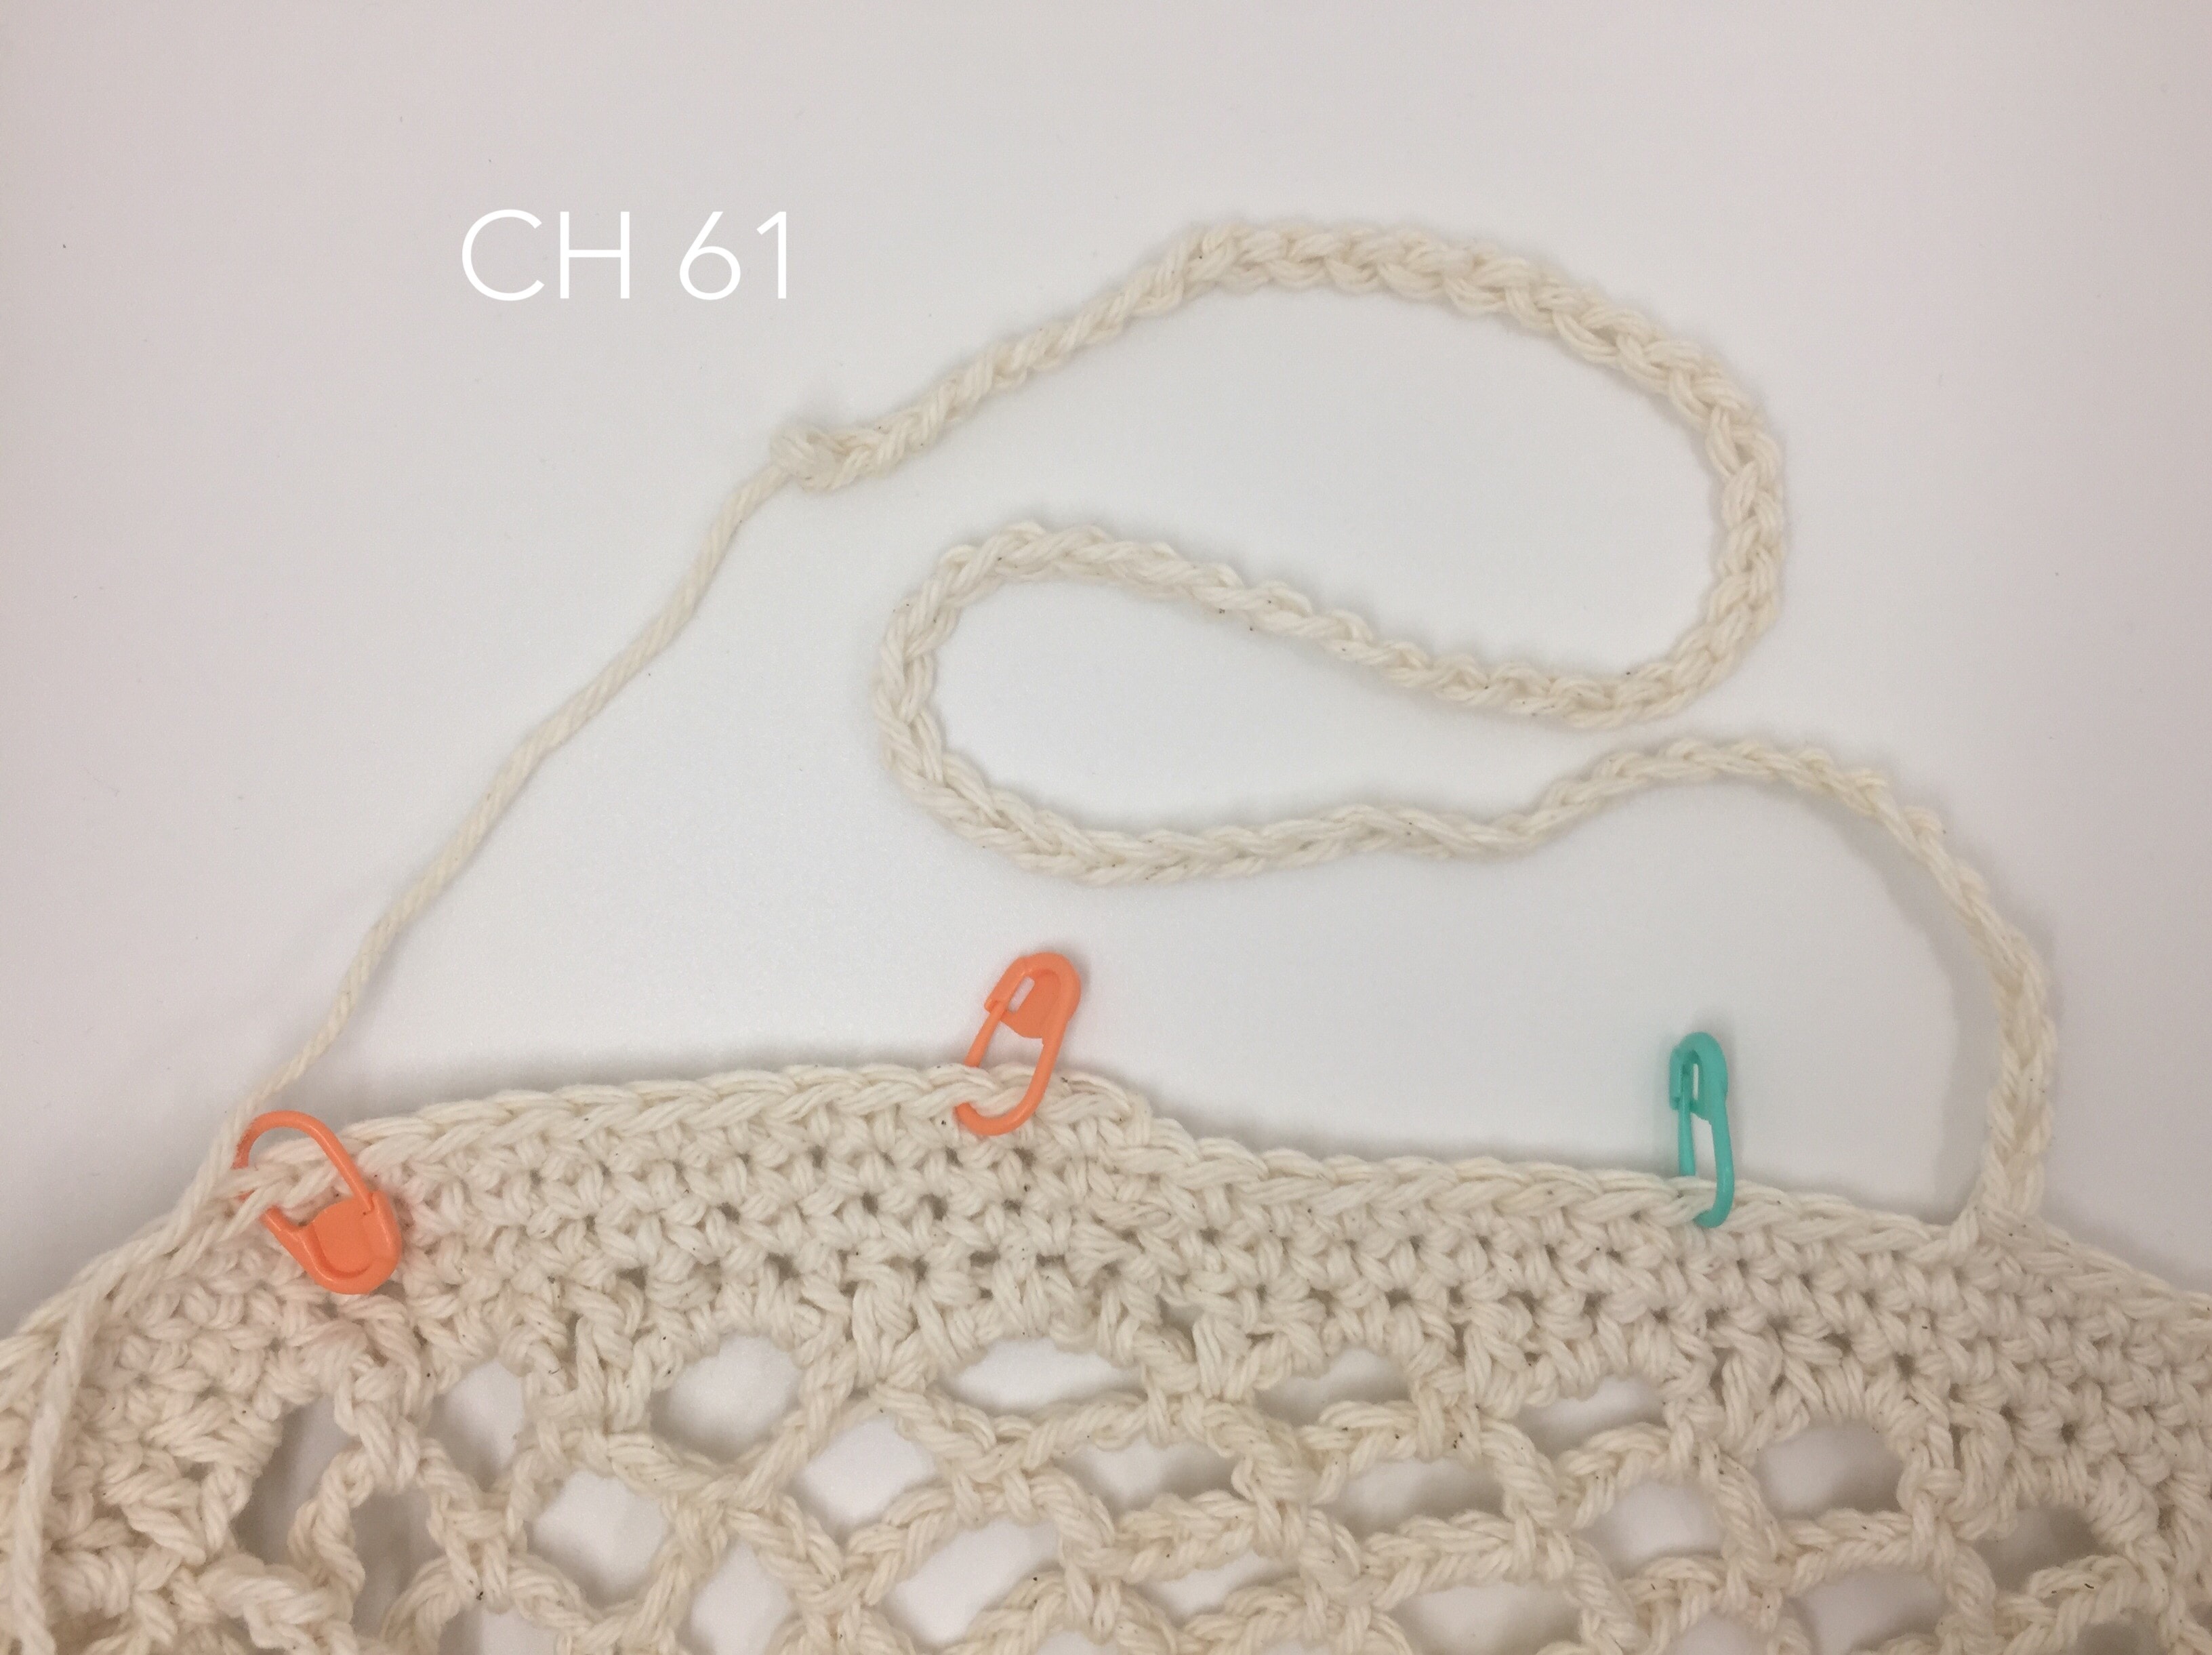
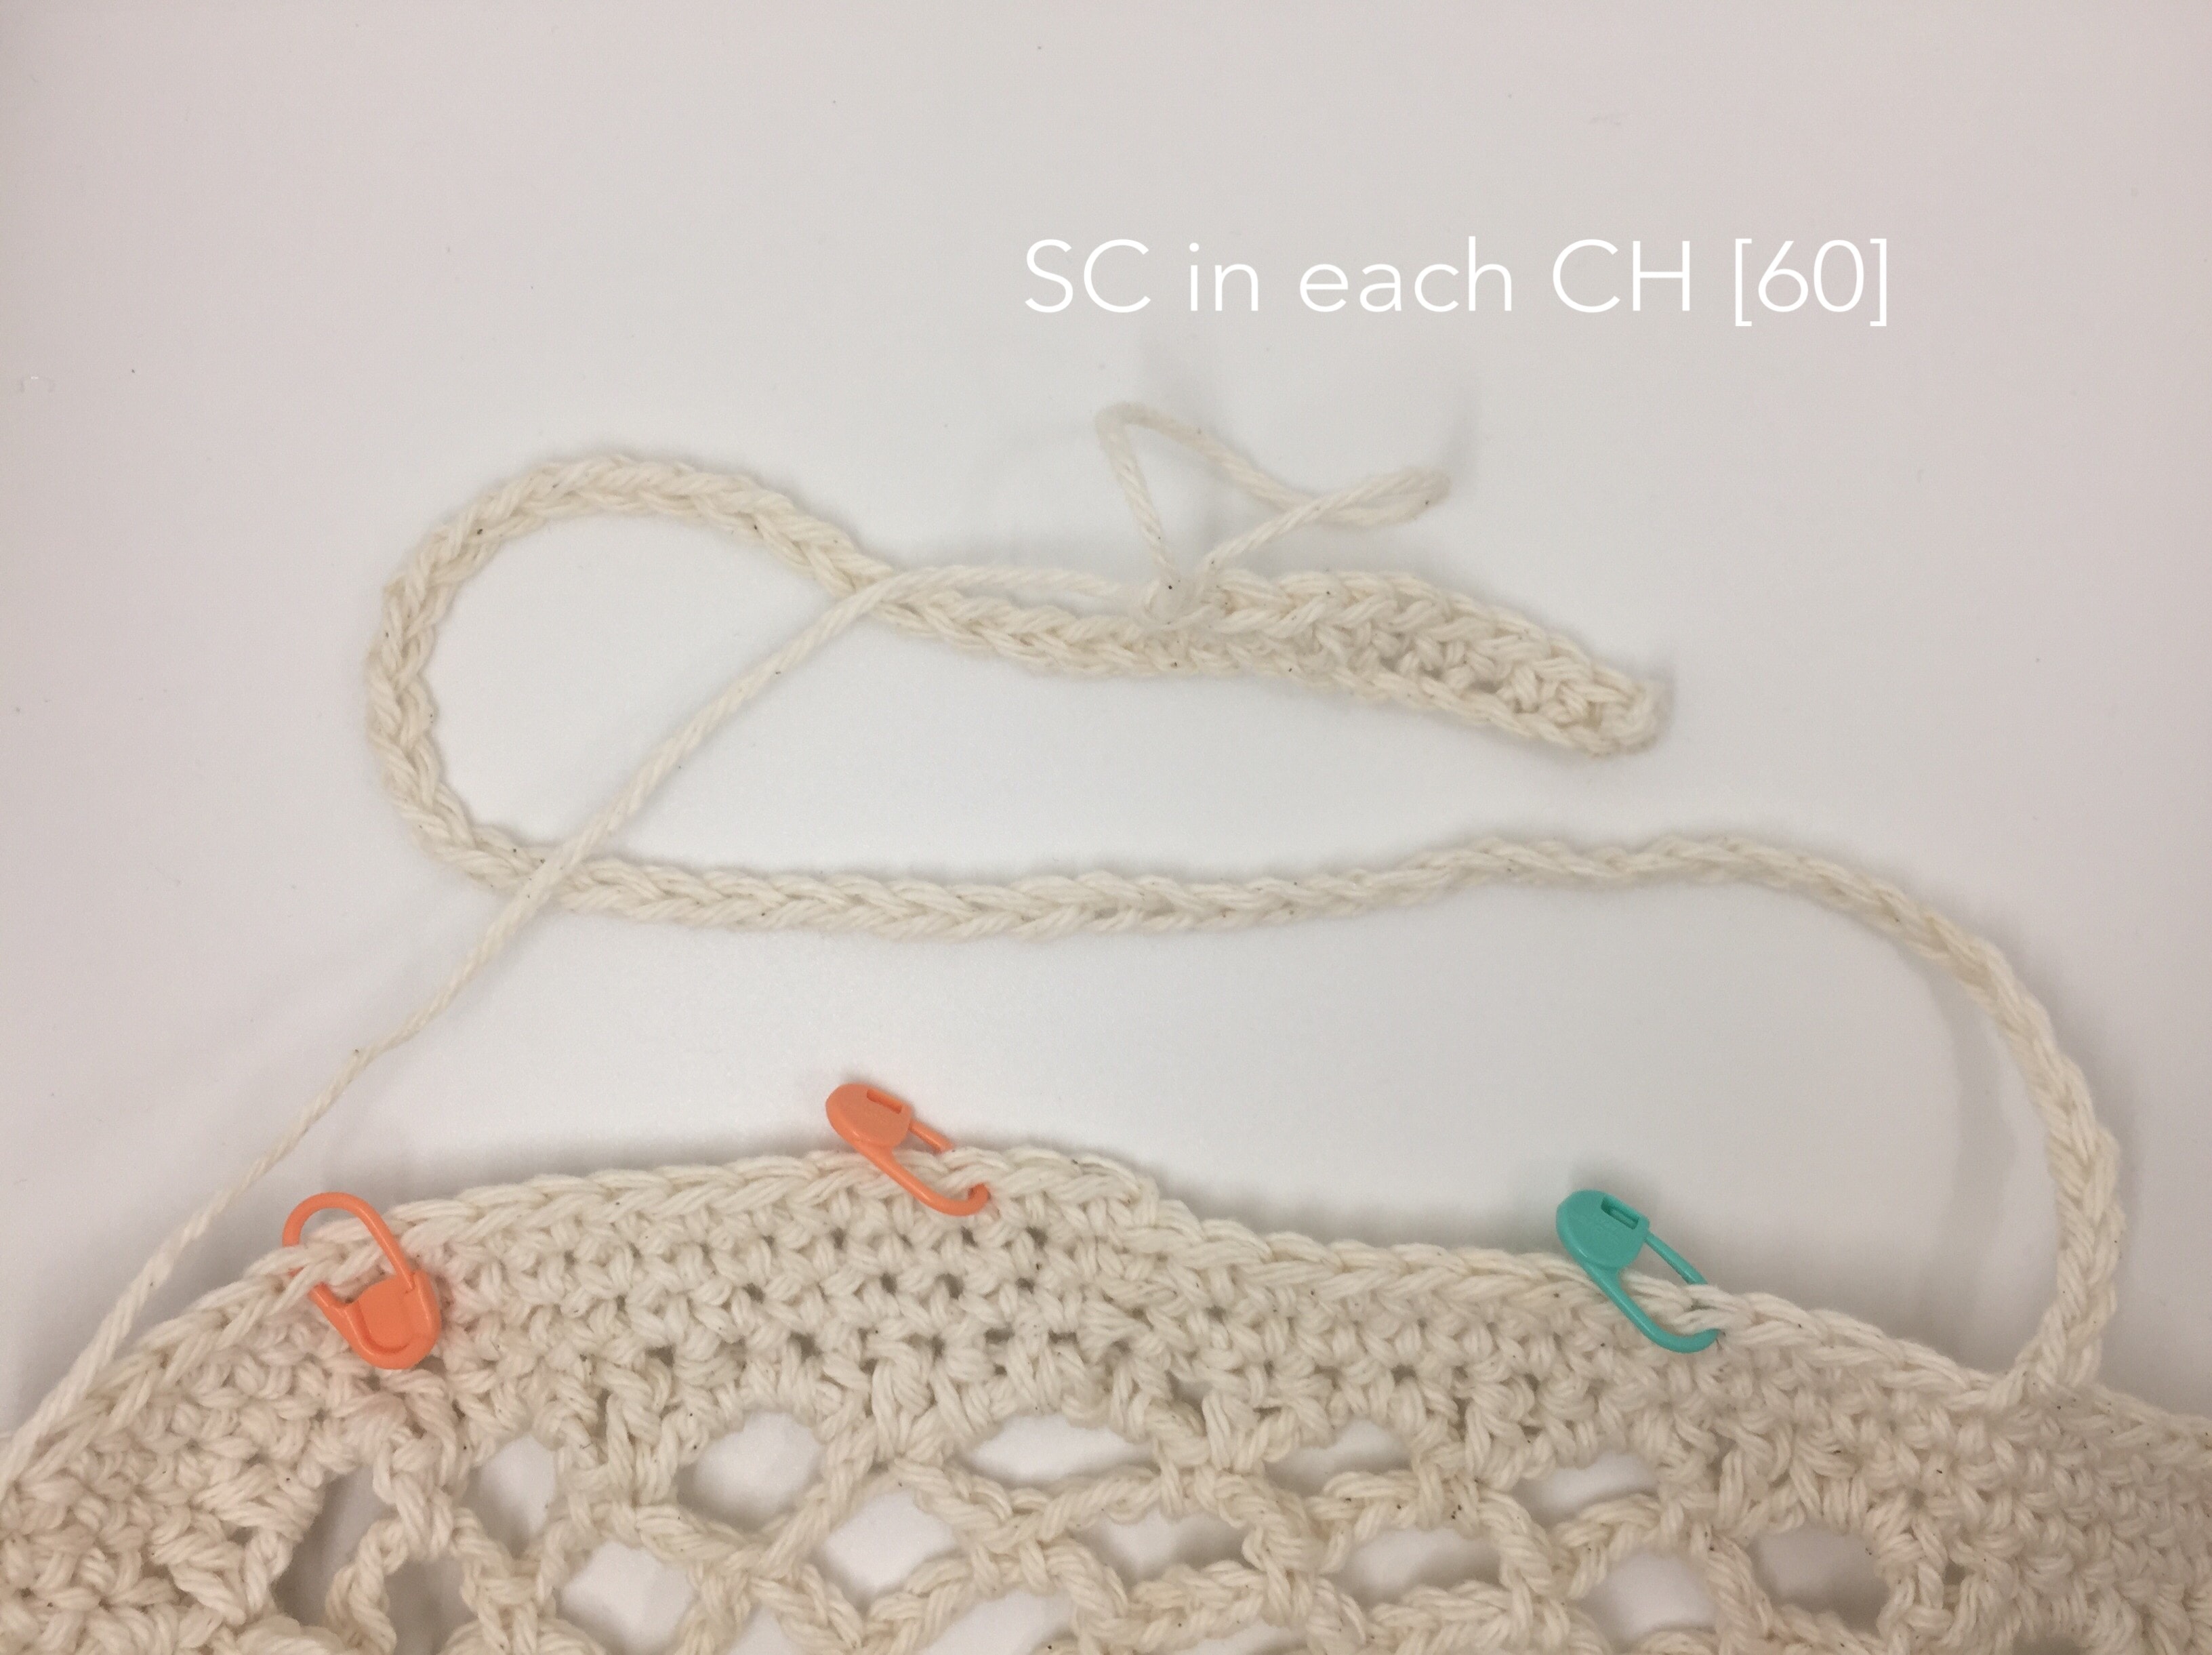
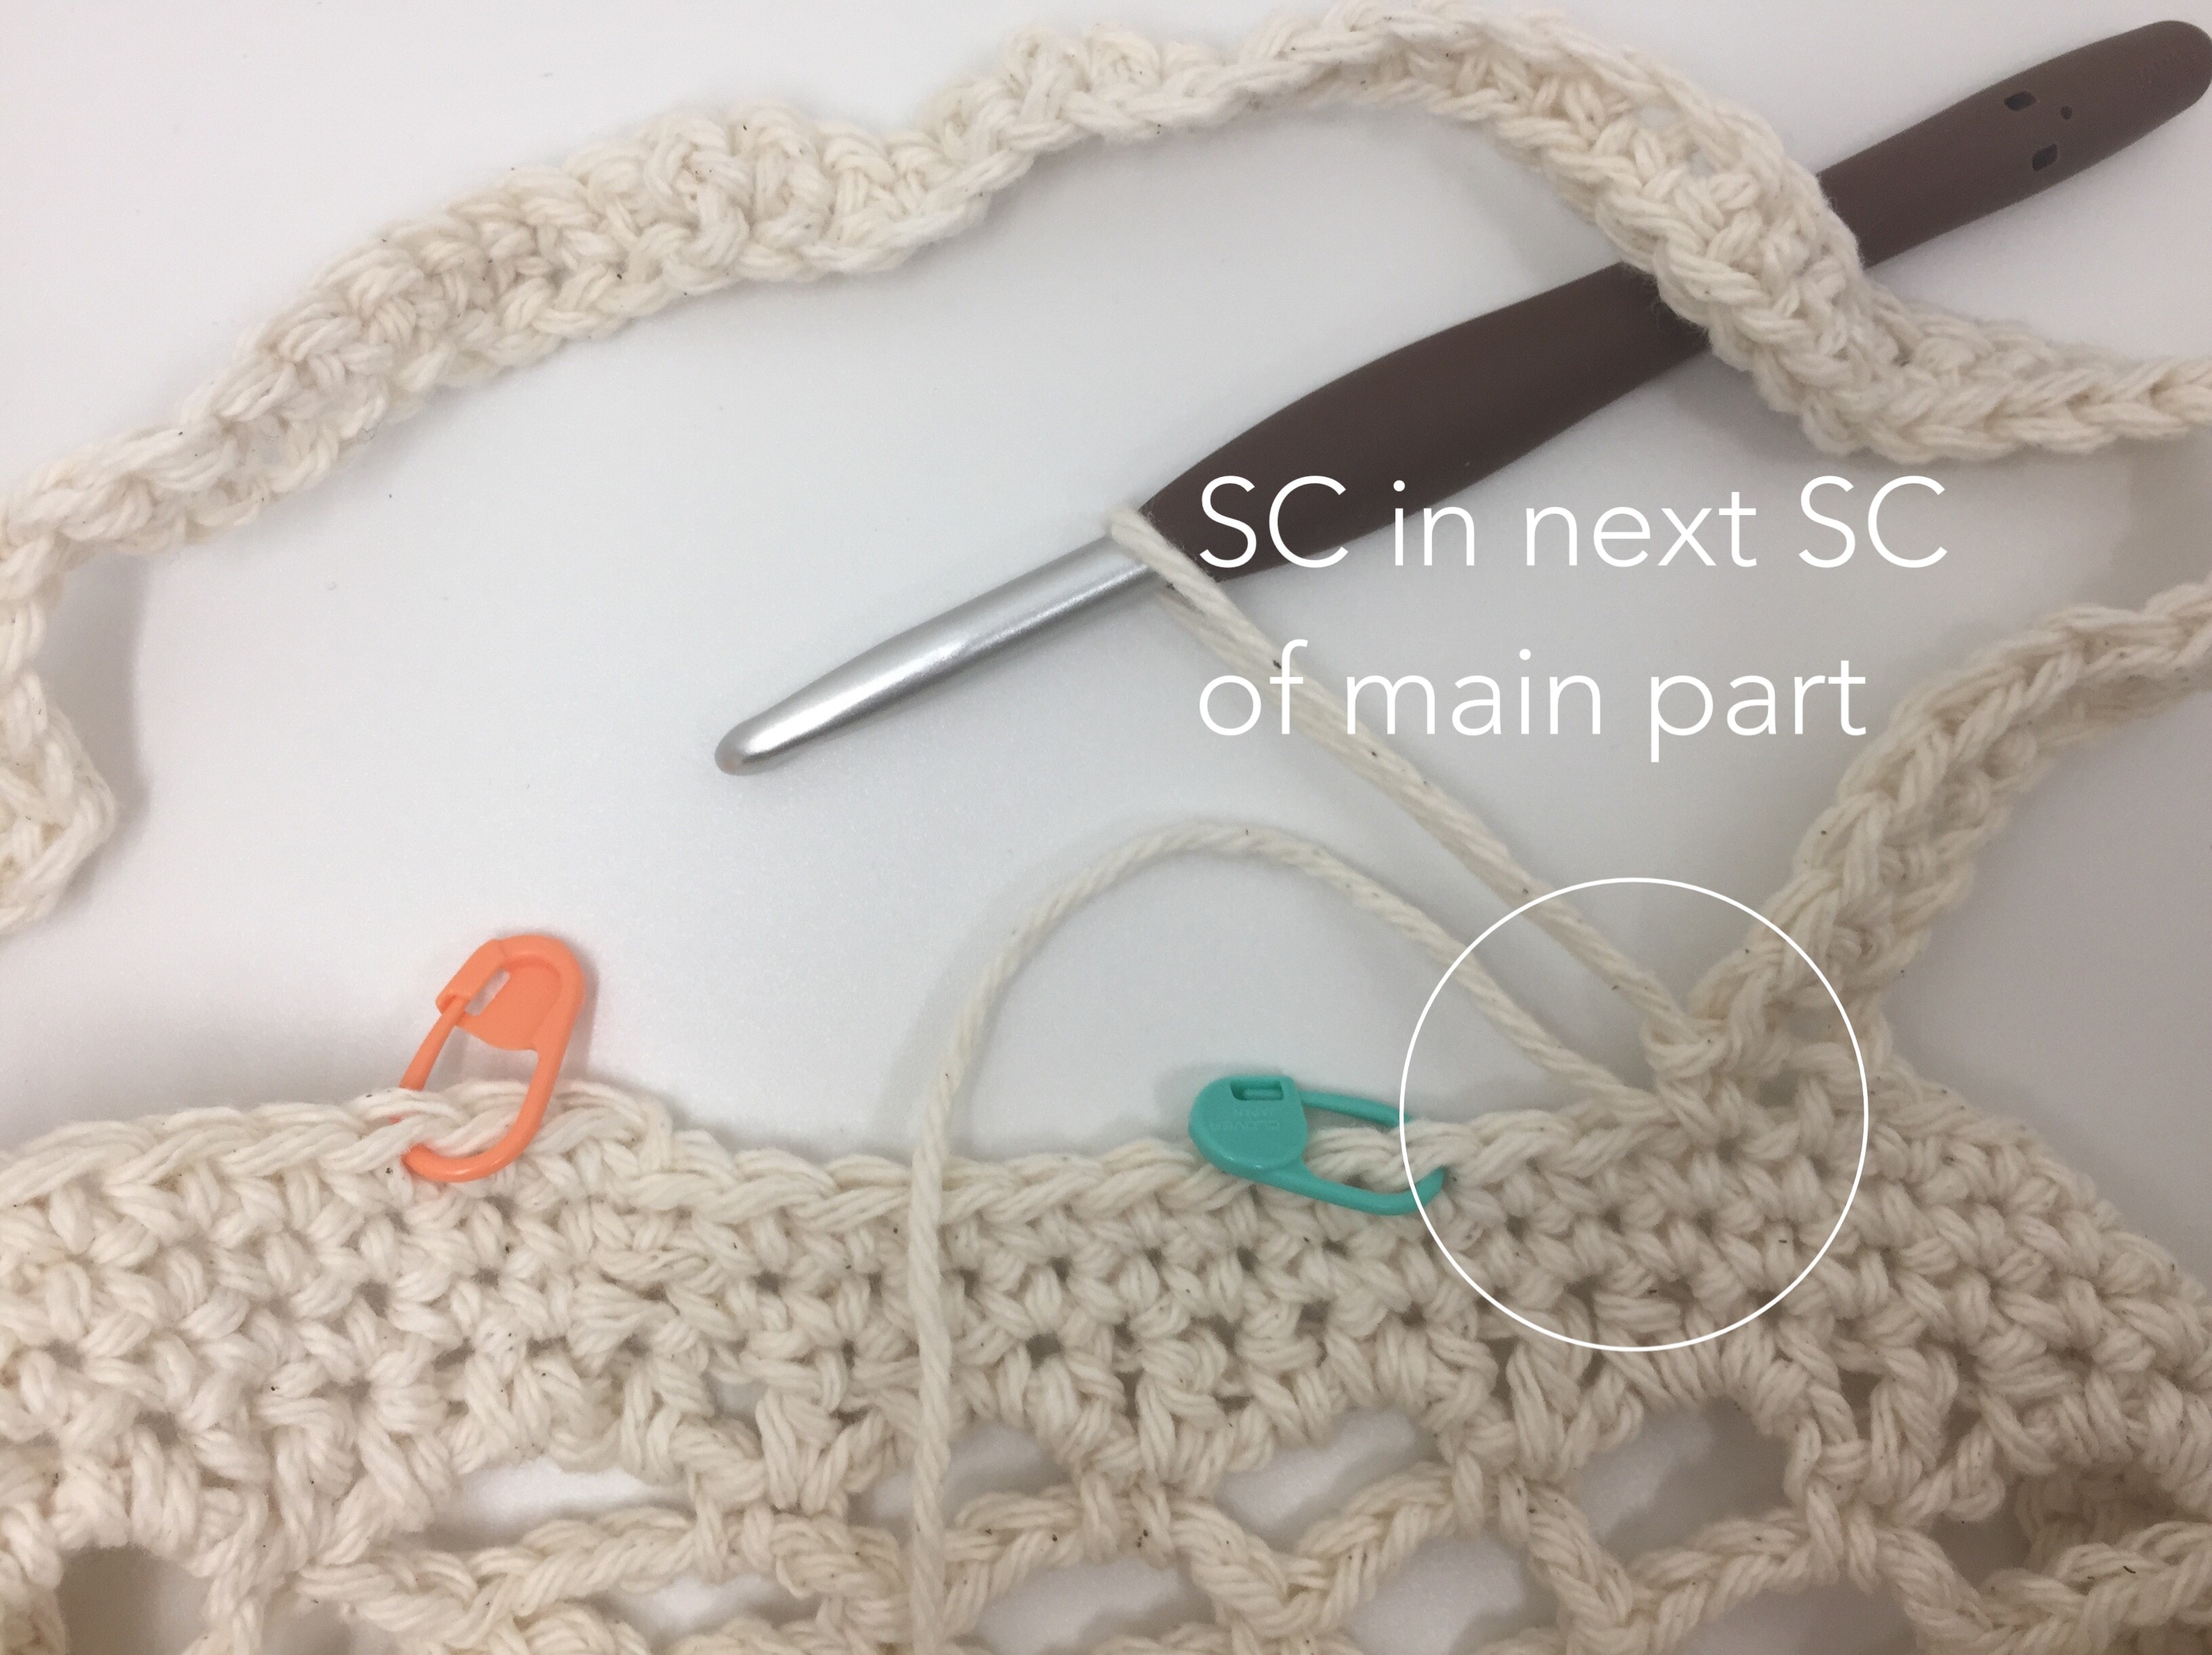
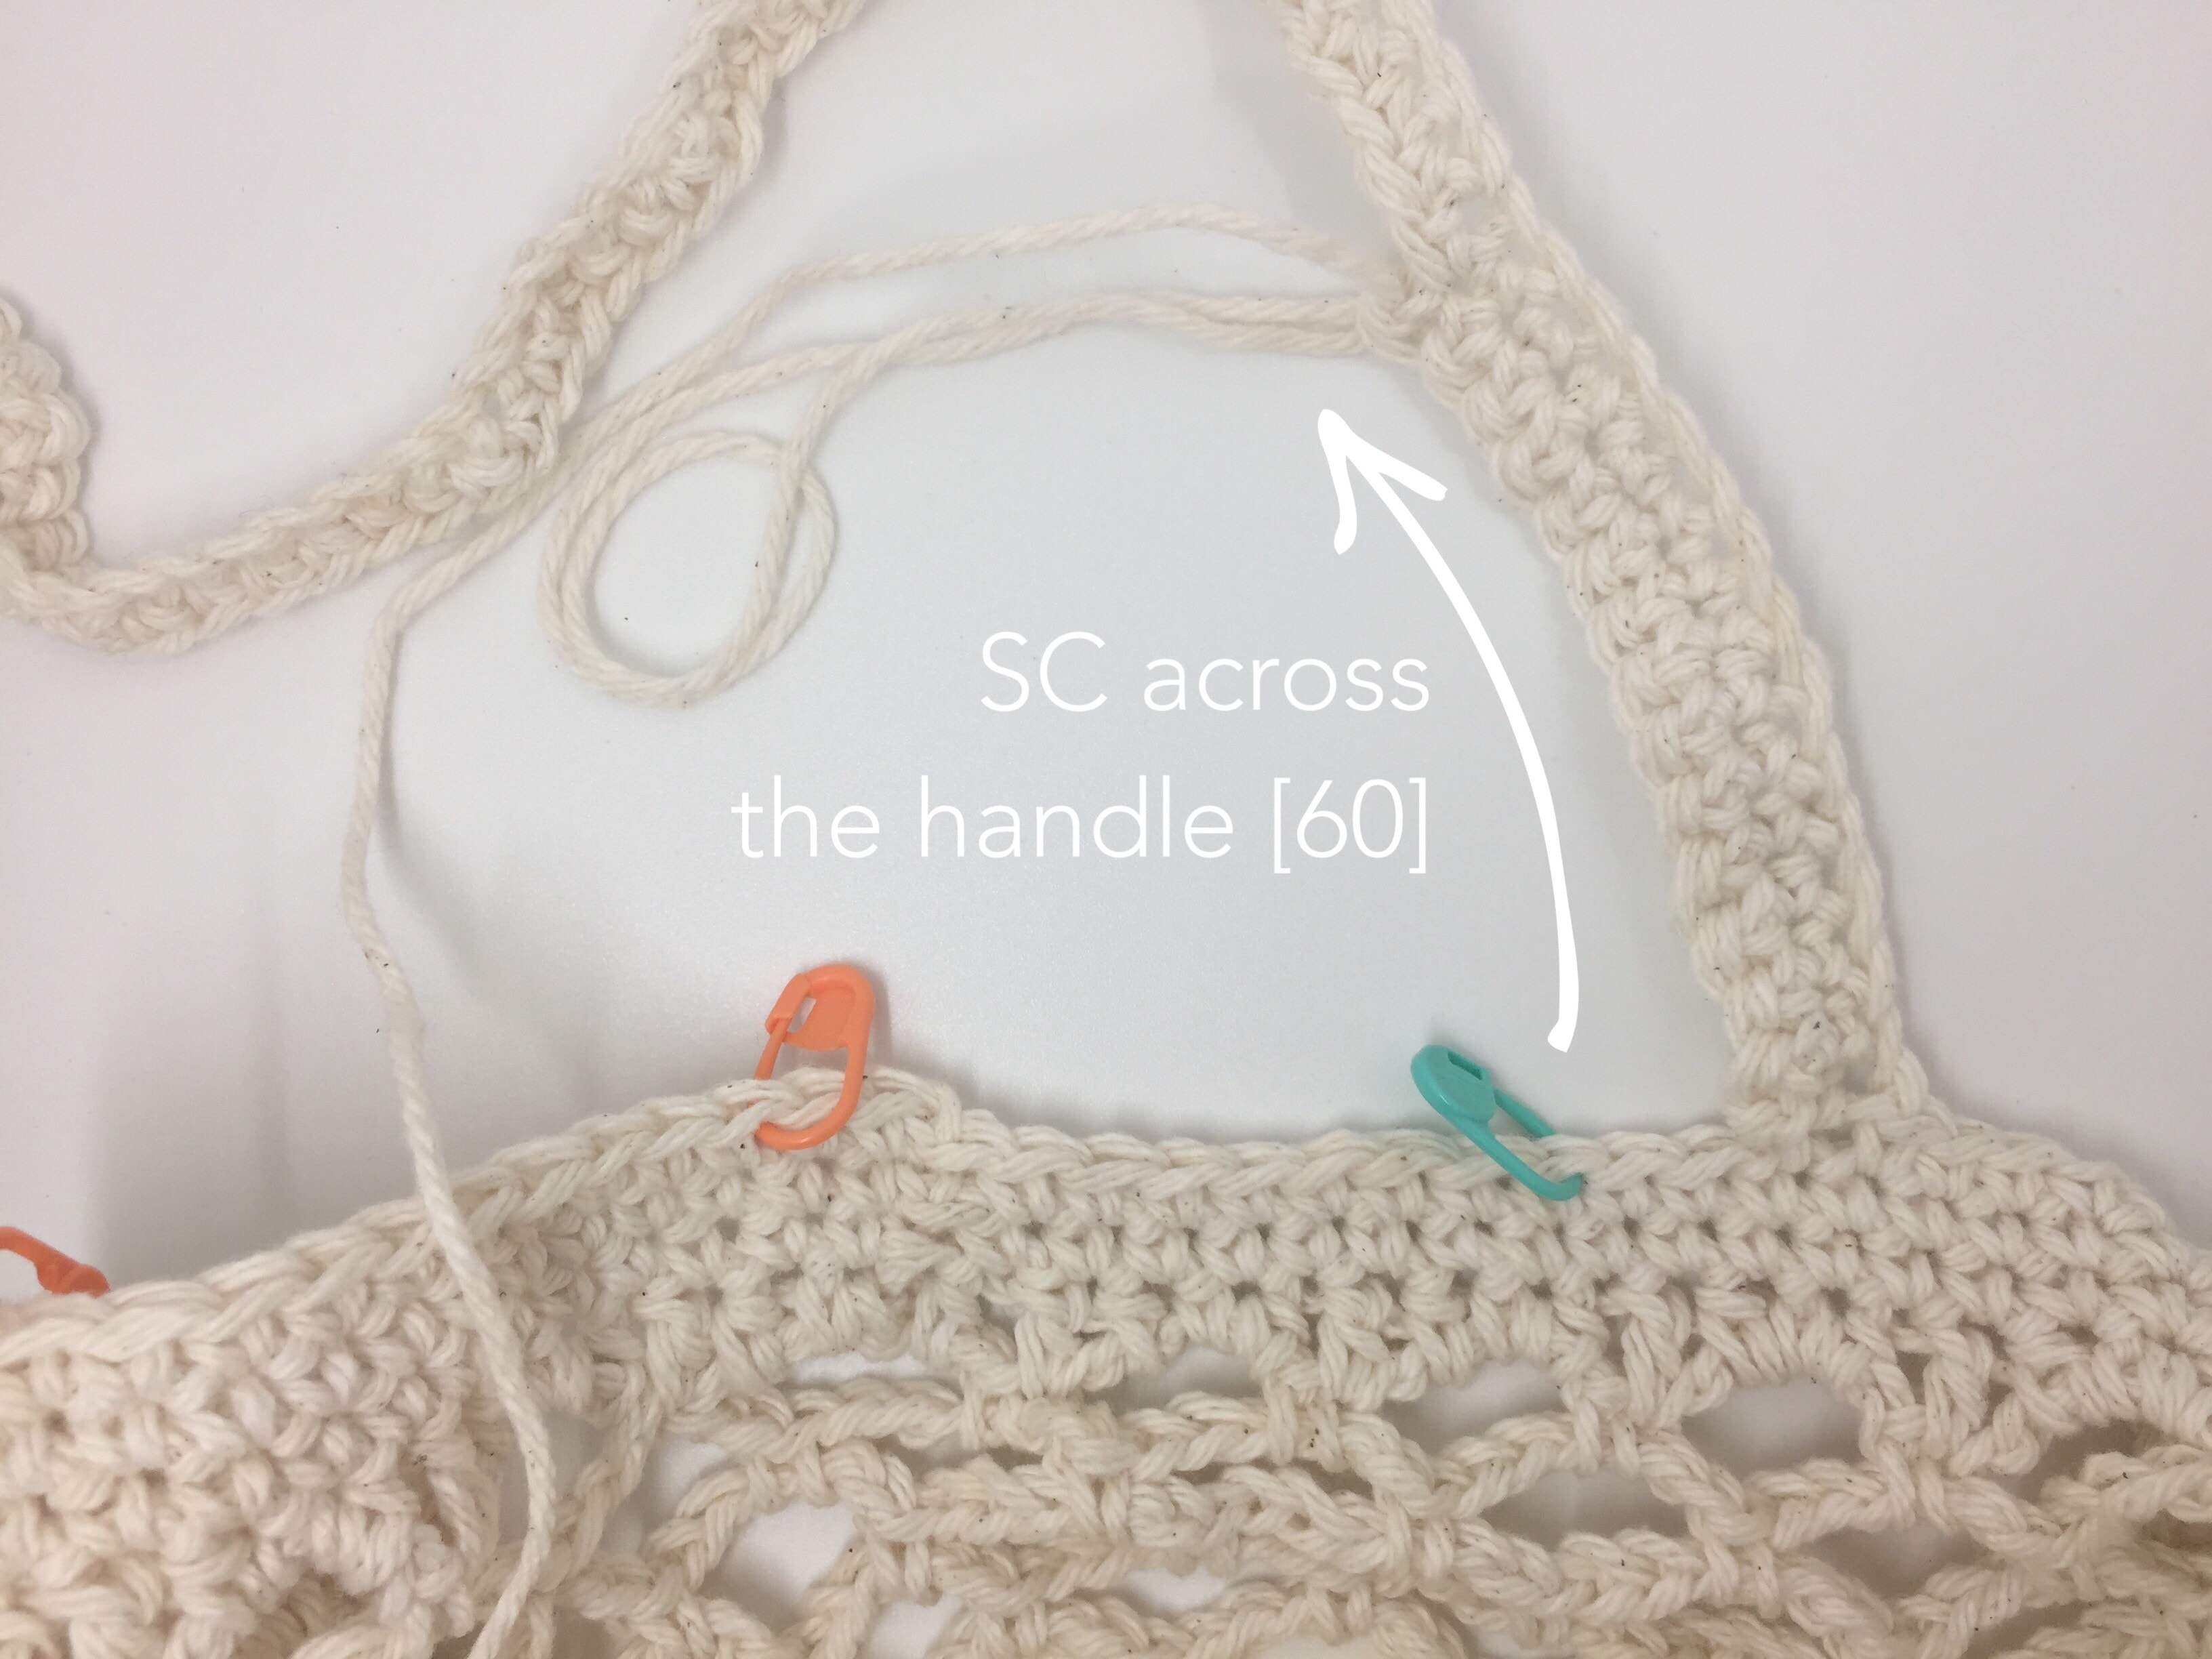
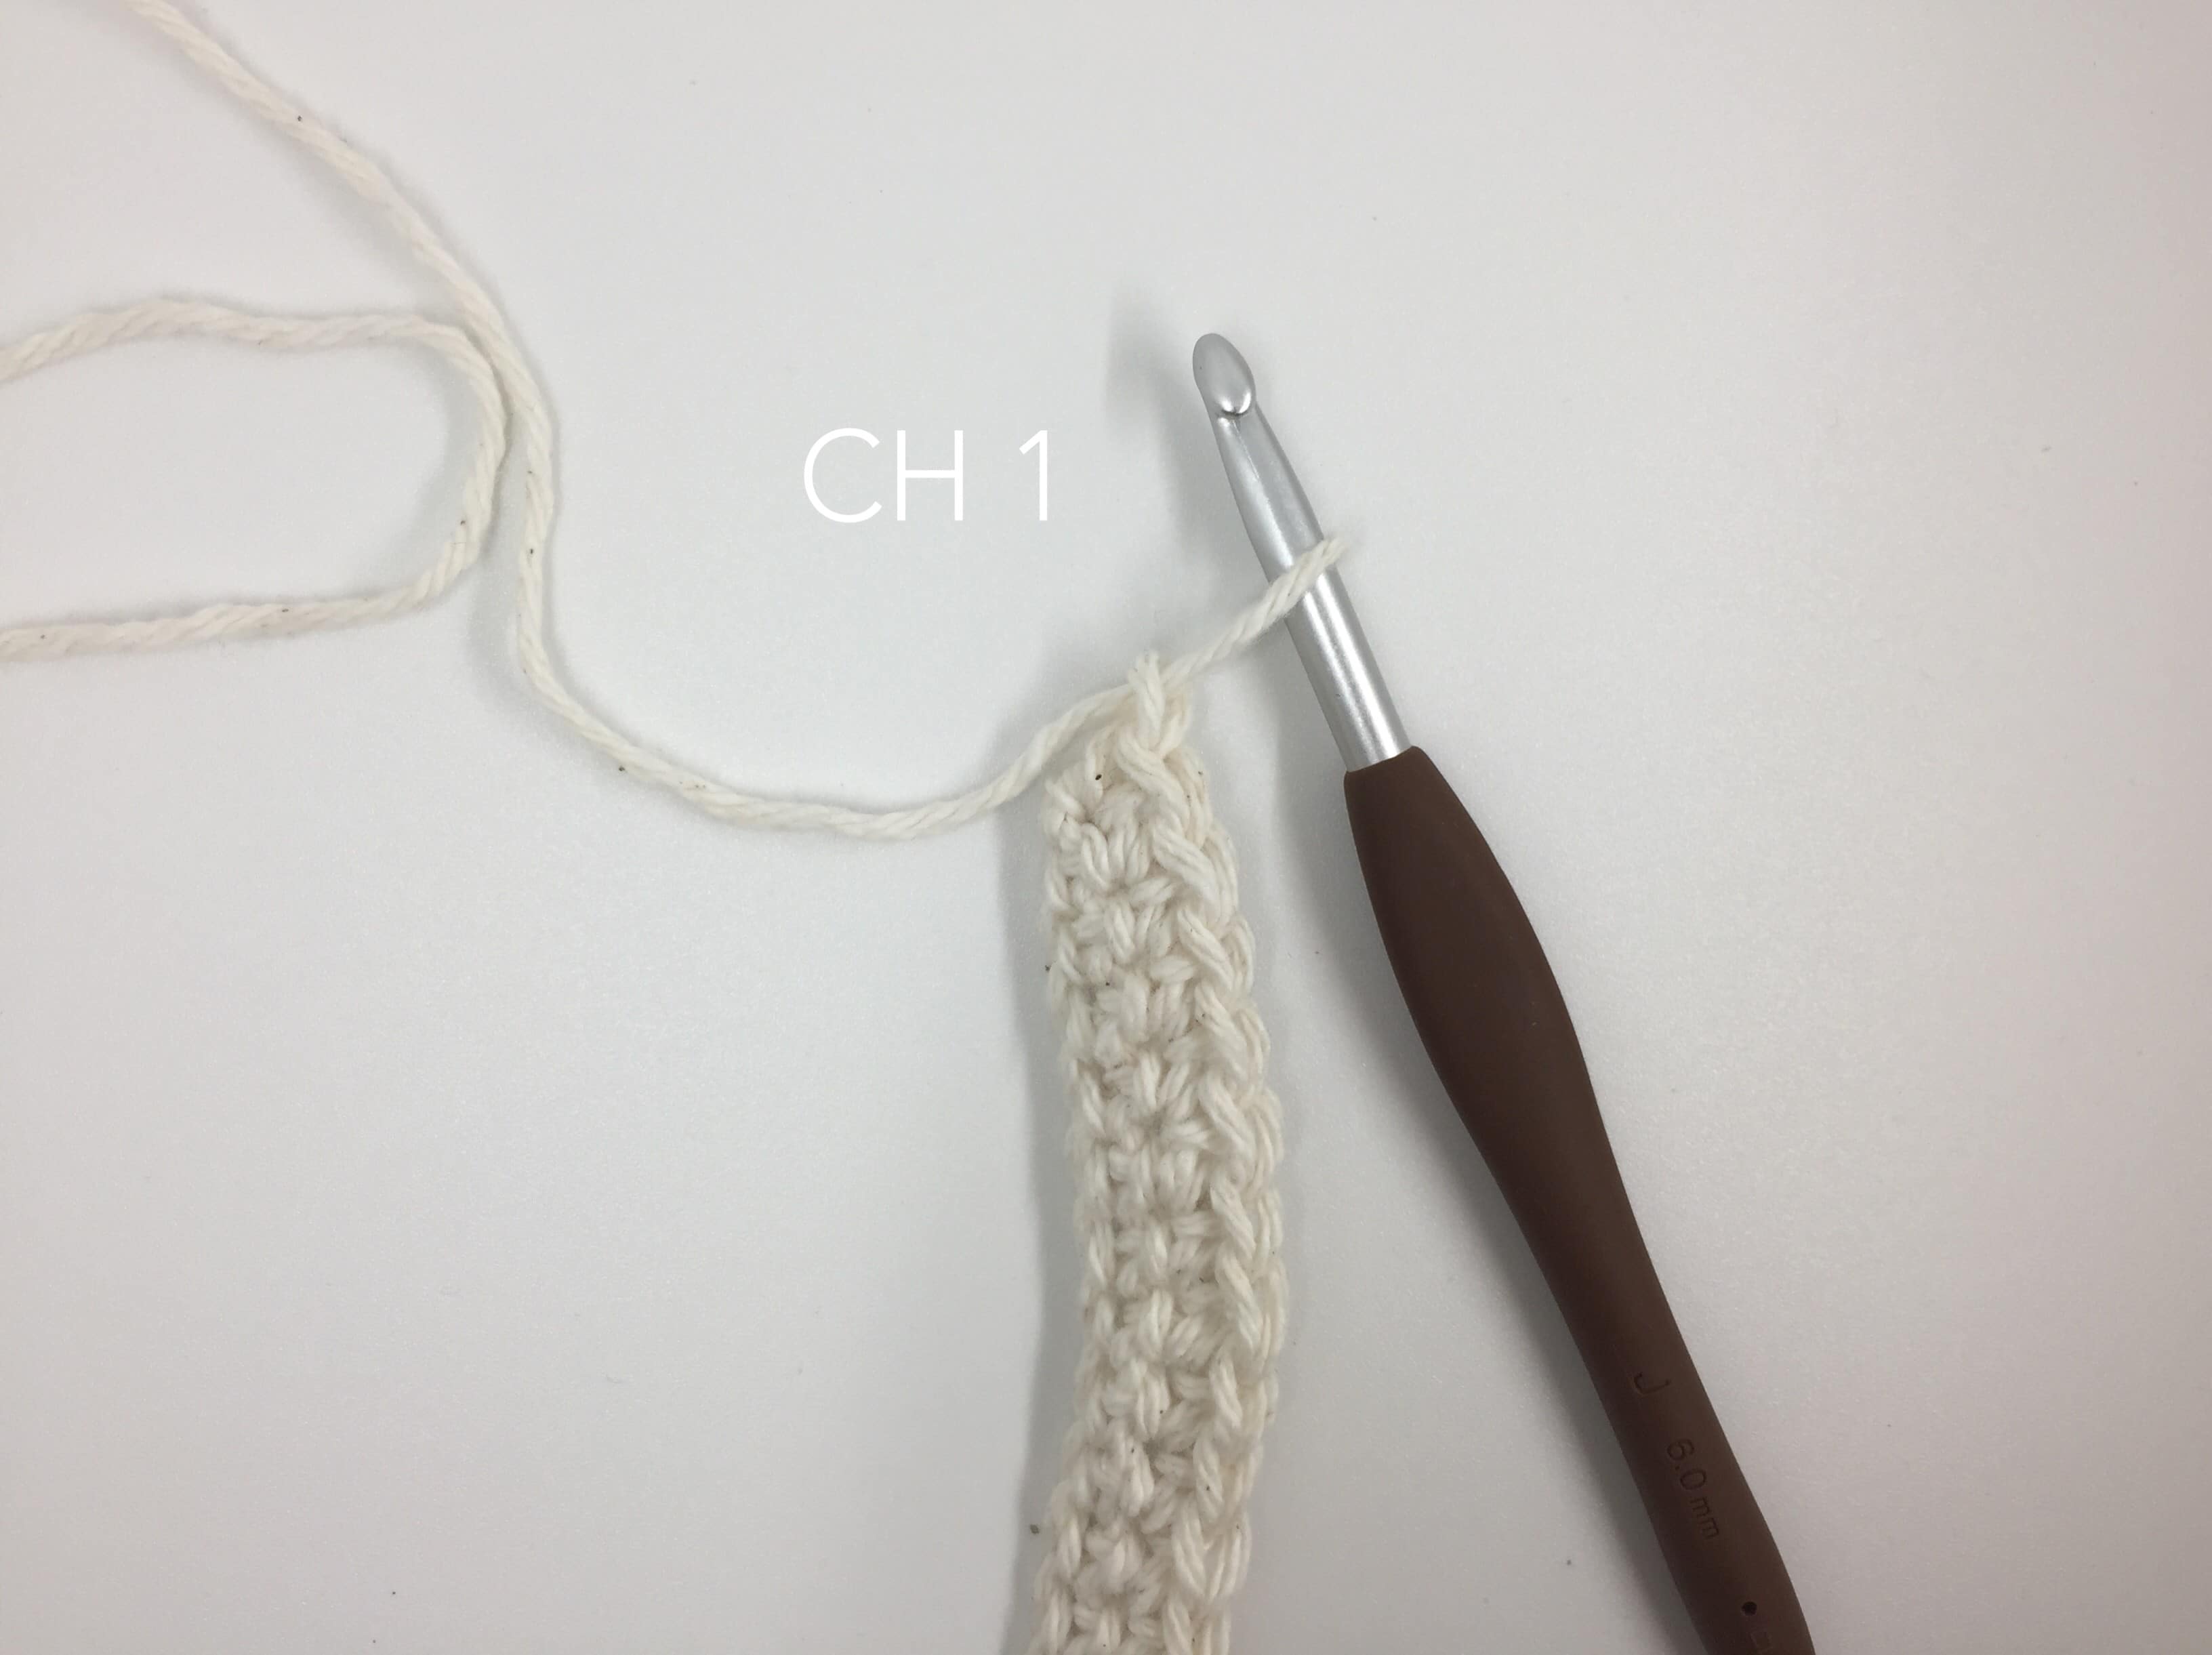
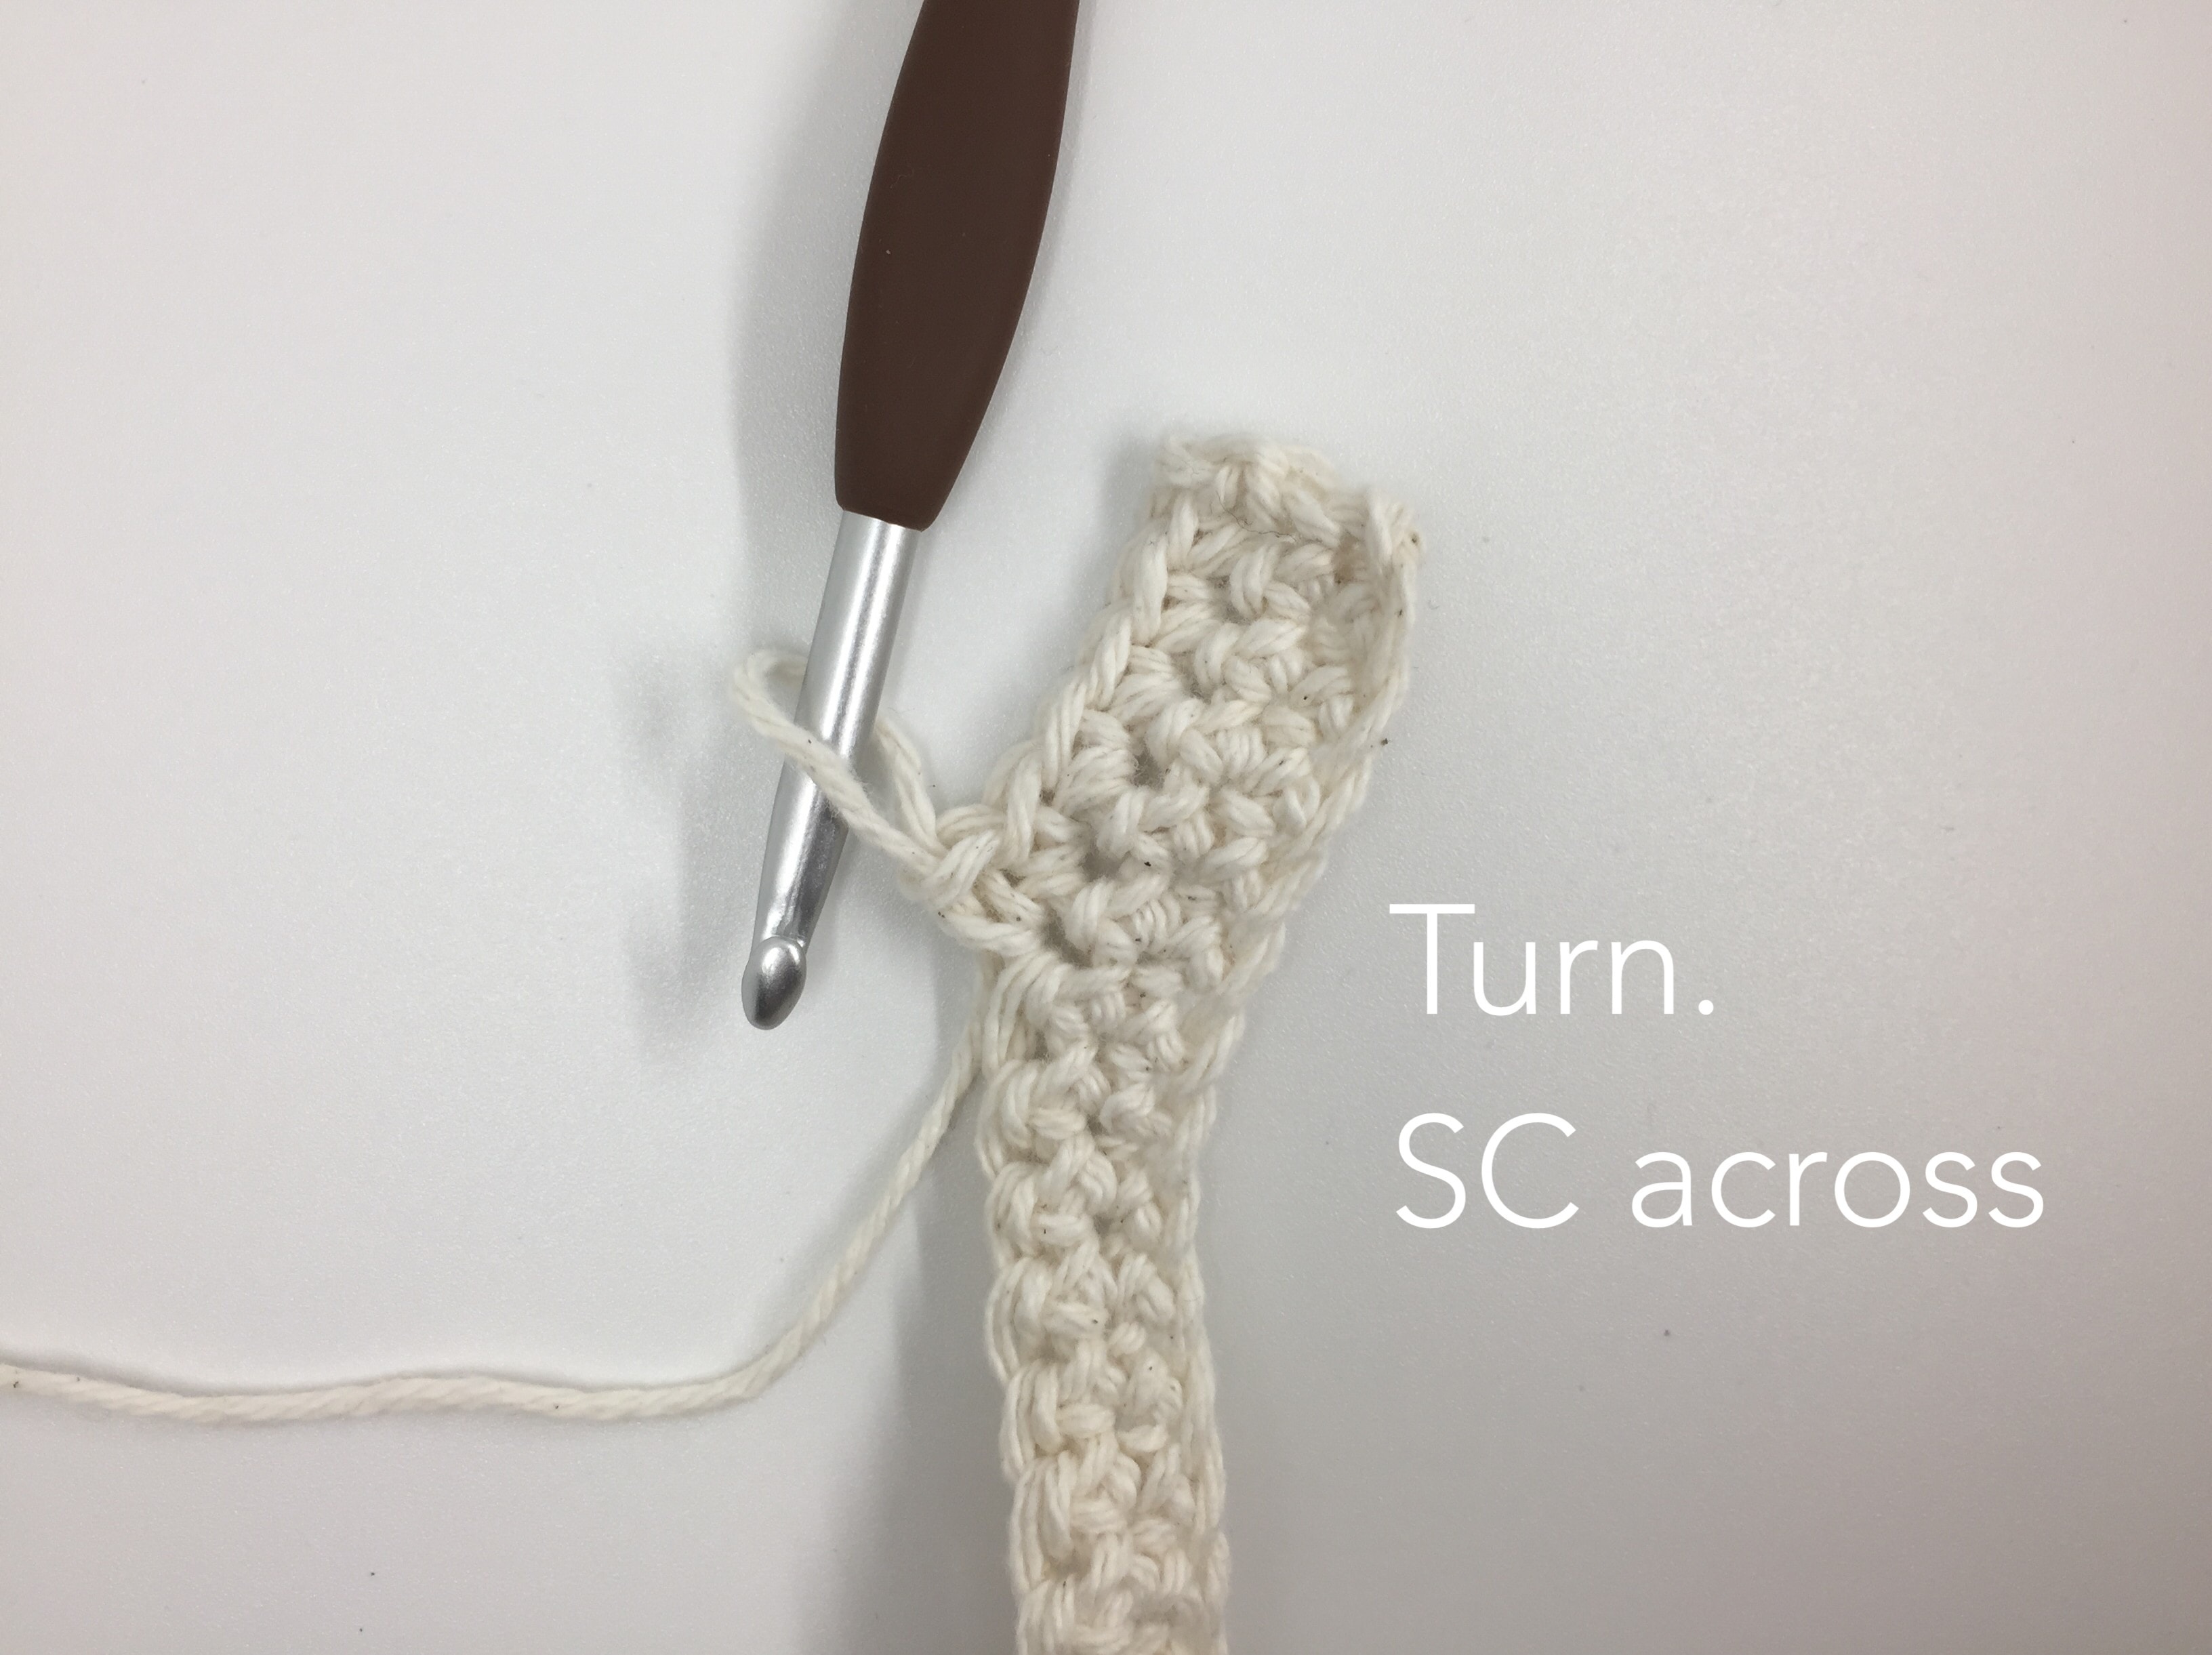
Round 50 – CH 1. SC 109. (Making handles from here. See below for detail photo instructions) CH 61. SC in each CH [60]. (SC in next SC of main part. SC across the handle [60]. CH 1. Turn. SC across)*. Repeat * 1 time. SC in next SC of main part. SC 8. SL ST BLO to the first SC.
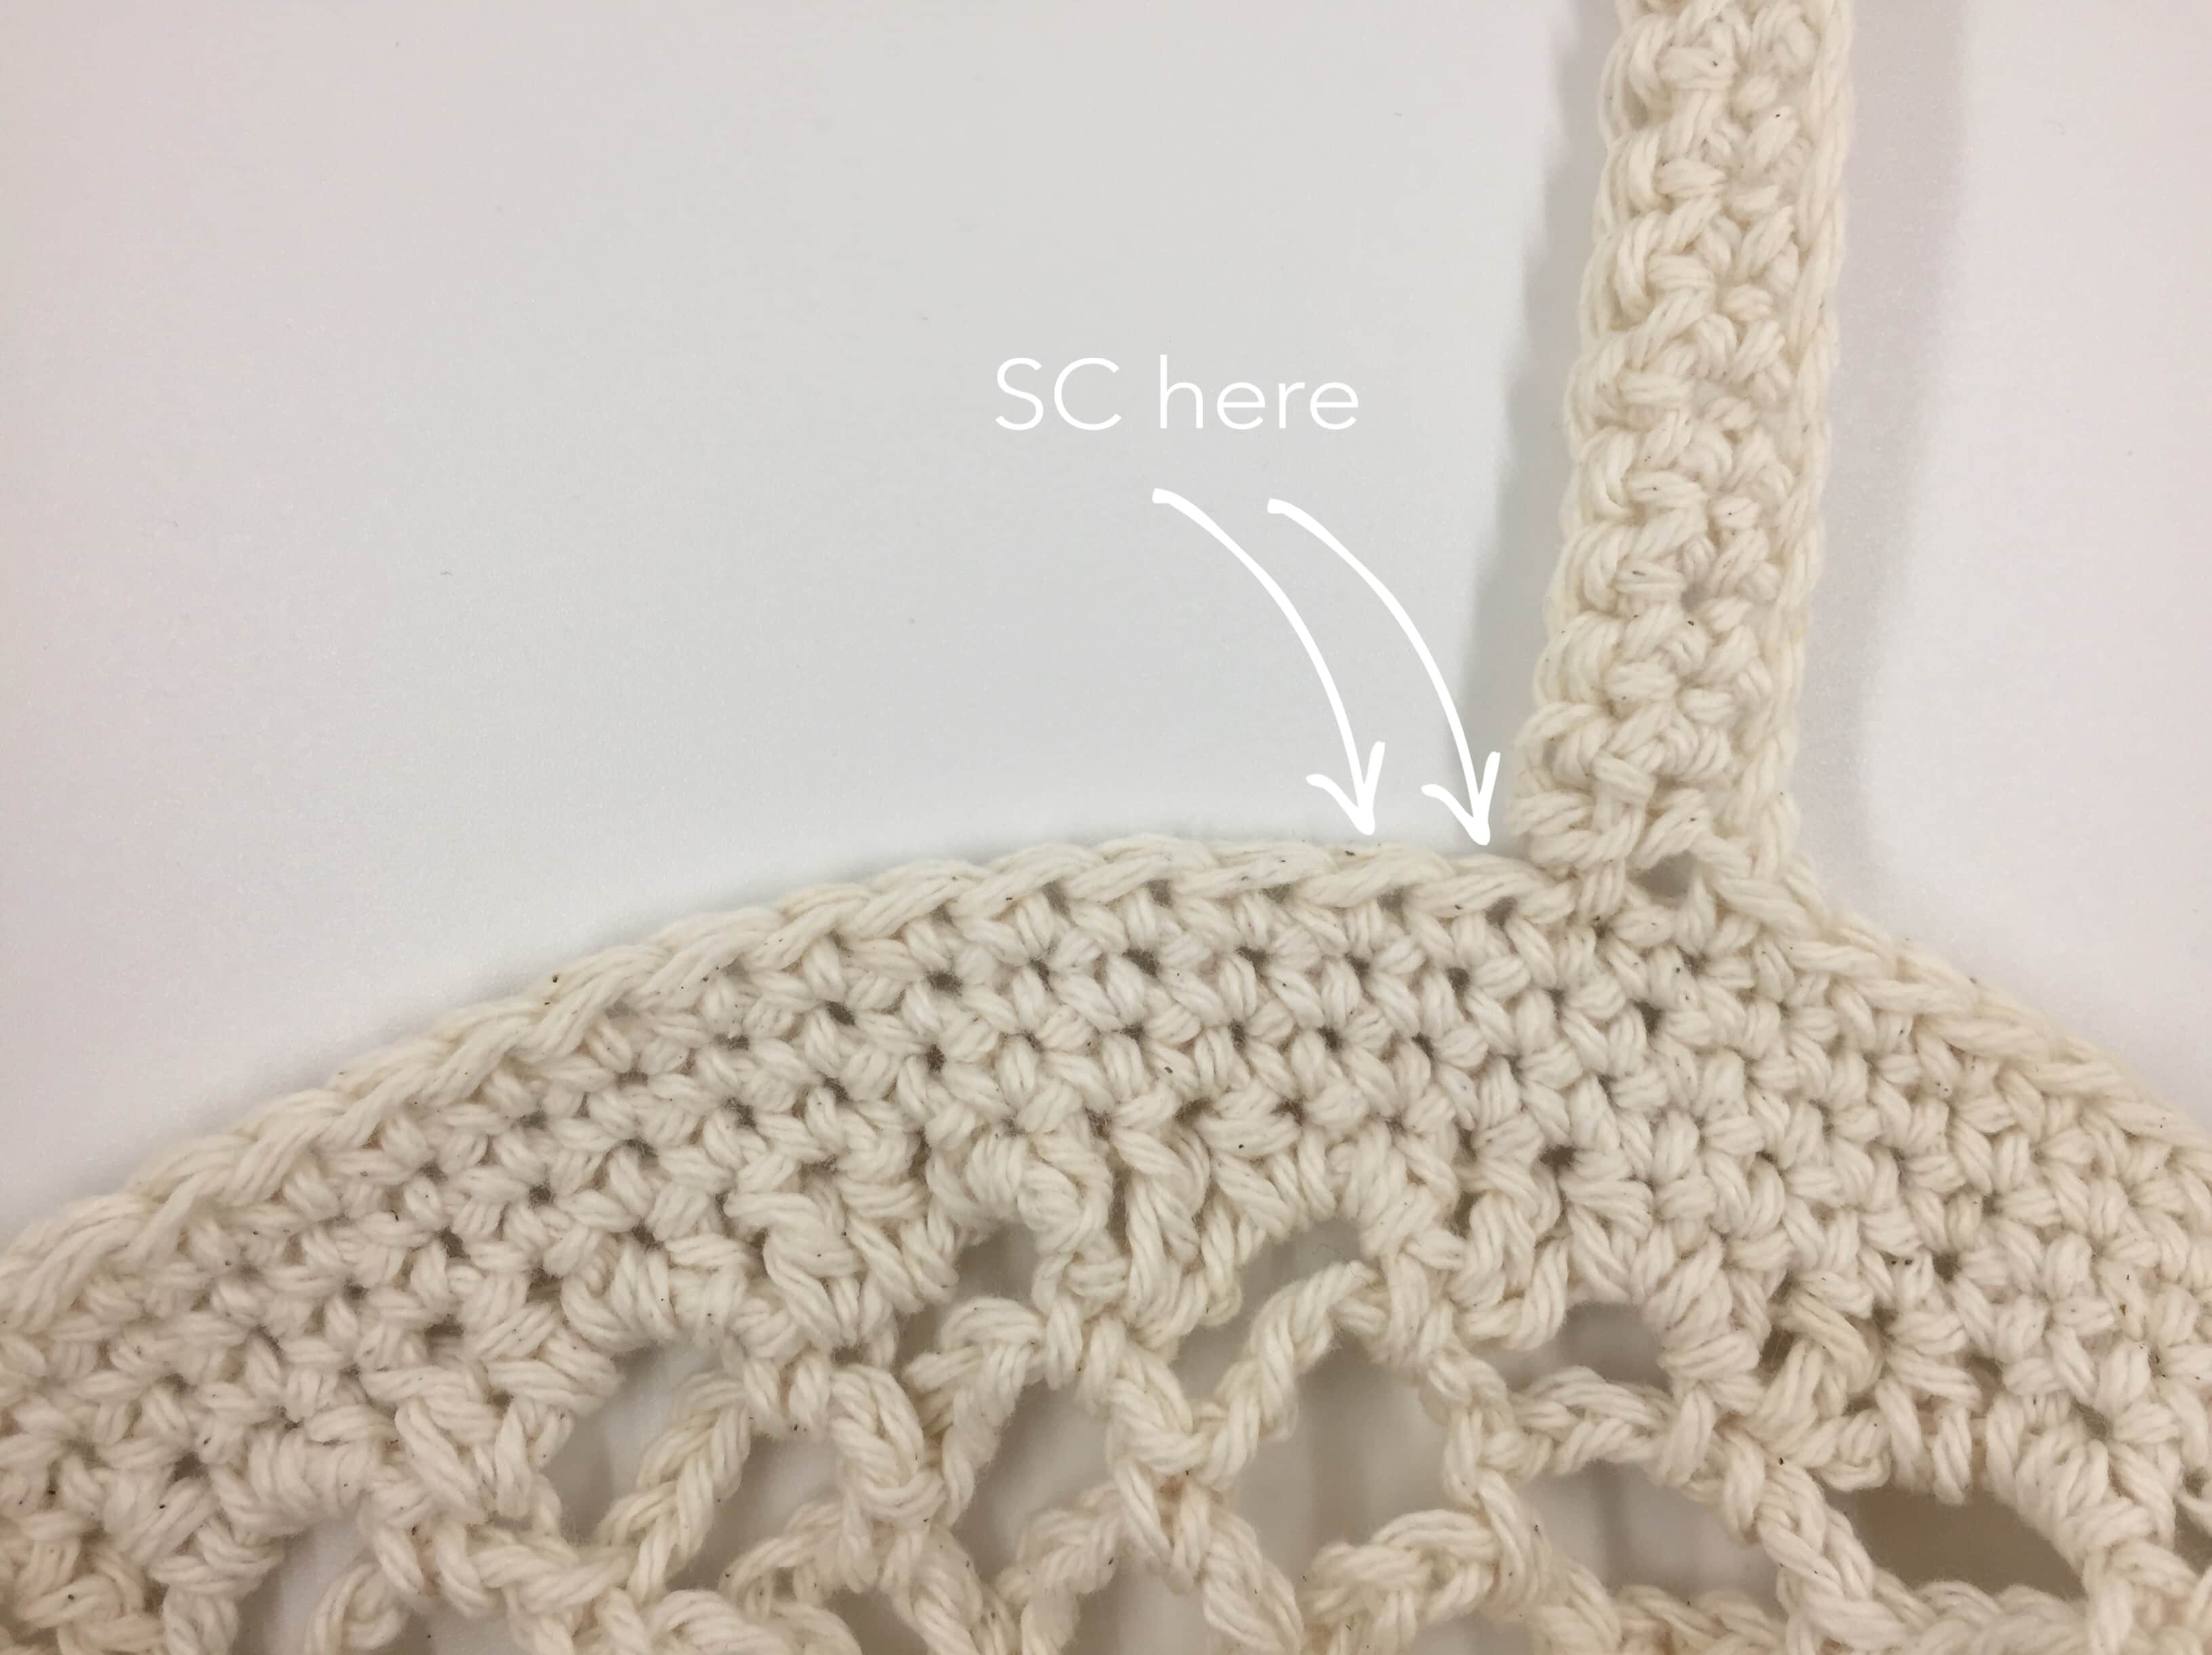

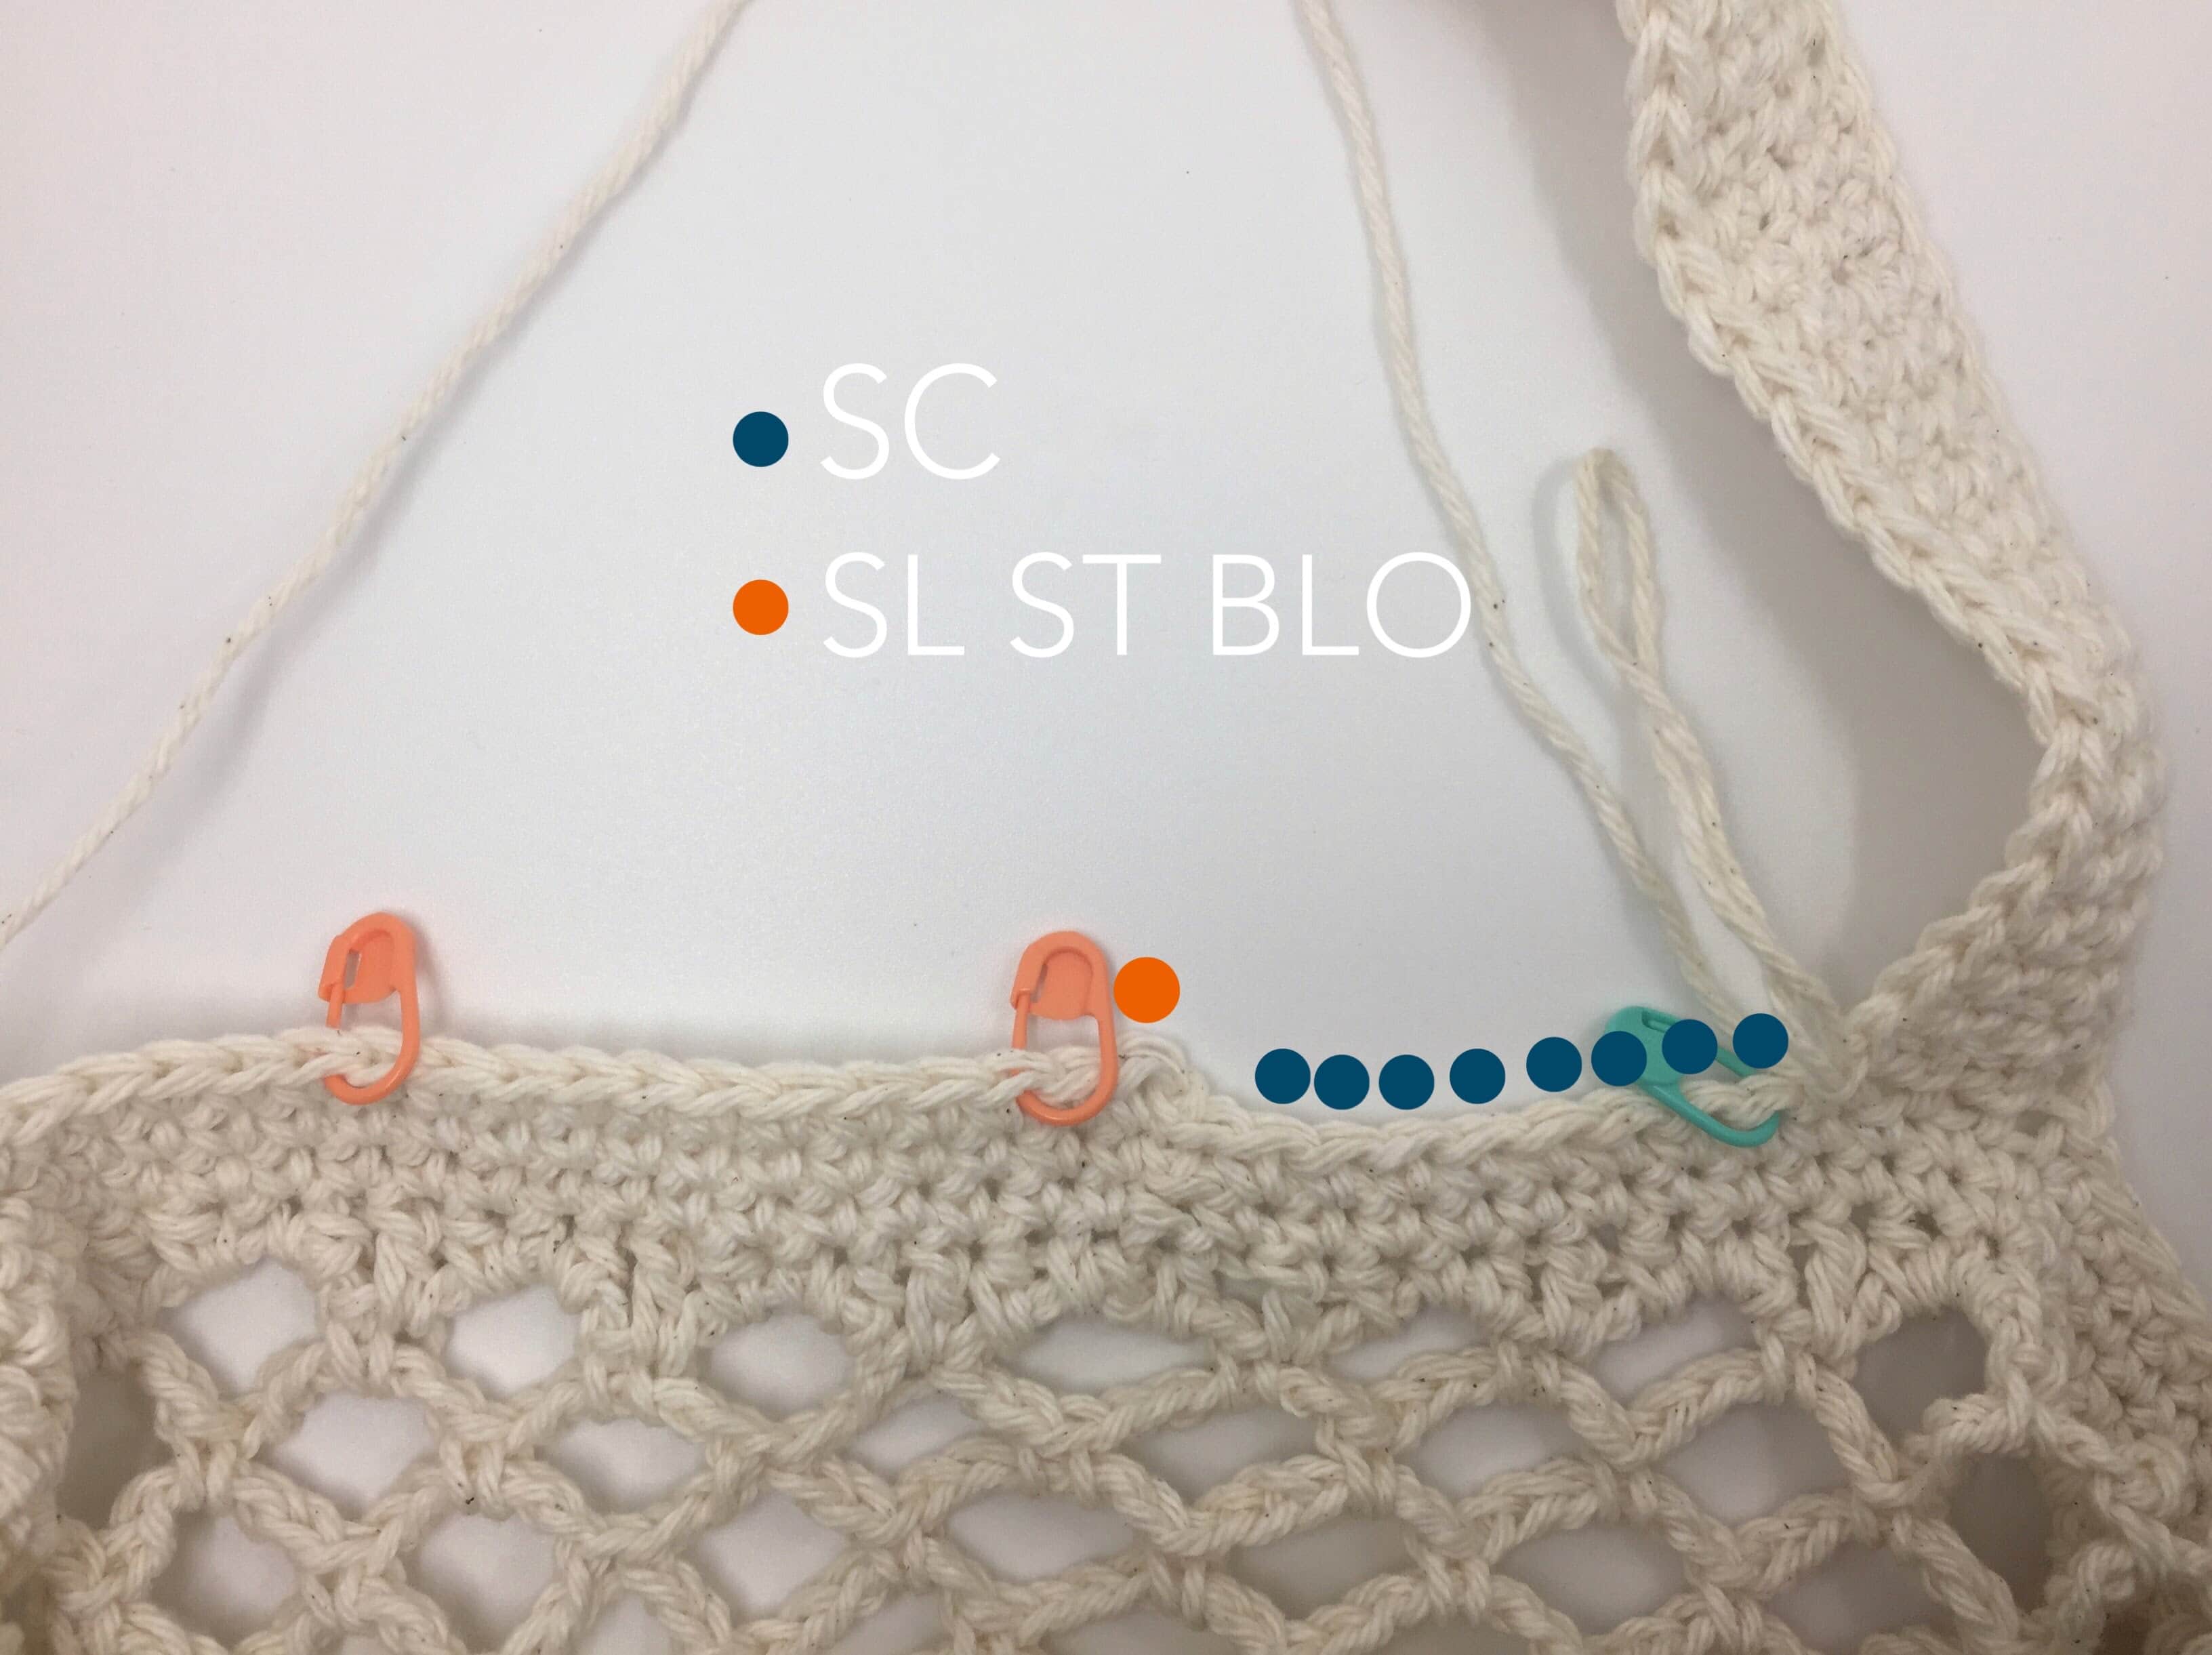
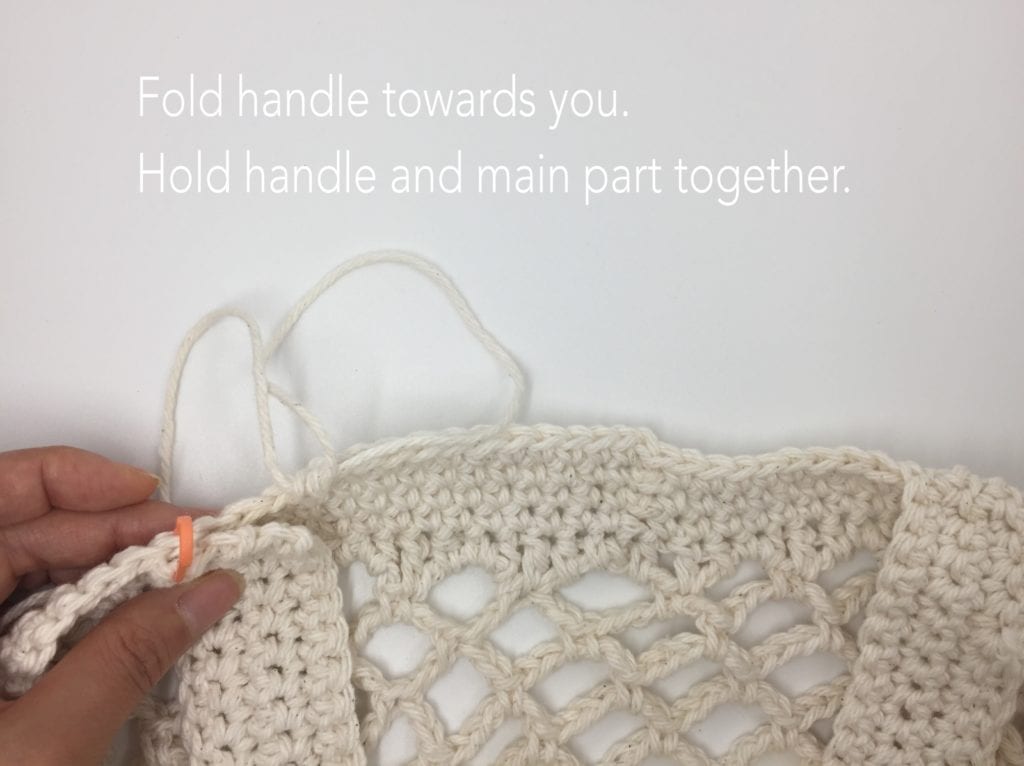
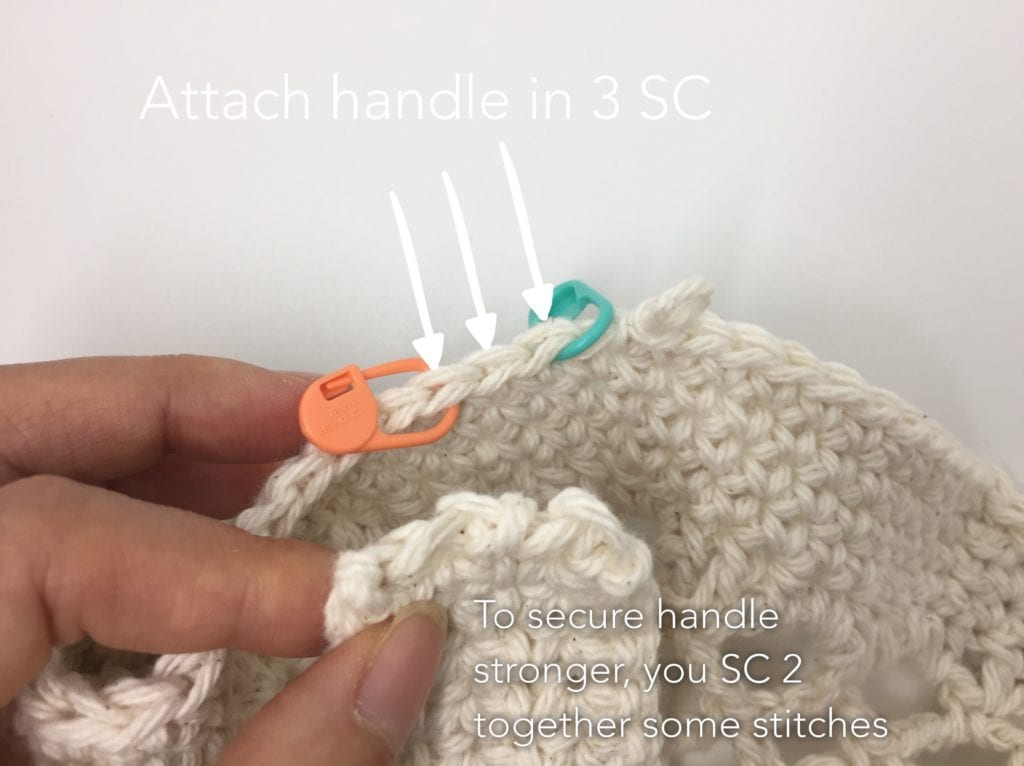
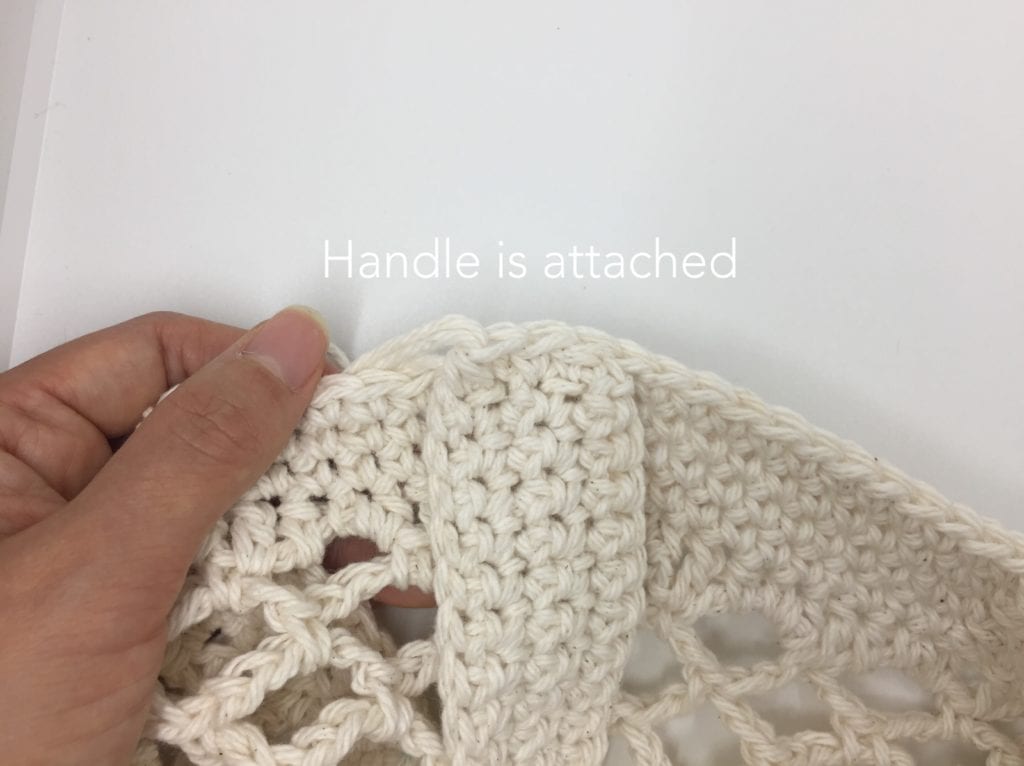
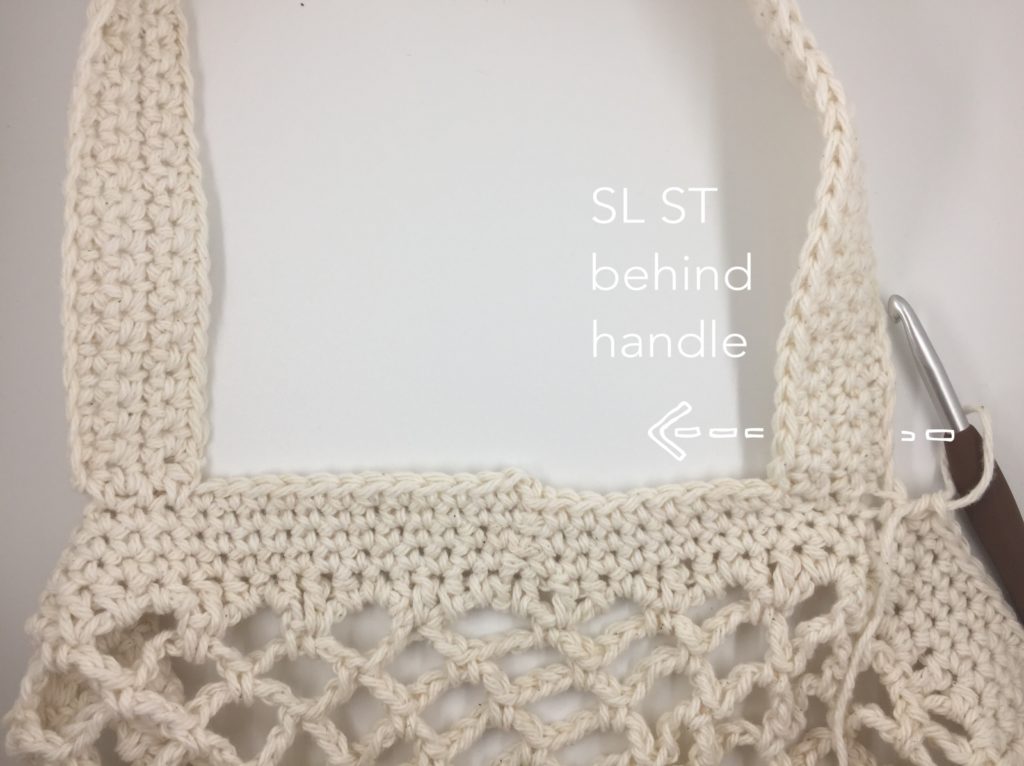
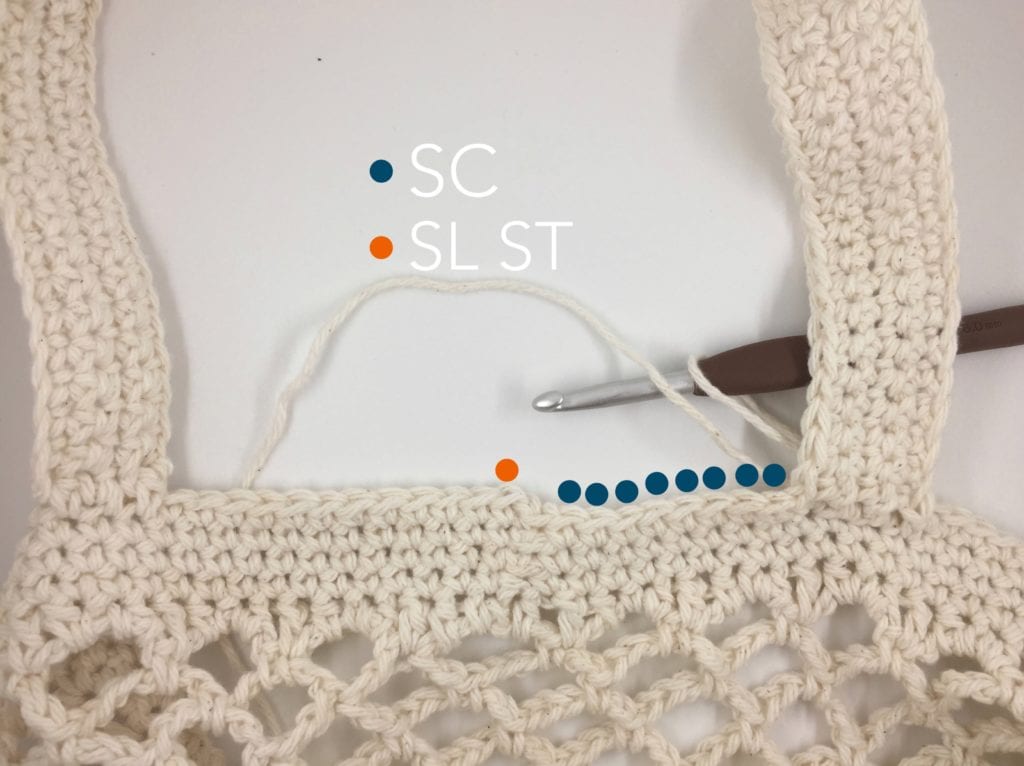
Round 51 – CH 1. SC 12. Attach handle in next 3 SC (See below for details on how to attach handle). SC 34. (Making handles) CH 61. SC in each CH [60]. (SC in next SC of main part. SC across the handle [60]. CH 1. Turn. SC across)*. Repeat * 1 time. SC in next SC of main part. SC 20. Attach handle in next 3 SC. SC 34. SL ST at back of the handle. SC 8. SL ST to the first SC.

Fasten off and weave in ends.
Please let me know if there’s something wrong with the pattern!
Thank you for reading!!

This pattern is an original pattern by Tae of Tying An End. Please do not claim this pattern as your own. If you wish to share this pattern, please link to this pattern and do not copy and paste it on to your site. You may keep a copy for your own personal use but please do not sell the pattern or distribute it. You may sell products made from this pattern but please clearly credit the design to me, Tae of Tying An End, and provide a link to my blog tyinganend.com. Permission is not granted for mass production or factory manufacturing of any kind.
![[Free Crochet Pattern] Would you like patriotic accessory? Easy bracelet pattern to make! Mixed Star Bracelet by Tying An End](https://www.tyinganend.com/wp-content/uploads/2017/07/IMG_0514-1.jpg)
Mixed Star Bracelet