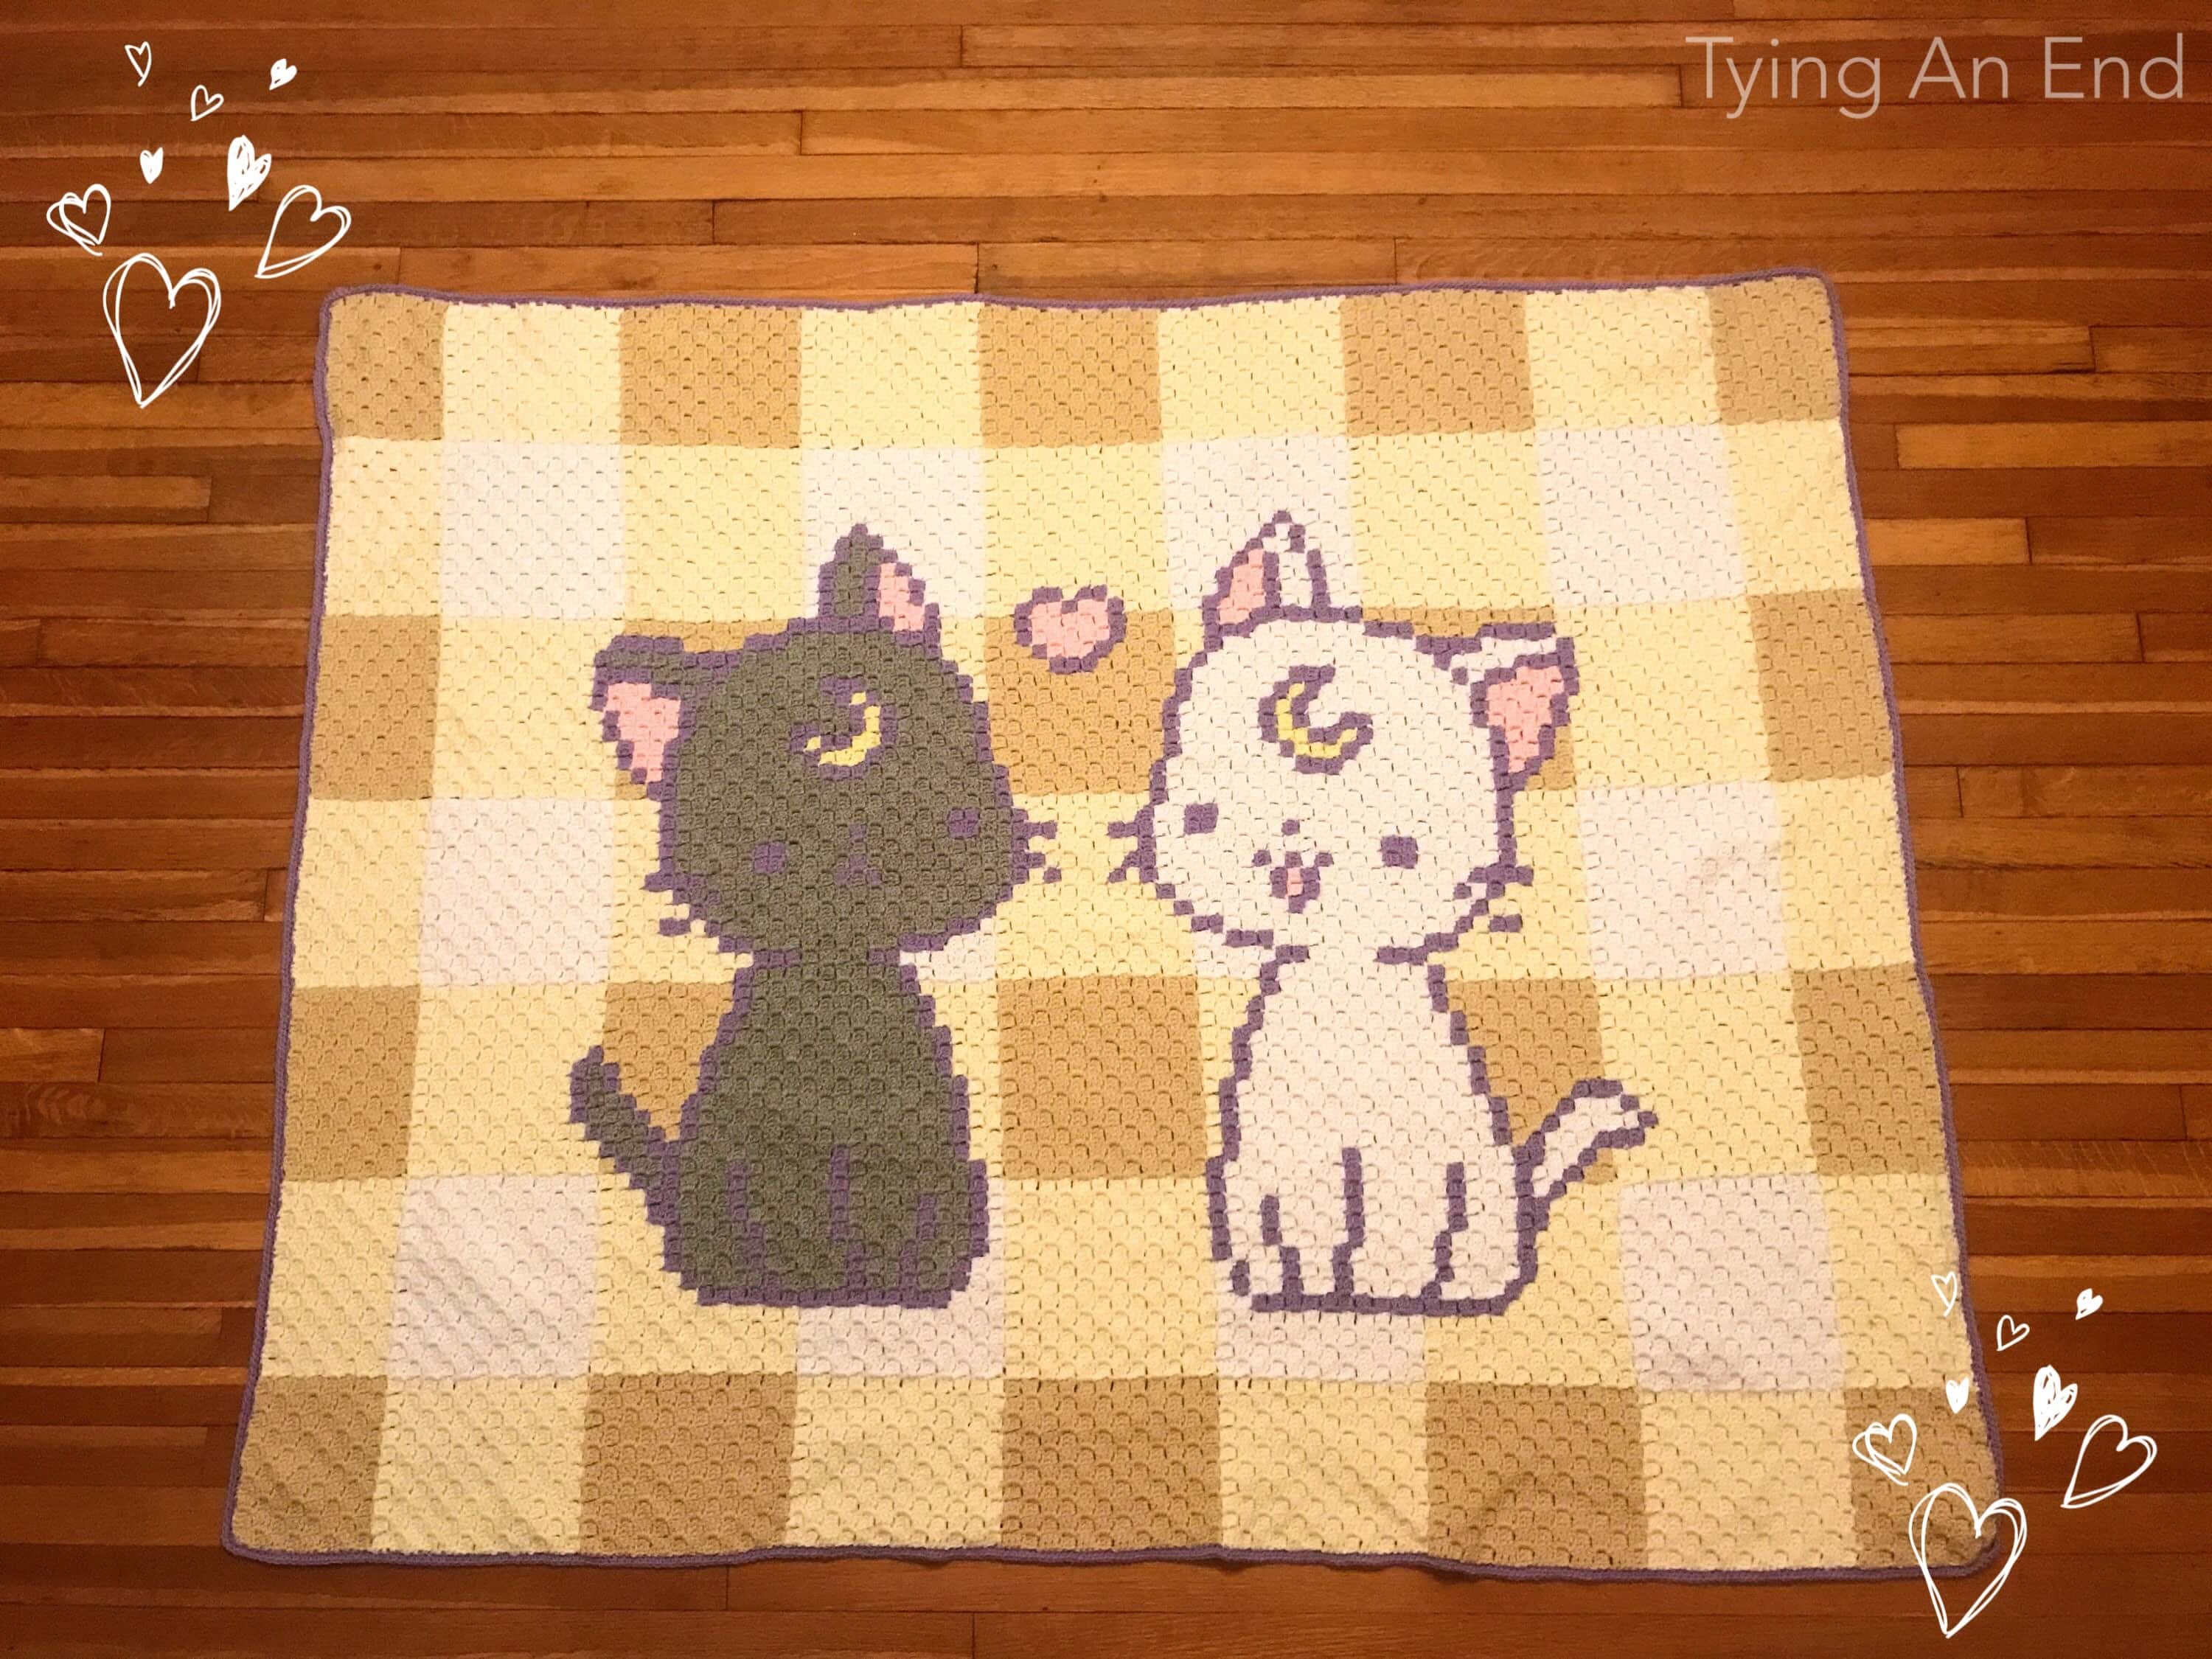
![[How-To] Corner-to-Corner (C2C) beginner-friendly photo tutorial by Tying An End](https://www.tyinganend.com/wp-content/uploads/2018/07/IMG_9349.jpg)
[How-To] Crochet Corner-to-Corner (C2C)
When crochet was becoming my addiction, Corner-to-Corner (C2C) was one of the crochet technique I saw all over the internet. At first, all it said was “C2C” on the Pinterst and other search engines and I had no clue what it meant! I looked through many patterns and blog posts and I learned that it’s a type of crochet technique where you work diagonally. Using basic stitches, this technique is beginner friendly, addictive, and fun! This post contains tutorial on how to crochet C2C and you find it helpful!
What is C2C?
C2C is a type of crochet construction technique, typically using chain stitch and double crochet. You make a “block” diagonally to increase and decrease the number of blocks in rows. Most common projects using this technique is a blanket. Anything that has square or rectangle shape can be made in C2C, and it’s easily adjustable in sizes!
Like it’s included in the name, C2C does not have exact start corner. You can start any one of 4 corners you like. Most common corner to start off is from bottom right. Some people work from bottom left, but that’s not a problem at all. I think depending on the design you can determine which corner would be best one to start off with.
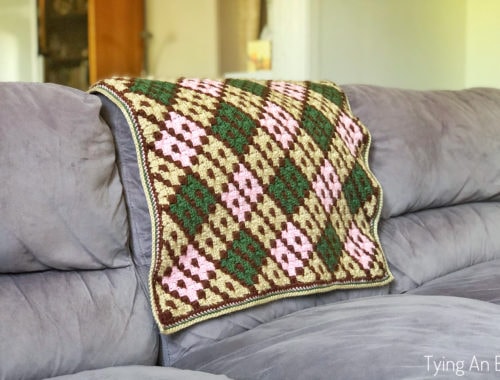
![[Free Crochet Pattern] Add a pop of color to your room! Pop Floor Mat by Tying An End](https://www.tyinganend.com/wp-content/uploads/2017/05/IMG_9853-1-640x640.jpg)
Works Diagonally
That’s my Pop Floor Mat. You see the diagonal lines going from bottom left to upper right? So design like this, it would be best to start off from bottom right corner or upper left, which is opposite from bottom right. If this was mirrored design, then go from bottom left corner or upper right. C2C designs always comes with pixel graph in the pattern. It’s usually numbered so you know which corner to start off!
When you begin your project, it’s very helpful you print out the graph! You can make marks (I usually draw diagonal line through finished row) to keep track of where you are on the graph. It’s very easy to lose your spot without tracking it! I recommend use 2 different color pens so that I know which direction I need to be working on.
Tutorials
I’ve put together photo tutorials to help you understand how C2C works!
![[How-To] Corner-to-Corner (C2C) beginner-friendly photo tutorial by Tying An End](https://www.tyinganend.com/wp-content/uploads/2018/08/C2C-tutorial-graph.png)
Above diagram is showing 3×3 grid pattern. In this tutorial, you are starting from bottom right corner. Also note that once you finish a row, you always turn the side. So usually and in this case, odd number rows are “right” side, (going from right to left when looking at the diagram) and even number rows are “wrong” side (going from left to right when looking at the diagram). Even though your piece is turning all the time, if you’re right-handed, your direction is always going to be from right to left (and of course left-handed are from left to right). However, when you look at the diagram, it’s not like you’re flipping the diagram front and back, so I thought it’s easier (for reading/looking the graph wise) calling it as “right to left” and “left to right” would be easier to understand.
Enough said, now let’s get started!
INCREASE ROWS:
![[How-To] Corner-to-Corner (C2C) beginner-friendly photo tutorial by Tying An End](https://www.tyinganend.com/wp-content/uploads/2018/07/IMG_0832-640x640.jpg)
![[How-To] Corner-to-Corner (C2C) beginner-friendly photo tutorial by Tying An End](https://www.tyinganend.com/wp-content/uploads/2018/07/IMG_0833-640x640.jpg)
![[How-To] Corner-to-Corner (C2C) beginner-friendly photo tutorial by Tying An End](https://www.tyinganend.com/wp-content/uploads/2018/07/IMG_0834-640x640.jpg)
![[How-To] Corner-to-Corner (C2C) beginner-friendly photo tutorial by Tying An End](https://www.tyinganend.com/wp-content/uploads/2018/07/IMG_0896-640x640.jpg)
![[How-To] Corner-to-Corner (C2C) beginner-friendly photo tutorial by Tying An End](https://www.tyinganend.com/wp-content/uploads/2018/07/IMG_0898-640x640.jpg)
![[How-To] Corner-to-Corner (C2C) beginner-friendly photo tutorial by Tying An End](https://www.tyinganend.com/wp-content/uploads/2018/07/IMG_0899-640x640.jpg)
![[How-To] Corner-to-Corner (C2C) beginner-friendly photo tutorial by Tying An End](https://www.tyinganend.com/wp-content/uploads/2018/07/IMG_0900-640x640.jpg)
![[How-To] Corner-to-Corner (C2C) beginner-friendly photo tutorial by Tying An End](https://www.tyinganend.com/wp-content/uploads/2018/07/IMG_0901-640x640.jpg)
![[How-To] Corner-to-Corner (C2C) beginner-friendly photo tutorial by Tying An End](https://www.tyinganend.com/wp-content/uploads/2018/07/IMG_0902-640x640.jpg)
![[How-To] Corner-to-Corner (C2C) beginner-friendly photo tutorial by Tying An End](https://www.tyinganend.com/wp-content/uploads/2021/09/IMG_0903-800x800.jpg)
![[How-To] Corner-to-Corner (C2C) beginner-friendly photo tutorial by Tying An End](https://www.tyinganend.com/wp-content/uploads/2018/07/IMG_0904-640x640.jpg)
![[How-To] Corner-to-Corner (C2C) beginner-friendly photo tutorial by Tying An End](https://www.tyinganend.com/wp-content/uploads/2018/07/IMG_0905-640x640.jpg)
![[How-To] Corner-to-Corner (C2C) beginner-friendly photo tutorial by Tying An End](https://www.tyinganend.com/wp-content/uploads/2018/07/IMG_0906-640x640.jpg)
![[How-To] Corner-to-Corner (C2C) beginner-friendly photo tutorial by Tying An End](https://www.tyinganend.com/wp-content/uploads/2018/07/IMG_0907-640x640.jpg)
![[How-To] Corner-to-Corner (C2C) beginner-friendly photo tutorial by Tying An End](https://www.tyinganend.com/wp-content/uploads/2018/07/IMG_0908-640x640.jpg)
![[How-To] Corner-to-Corner (C2C) beginner-friendly photo tutorial by Tying An End](https://www.tyinganend.com/wp-content/uploads/2018/07/IMG_0909-640x640.jpg)
![[How-To] Corner-to-Corner (C2C) beginner-friendly photo tutorial by Tying An End](https://www.tyinganend.com/wp-content/uploads/2018/07/IMG_0910-640x640.jpg)
DECREASE ROWS:
![[How-To] Corner-to-Corner (C2C) beginner-friendly photo tutorial by Tying An End](https://www.tyinganend.com/wp-content/uploads/2018/07/IMG_0911-640x640.jpg)
![[How-To] Corner-to-Corner (C2C) beginner-friendly photo tutorial by Tying An End](https://www.tyinganend.com/wp-content/uploads/2018/07/IMG_0912-640x640.jpg)
![[How-To] Corner-to-Corner (C2C) beginner-friendly photo tutorial by Tying An End](https://www.tyinganend.com/wp-content/uploads/2021/09/IMG_0913-800x800.jpg)
![[How-To] Corner-to-Corner (C2C) beginner-friendly photo tutorial by Tying An End](https://www.tyinganend.com/wp-content/uploads/2018/07/IMG_0914-640x640.jpg)
![[How-To] Corner-to-Corner (C2C) beginner-friendly photo tutorial by Tying An End](https://www.tyinganend.com/wp-content/uploads/2021/09/IMG_0915-800x800.jpg)
![[How-To] Corner-to-Corner (C2C) beginner-friendly photo tutorial by Tying An End](https://www.tyinganend.com/wp-content/uploads/2018/07/IMG_0916-640x640.jpg)
![[How-To] Corner-to-Corner (C2C) beginner-friendly photo tutorial by Tying An End](https://www.tyinganend.com/wp-content/uploads/2018/07/IMG_0917-640x640.jpg)
![[How-To] Corner-to-Corner (C2C) beginner-friendly photo tutorial by Tying An End](https://www.tyinganend.com/wp-content/uploads/2018/07/IMG_0918-640x640.jpg)
![[How-To] Corner-to-Corner (C2C) beginner-friendly photo tutorial by Tying An End](https://www.tyinganend.com/wp-content/uploads/2018/07/IMG_0926-640x640.jpg)
![[How-To] Corner-to-Corner (C2C) beginner-friendly photo tutorial by Tying An End](https://www.tyinganend.com/wp-content/uploads/2018/07/IMG_0927-640x640.jpg)
![[How-To] Corner-to-Corner (C2C) beginner-friendly photo tutorial by Tying An End](https://www.tyinganend.com/wp-content/uploads/2021/09/IMG_0929-800x800.jpg)
![[How-To] Corner-to-Corner (C2C) beginner-friendly photo tutorial by Tying An End](https://www.tyinganend.com/wp-content/uploads/2018/07/IMG_0931-640x640.jpg)
![[How-To] Corner-to-Corner (C2C) beginner-friendly photo tutorial by Tying An End](https://www.tyinganend.com/wp-content/uploads/2018/07/IMG_0932-640x640.jpg)
If CH 6/CH 3 creates big gap in between, change to CH 5/CH 2 method.
![[How-To] Corner-to-Corner (C2C) beginner-friendly photo tutorial by Tying An End](https://www.tyinganend.com/wp-content/uploads/2018/07/IMG_0933-640x480.jpg)
![[How-To] Corner-to-Corner (C2C) beginner-friendly photo tutorial by Tying An End](https://www.tyinganend.com/wp-content/uploads/2018/08/IMG_9187-640x480.jpg)
You can clearly see the difference between making it with CH 3 and CH 2! I usually make my C2C with CH 2 because of the gap I get. Not just C2C but in any project I have to make CH 3 or standing CH, I always do CH 2 (actually I do faux double crochet instead!) then DC. Some people are perfectly fine with CH 3, but some are not. So please try both ways and see what works best for you!Using this technique, now you can make beautiful patterns like Pop Floor Mat and Hello Spring Bath Mat and many more! I’ve listed several great bloggers who loves C2C and offers so many great designs! Click on the name below and go check them out!
RESOURCES:
Making Your Own
- Stitch Fiddle – Great website where you can use it for free. Premium membership available for more saving options
- Craft Design Online – Typed font can turn into pixel graph! There’s setting for friendship design as well.
Other Blogs That Have C2C Projects
I hope this tutorial was helpful to you in any way. Please let me know if you have any question!
Thank you for reading and happy crocheting!
The content is put together by Tae of Tying An End. Please do not claim any of the photos as your own. If you wish to share this information, please link back to this page site. You may keep a copy for your own personal use but please do not sell it.
![[Free Crochet Pattern] Summer is still here! Small reminder from your bathroom! Hello Summer Bath Mat by Tying An End](https://www.tyinganend.com/wp-content/uploads/2018/08/IMG_9434.jpg)